OUR BIGGEST SALE OF THE YEAR
15% OFF SITE WIDE ORDER EARLY AND SAVE! - USE CODE 15OFFSL AT CHECKOUT
Sale runs 12/19 - 12/31. Orders Placed Start Shipping First Week of January.
15% OFF SITE WIDE ORDER EARLY AND SAVE! - USE CODE 15OFFSL AT CHECKOUT
Sale runs 12/19 - 12/31.
Orders Placed Start Shipping First Week of January.

Engraving Help - Visual Reference

Personalizing an award happens in two places. On the product page you only choose whether you want engraving — you don't type anything there yet. You add your text after adding the item to your cart, in a screen we call the Engraving Room. This guide walks the whole journey step by step, with a screenshot for every tap.

Your engraving goes through three stages

1
Typed, not saved
Your text lives only in the form on your screen. Nothing saves automatically, so leaving the form before saving doesn't keep it.
2
Saved
You pressed the green SAVE & REVIEW button. Your text is stored — reopening the item from your cart brings it back, filled in.
3
Finished
You ticked the spelling agreement and pressed CLICK TO SET ENGRAVING. The item shows a green engraved badge.
The one rule that prevents almost every problem: press SAVE & REVIEW before you navigate away. If your browser ever asks “Leave this page?” while you still want your text, choose Cancel to stay on the form.

The whole flow at a glance

  1. Product page → Engraving dropdown → Yes Engraving
  2. Add to Cart → you land in the Engraving Room
  3. Tap the orange CLICK TO ENGRAVE
  4. only if quantity is 2+ choose Same or Separate engraving
  5. only if the award takes a graphic upload a logo or pick a stock insert
  6. Type your lines → green SAVE & REVIEW
  7. Review your engraving → tick the spelling agreementCLICK TO SET ENGRAVING
  8. The green engraved badge appears → return to cart

Steps 4 and 5 only appear when they apply — if you never see one, that's normal. The orange timer at the top of the Engraving Room is a hold on your cart while you work, not a countdown to finish typing.

Which walkthrough fits you?

Just one item and no logo? You'll skip the choices above and go straight to the text form — follow the type → save → confirm steps in any walkthrough below. Tip: tap any screenshot to enlarge it.

Same text on every piece Quantity 2+ of one product · type once, copied to all

When you order two or more of the same item and want identical engraving on each, you type it once and it's copied to every piece.
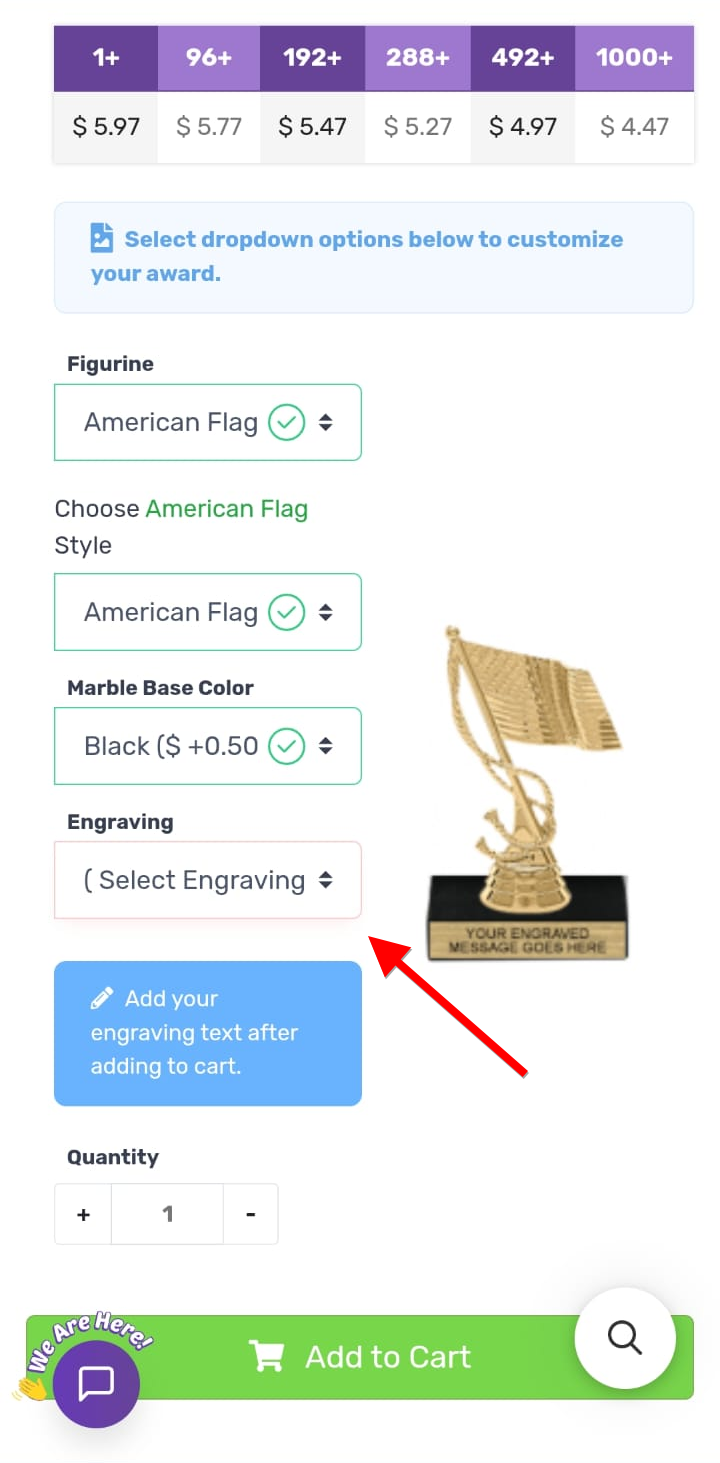
Product page Engraving dropdown
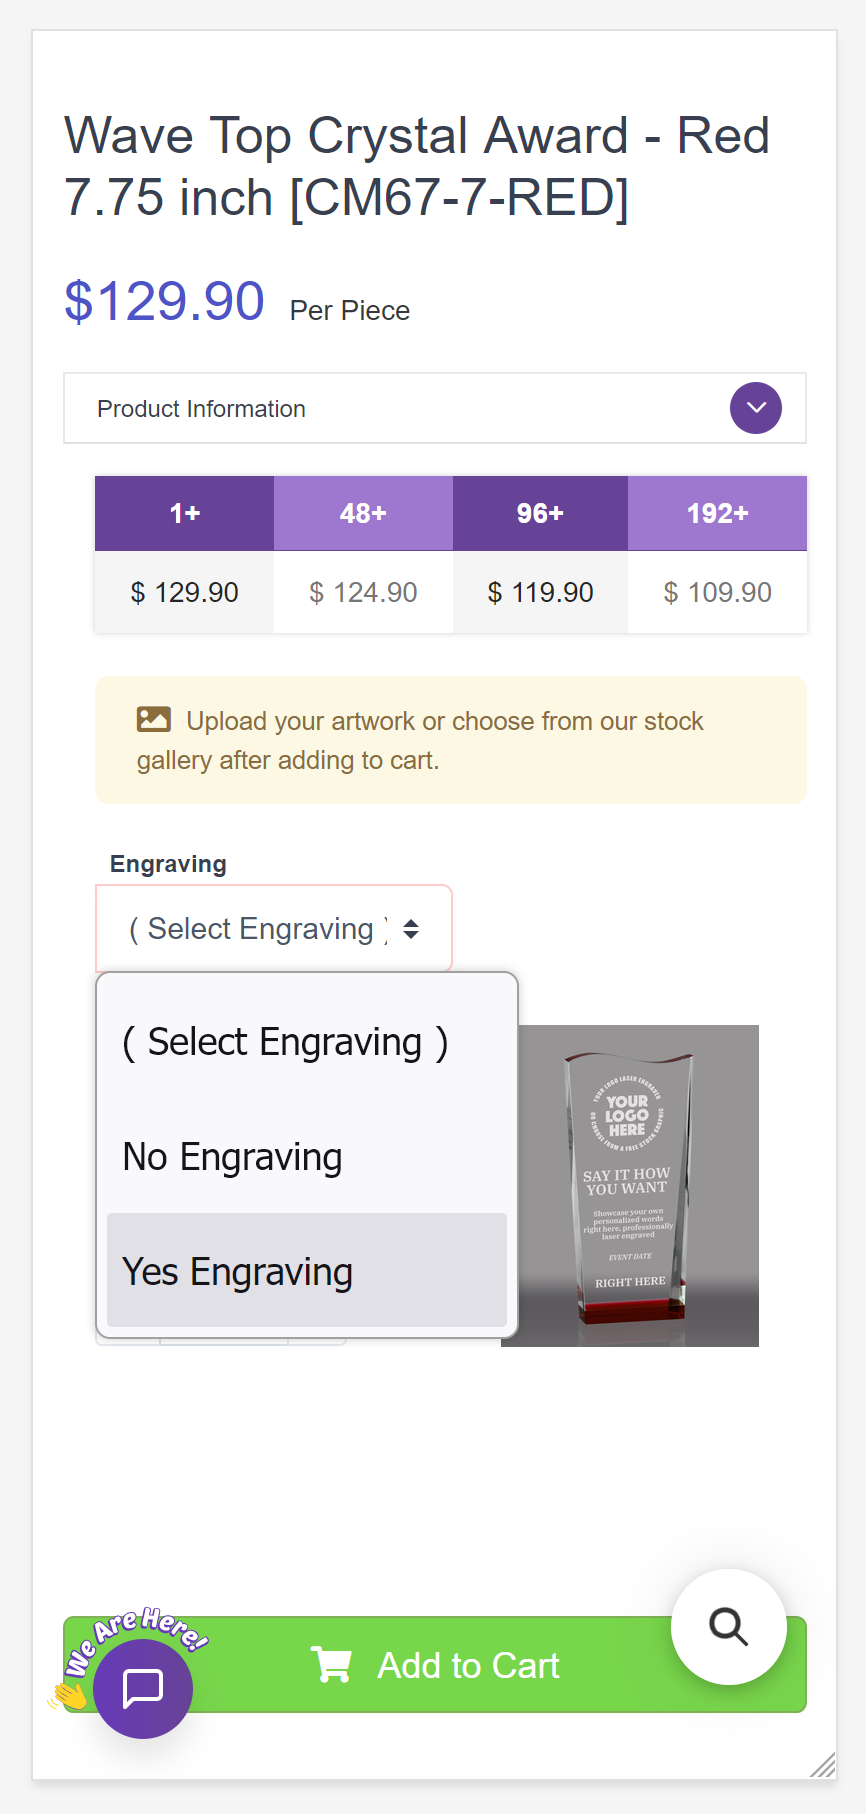
1 On the product page, open the “Engraving” dropdown to start personalizing your award.
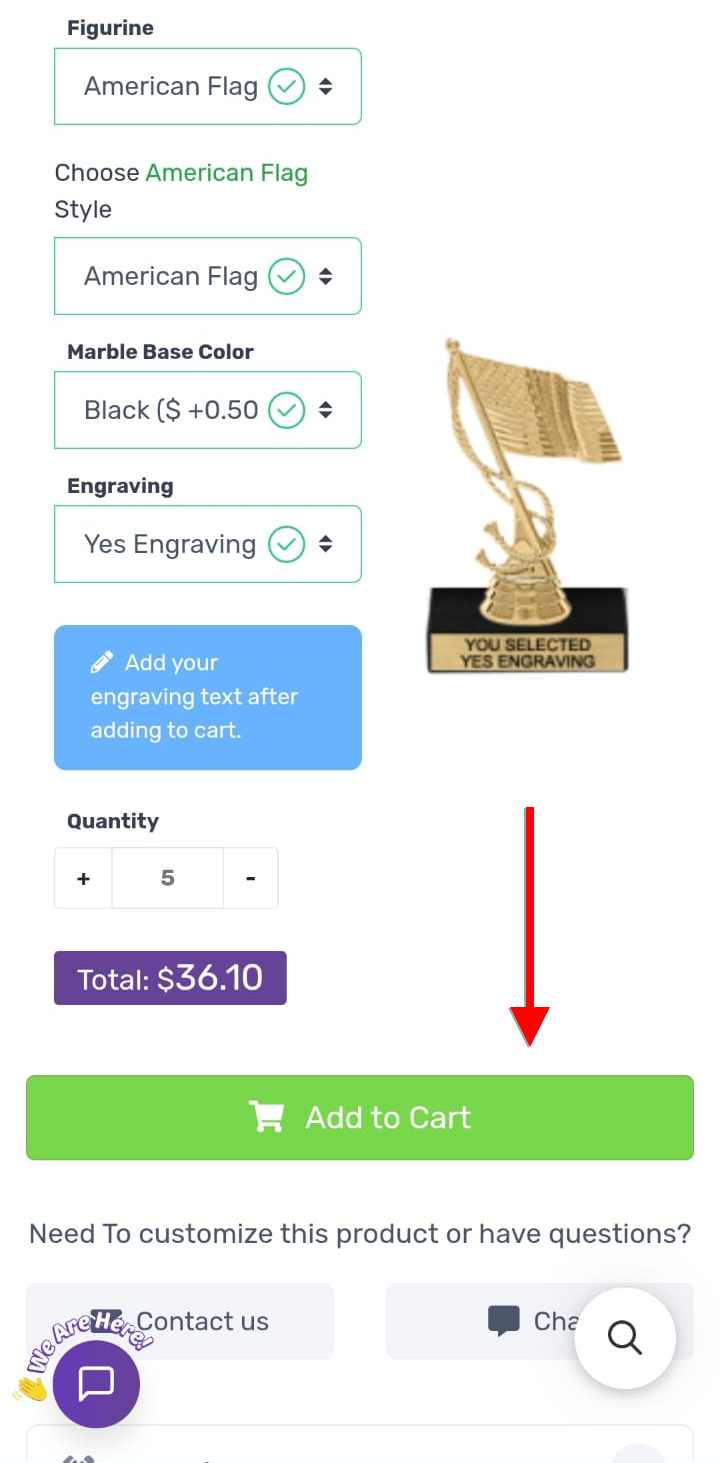
Product page with Yes Engraving selected and Add to Cart
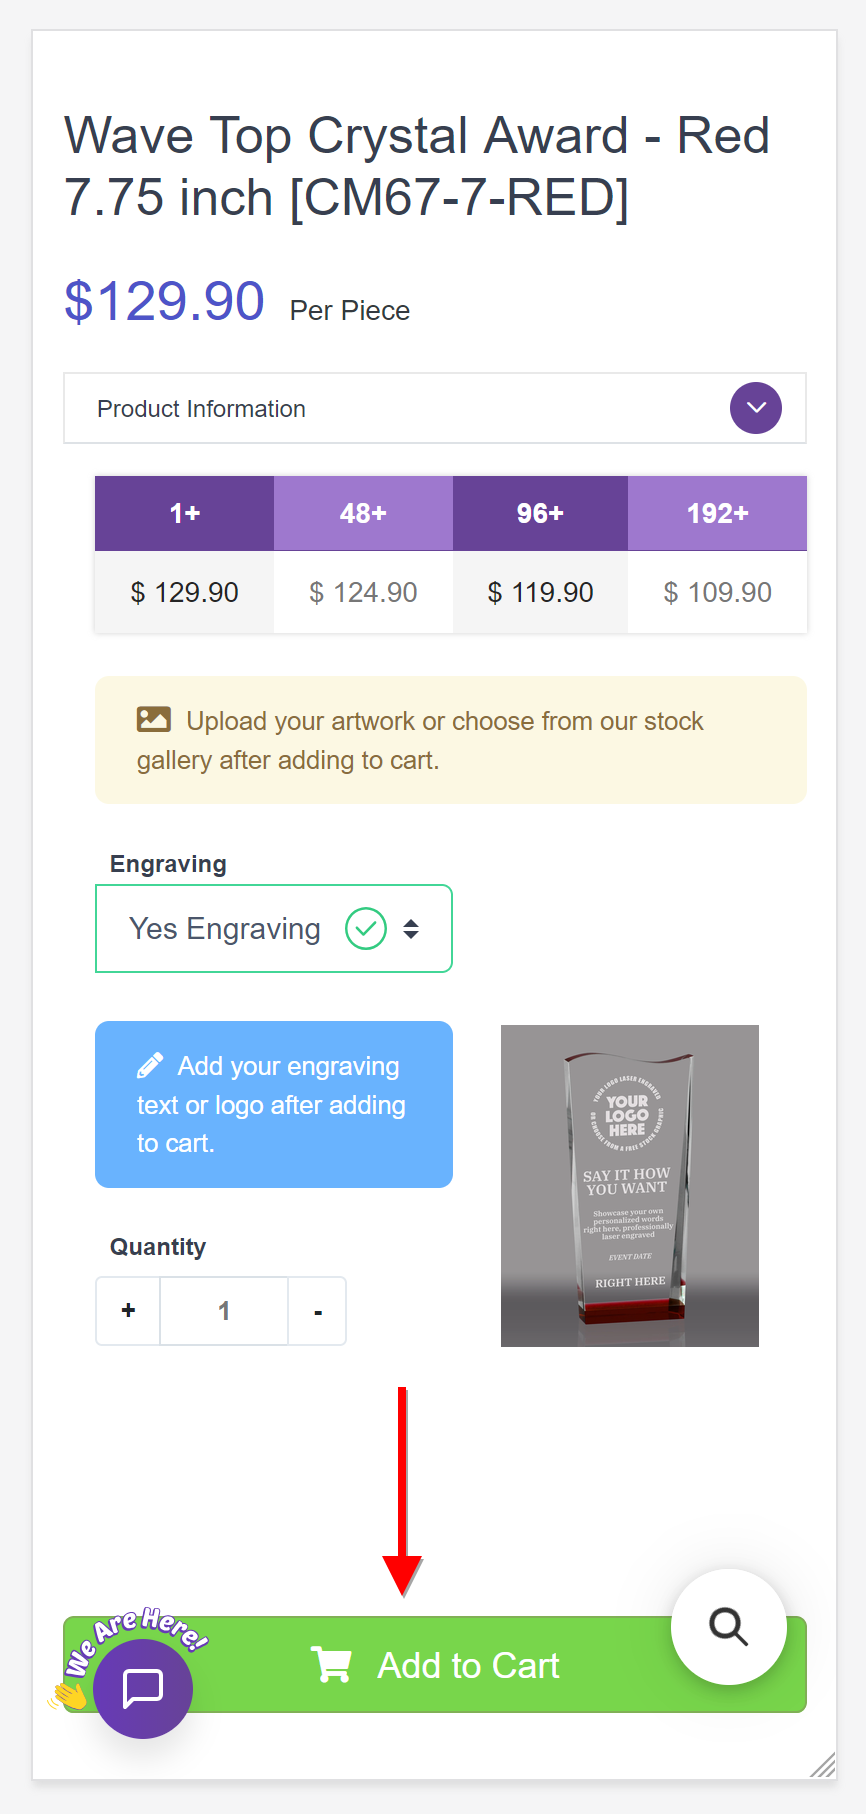
2 Choose “Yes Engraving,” set your quantity, then tap the green Add to Cart button.
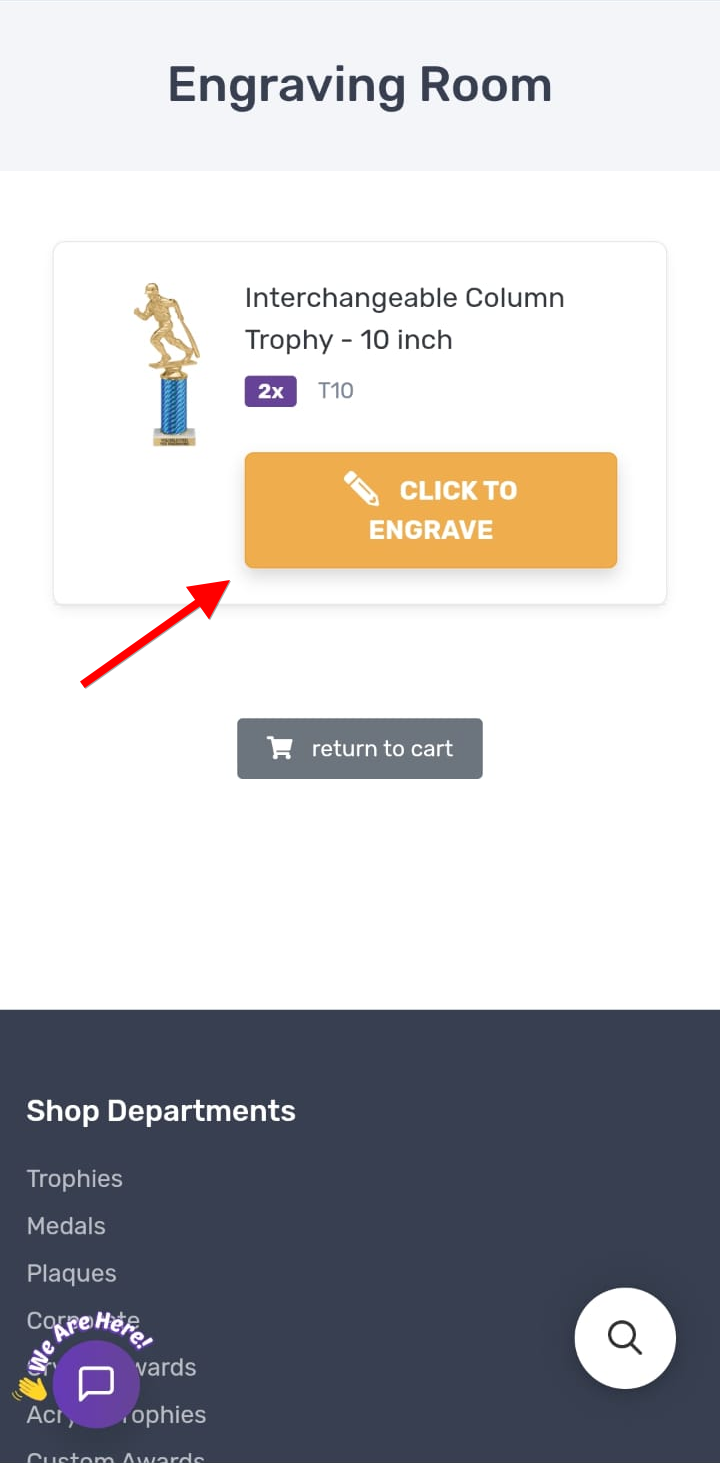
Engraving Room with the orange Click to Engrave button
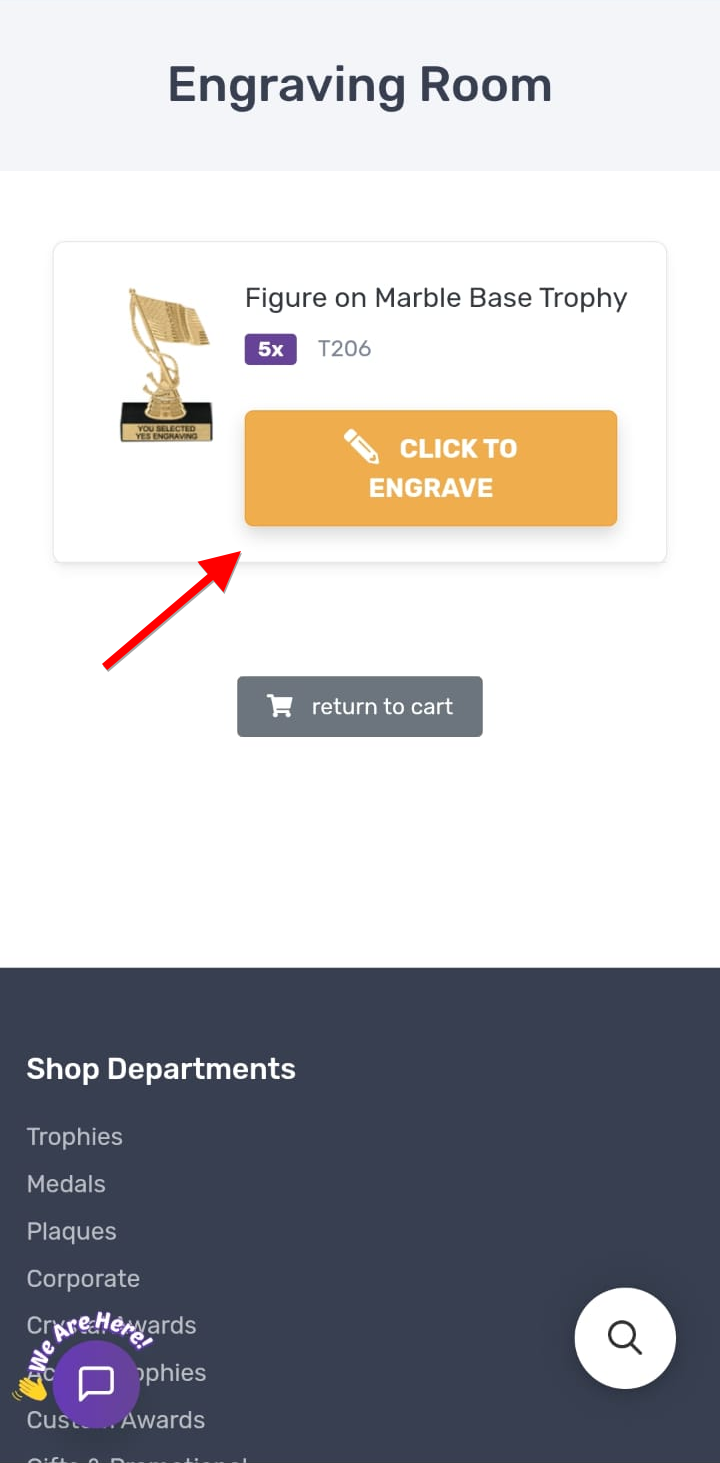
3 In the Engraving Room, tap the orange CLICK TO ENGRAVE button to add your text.
Choose same or separate engraving screen
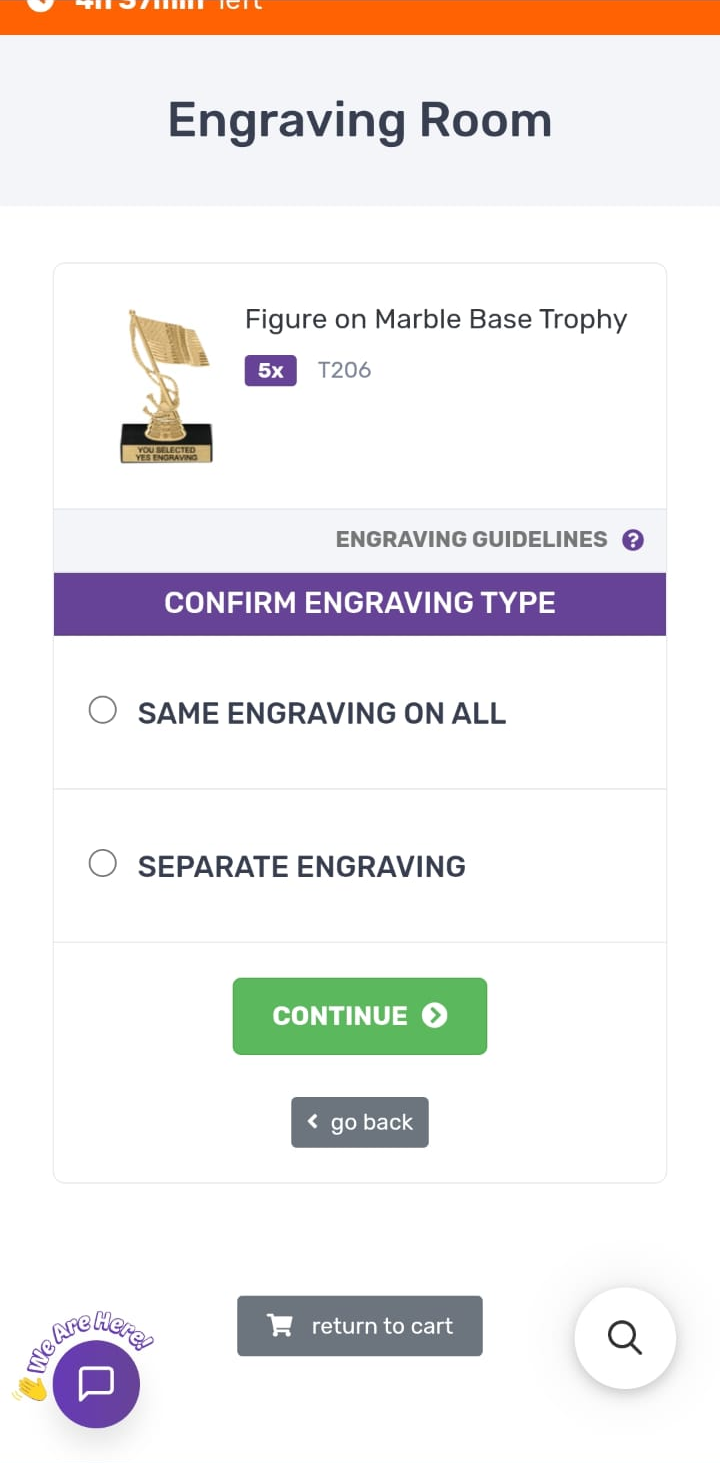
4 Choose whether every piece gets the same engraving or separate engraving.
Same Engraving on All selected with Continue
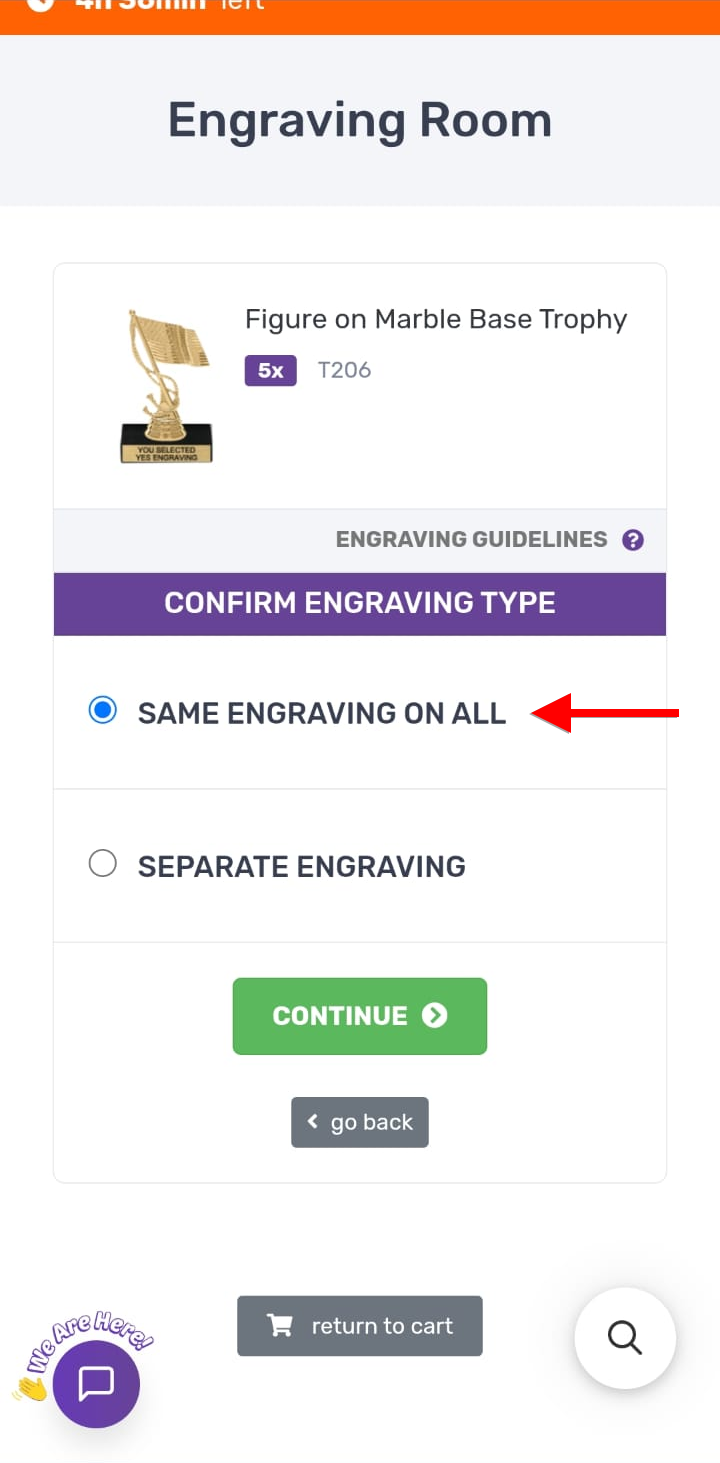
5 Select “Same Engraving on All,” then tap the green Continue button.
Blank engraving form with numbered lines
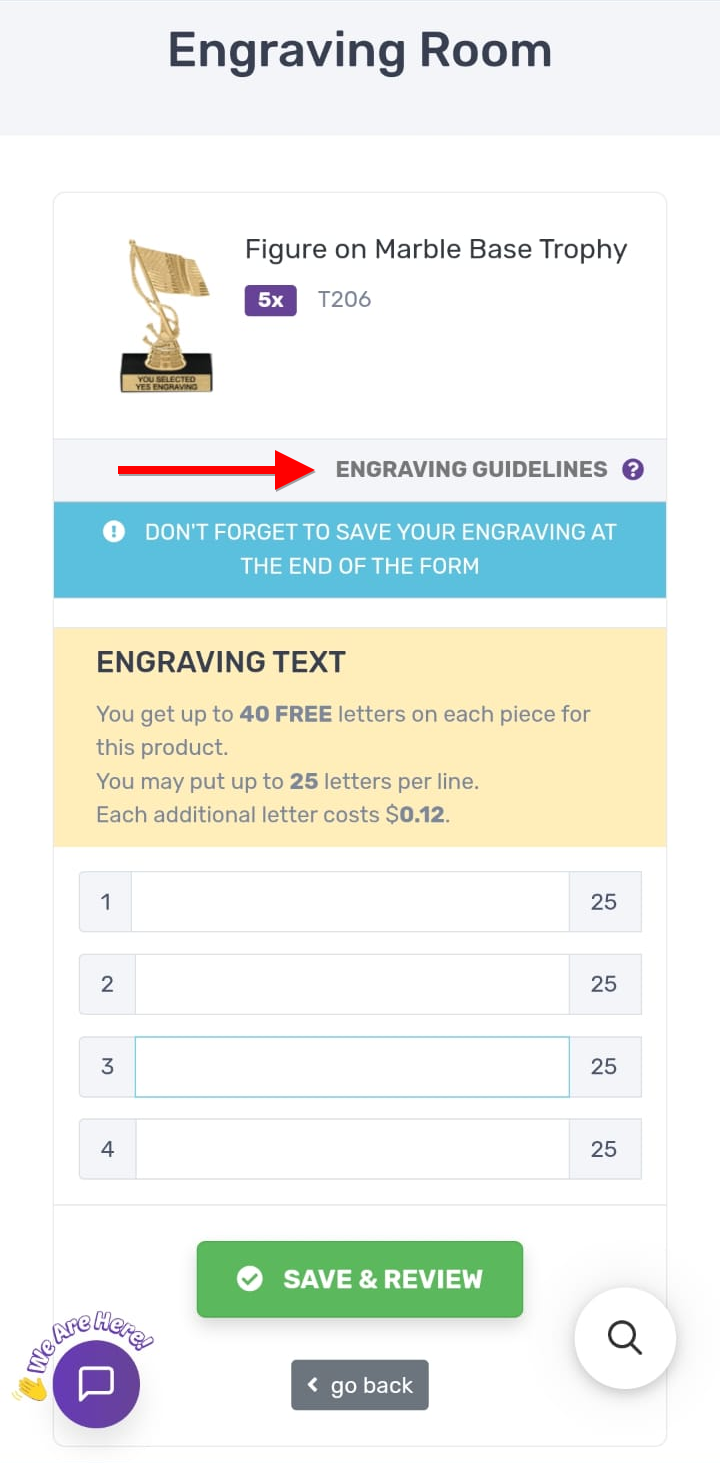
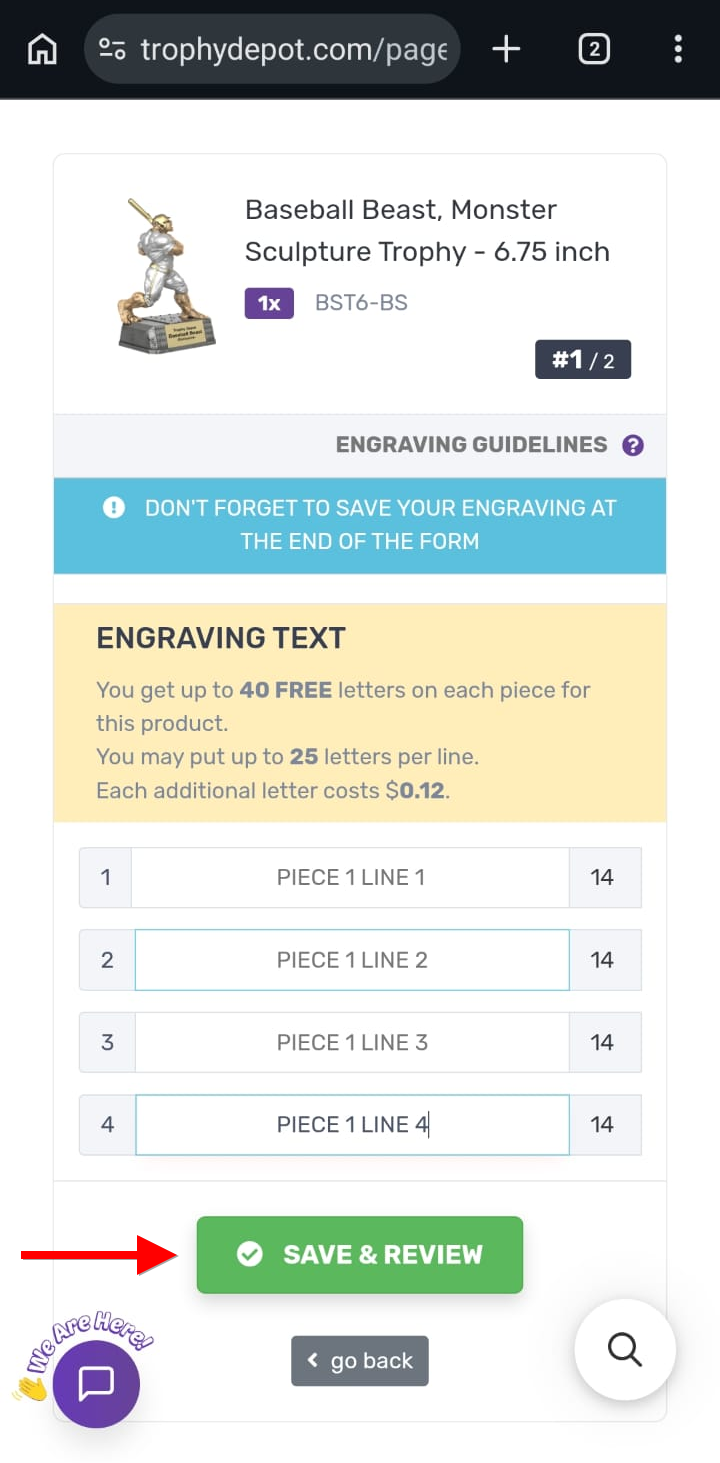
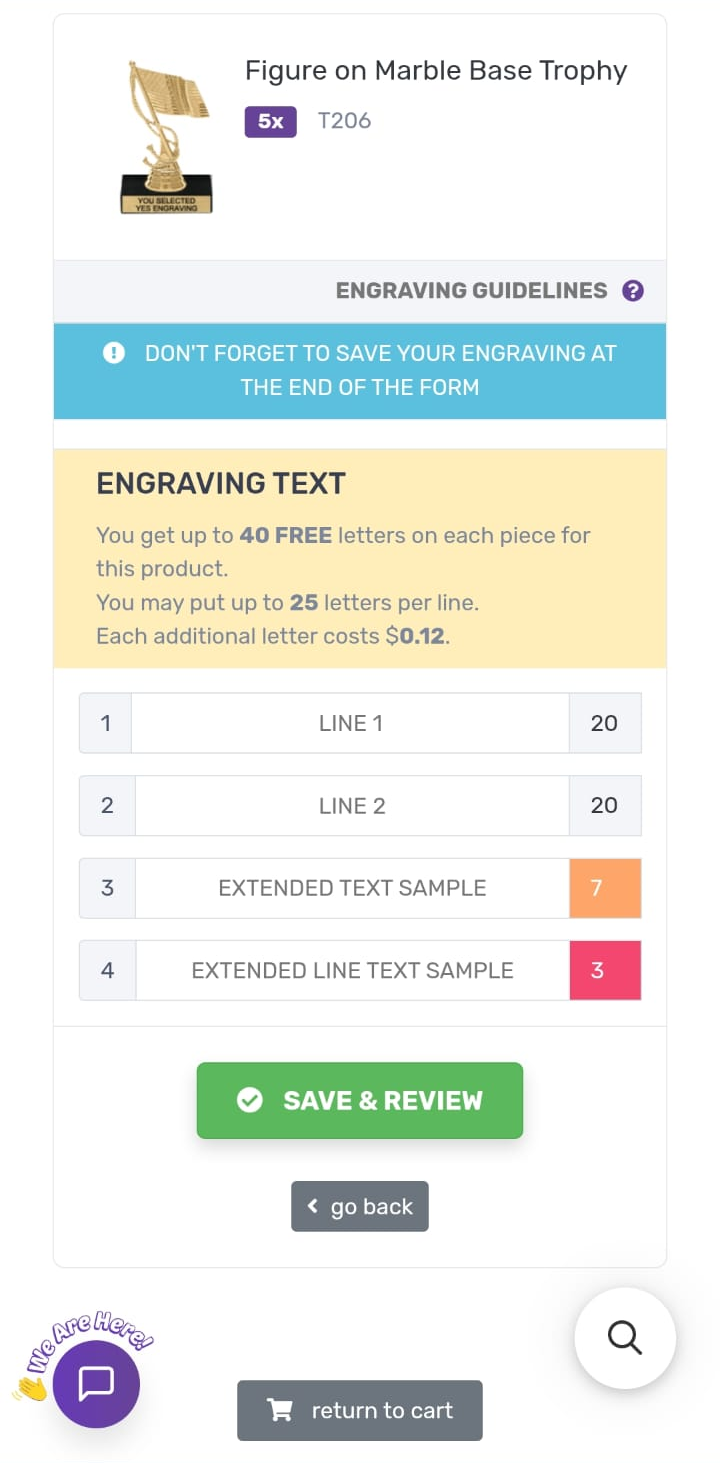
6 Type your engraving into the numbered lines; the box on each line shows characters remaining.
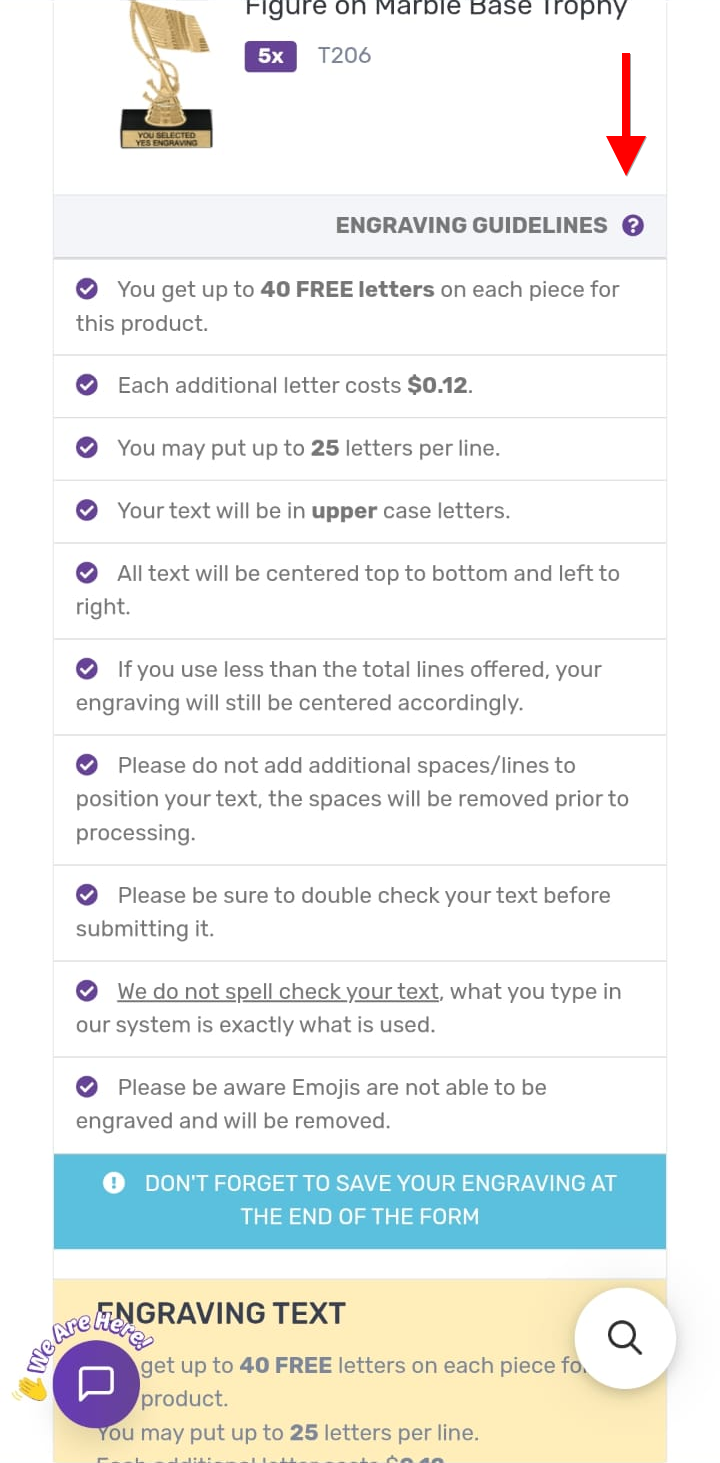
Engraving guidelines panel expanded
7 Review the engraving guidelines: text is upper-case, auto-centered, and not spell-checked.
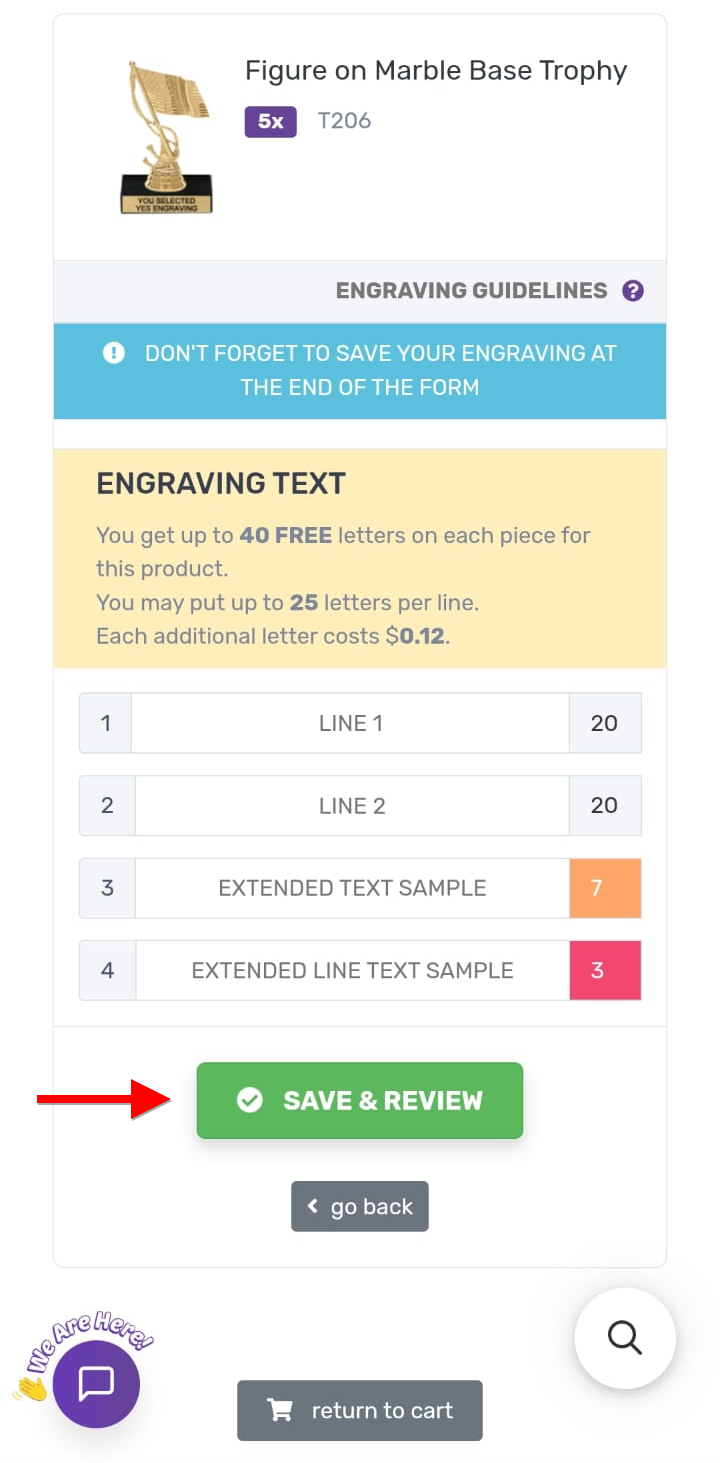
Engraving form filled with character counters
8 As you type, each counter counts down and turns orange then red; tap Save & Review.
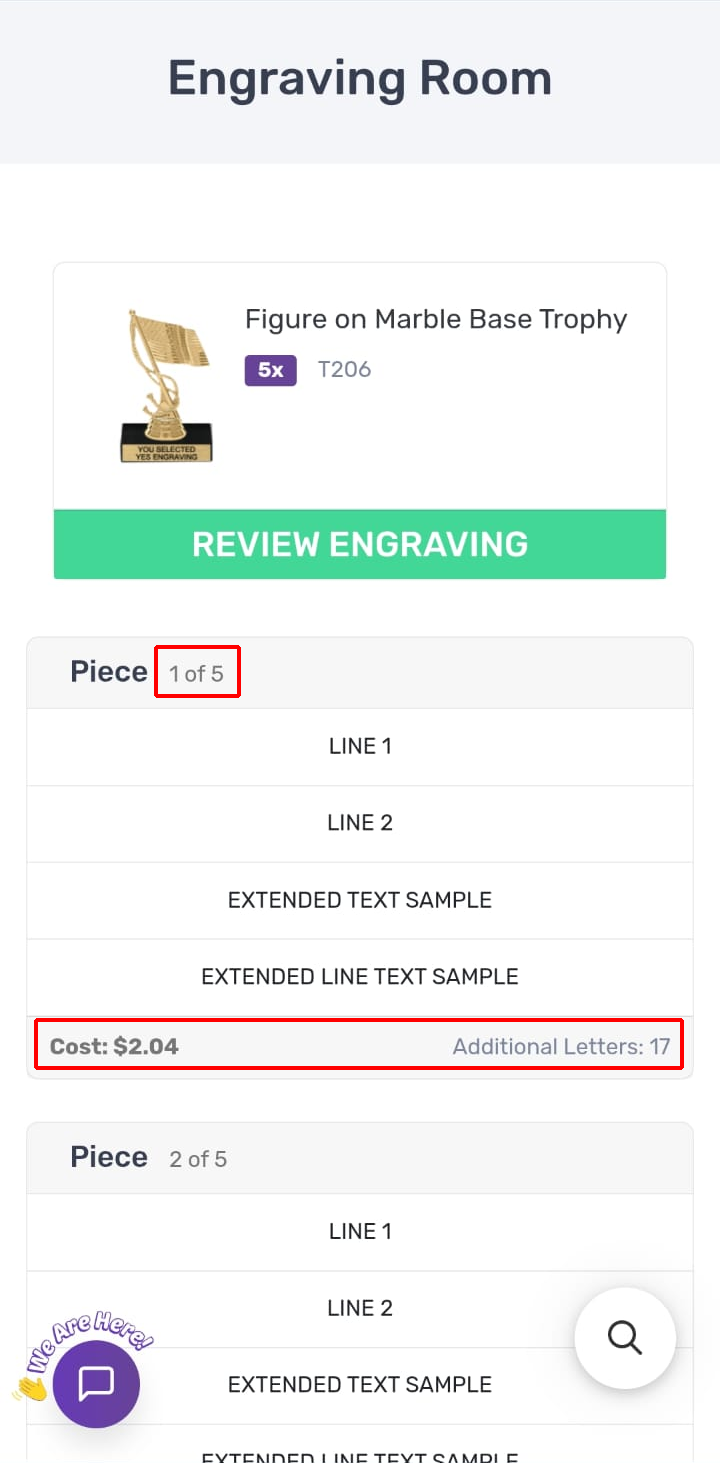
Review grid for piece 1
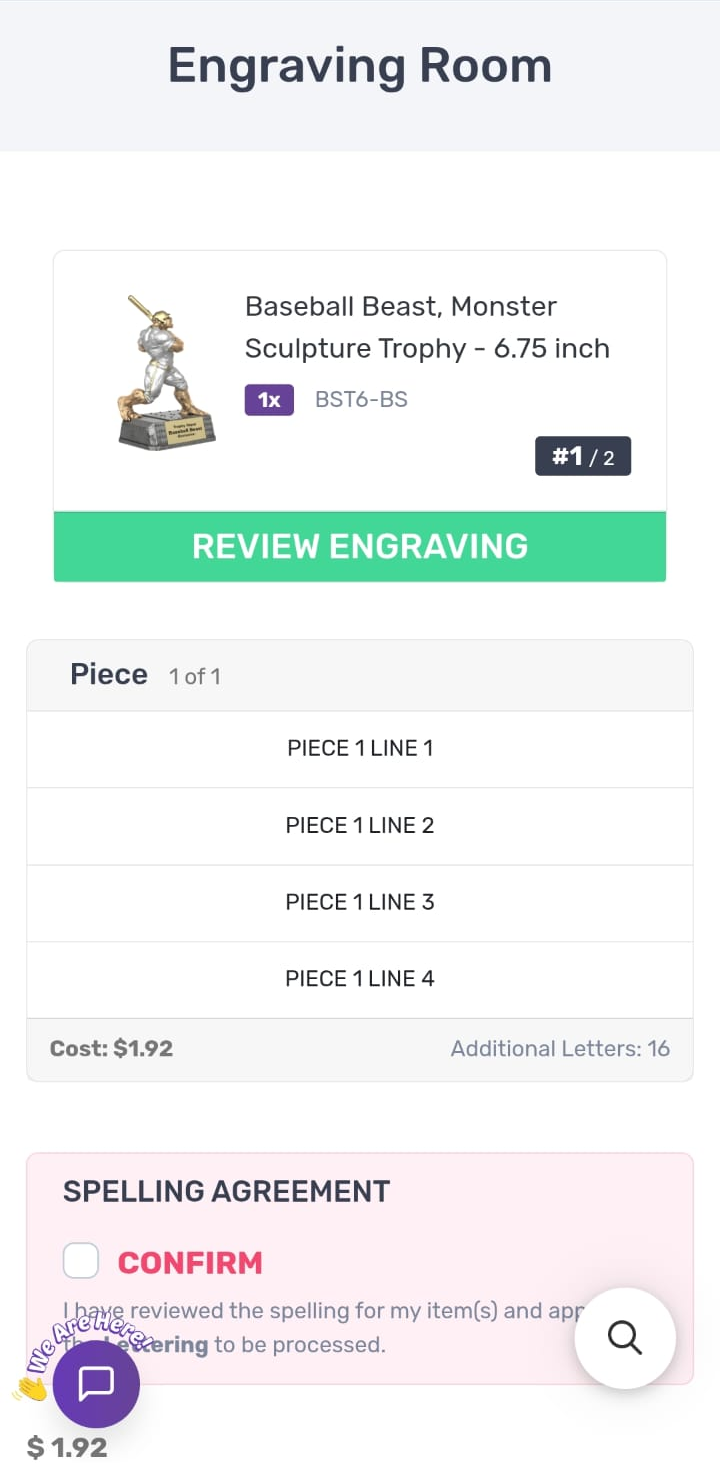
9 Review your engraving; each piece shows its lines, cost, and any additional-letter charges.
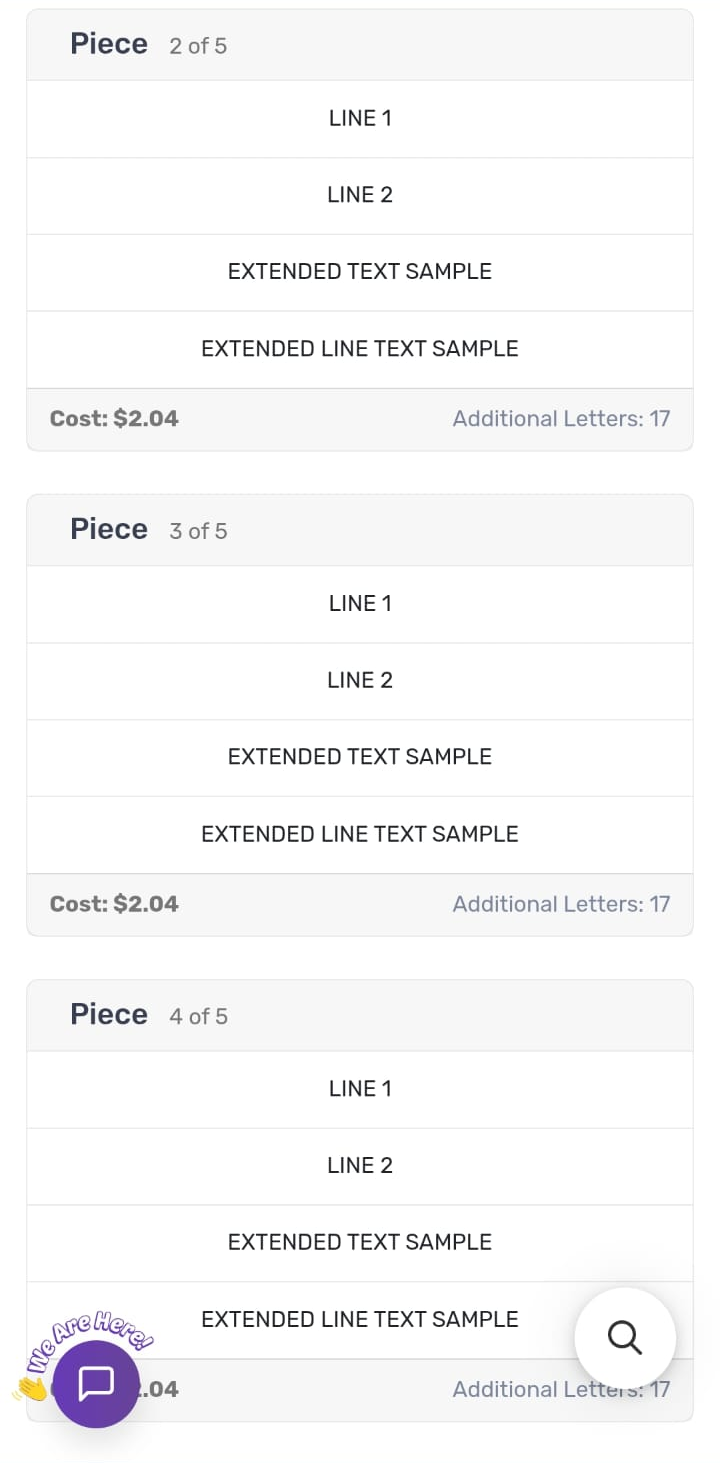
Review grid showing the same text on every piece
10 The same engraving is repeated on every piece in your order.
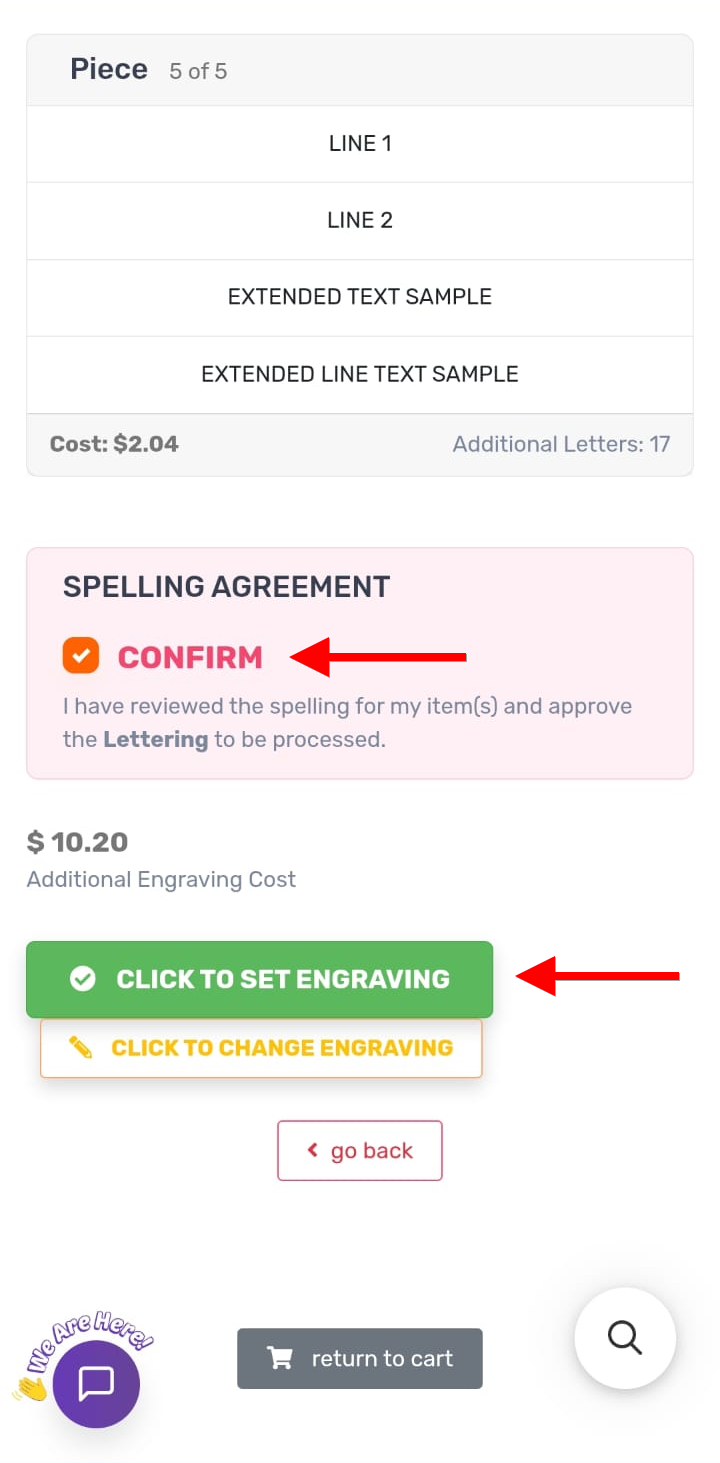
Spelling agreement with Click to Set Engraving
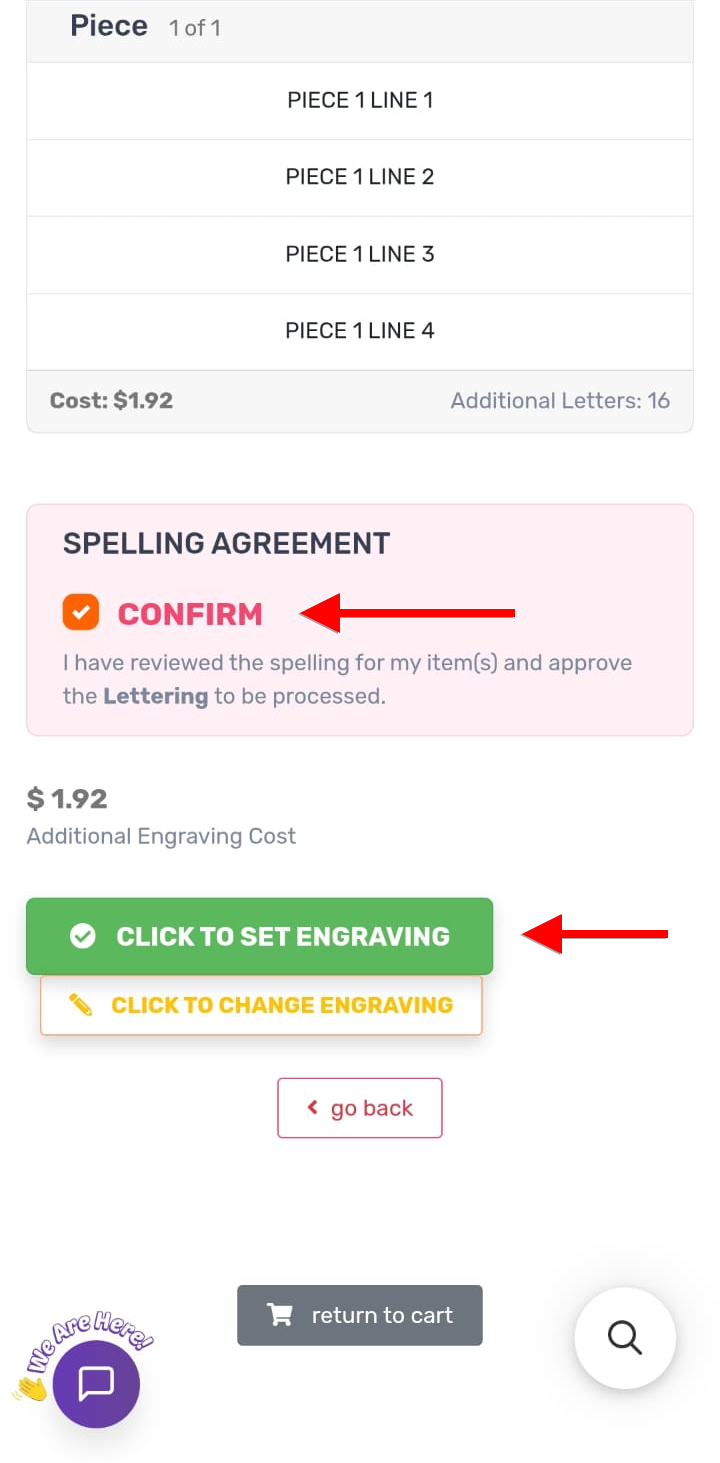
11 Tick Confirm to approve your spelling, then tap the green Click to Set Engraving.
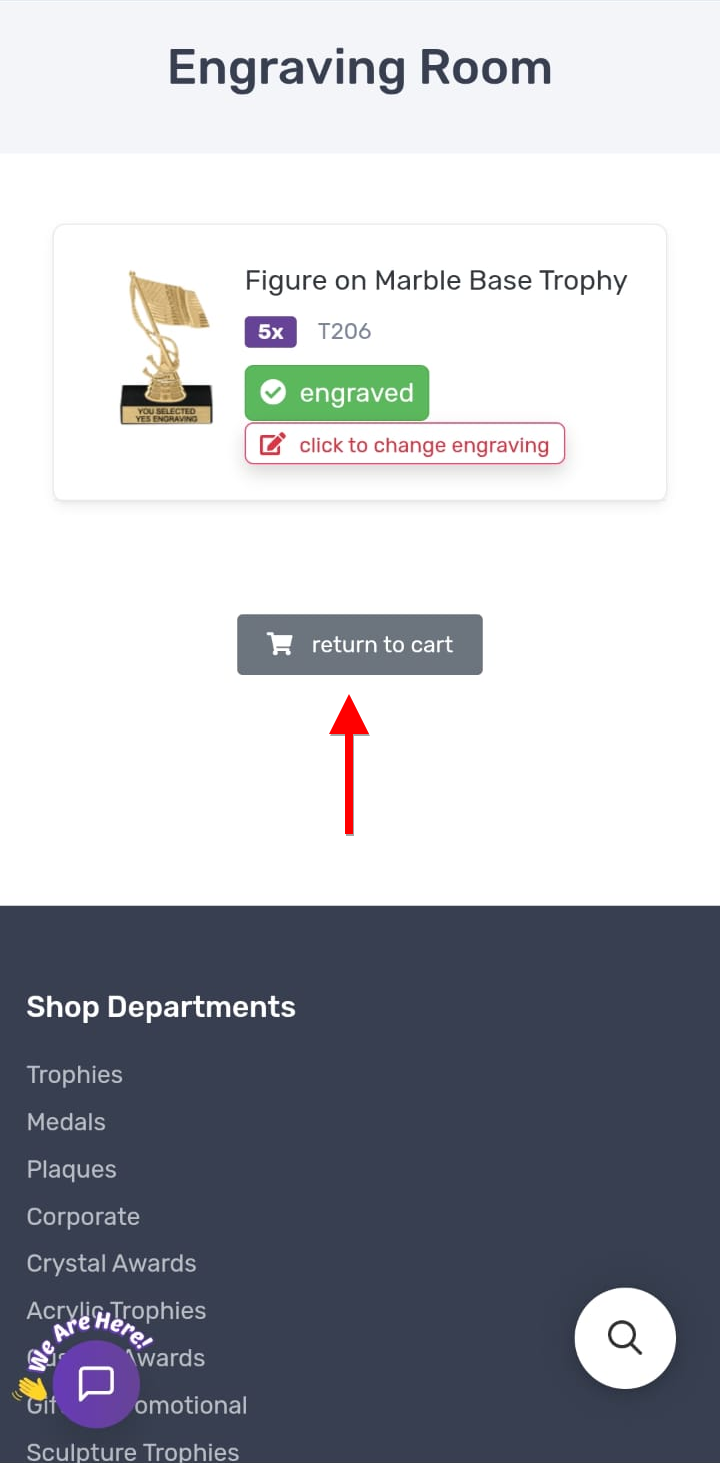
Green engraved badge confirmation
12 A green “engraved” badge confirms it's saved; tap Return to Cart to continue.
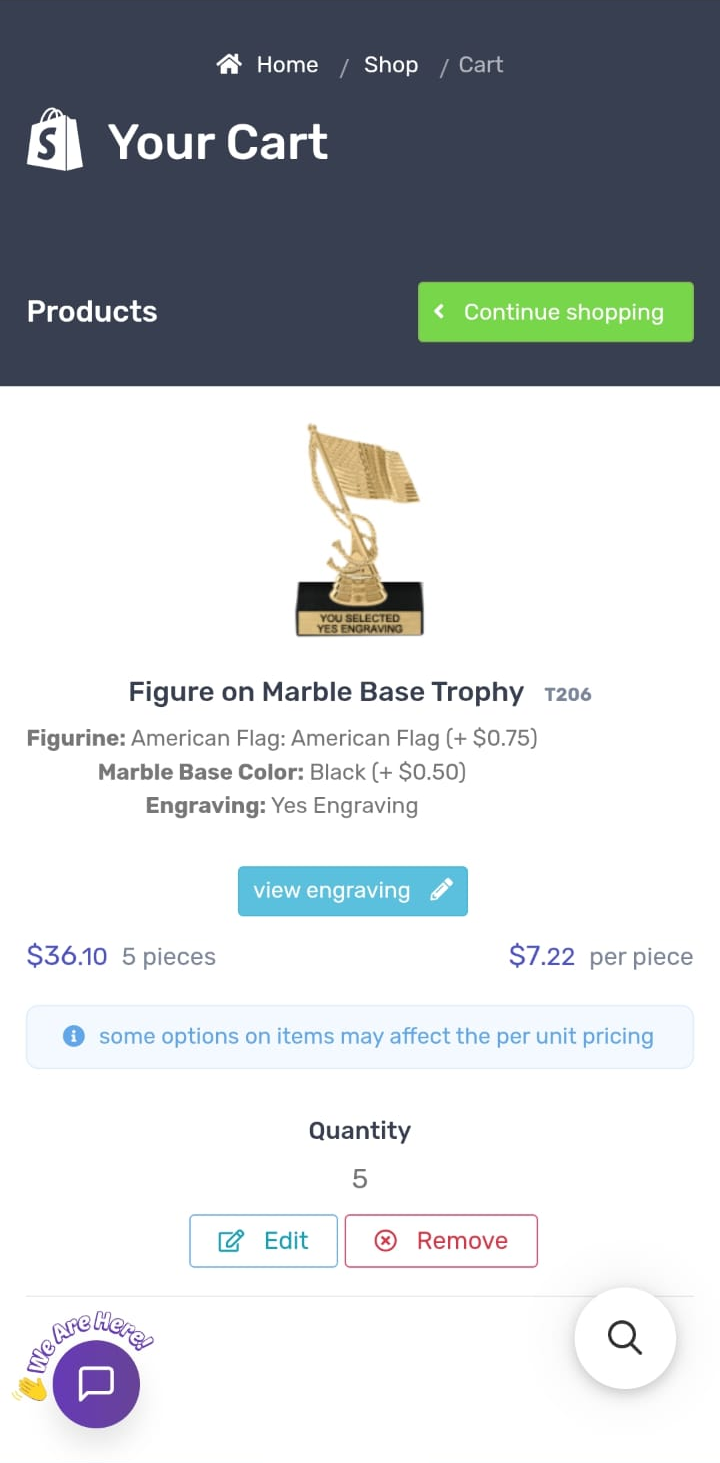
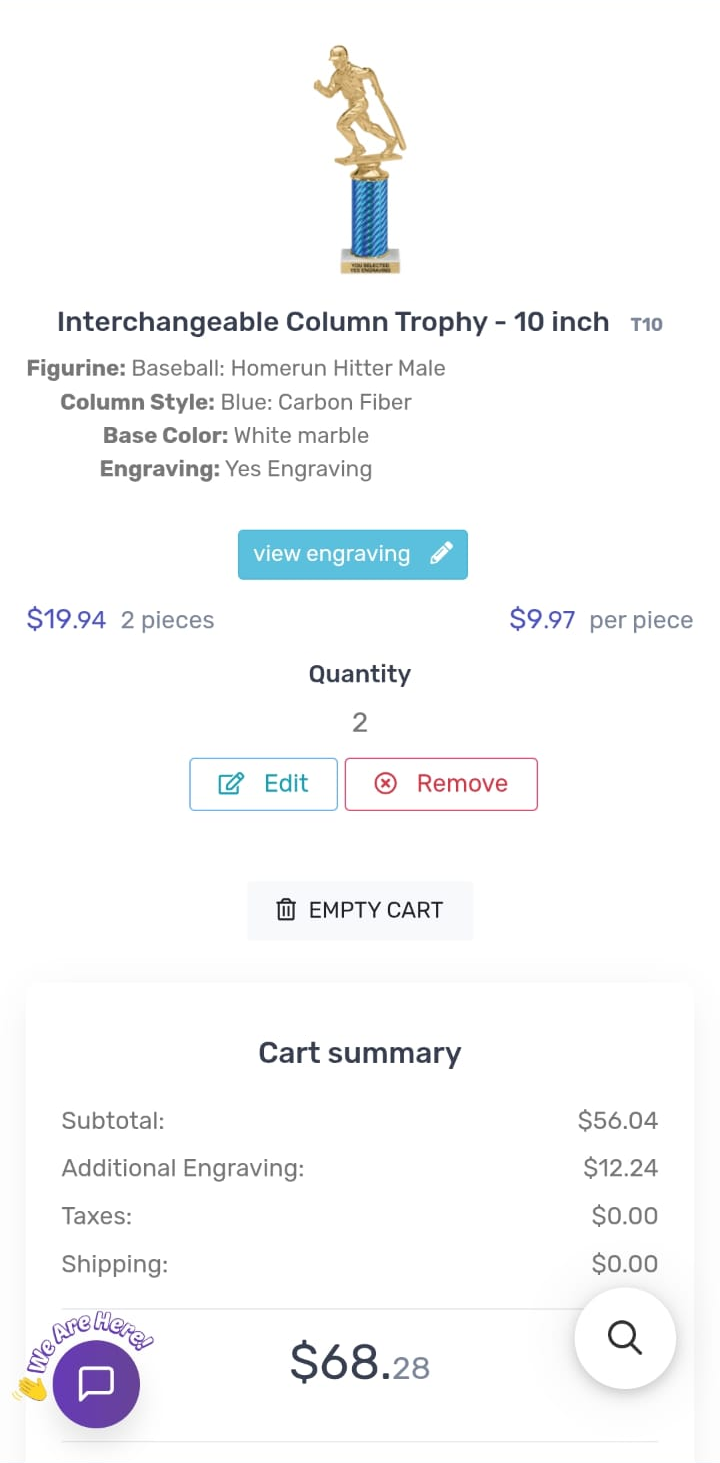
Cart showing Engraving Yes Engraving with view engraving
13 Your cart shows “Engraving: Yes Engraving”; tap the blue “view engraving” button to check it.
Different text per piece Quantity 2+ · a block of lines per piece, with a copy shortcut

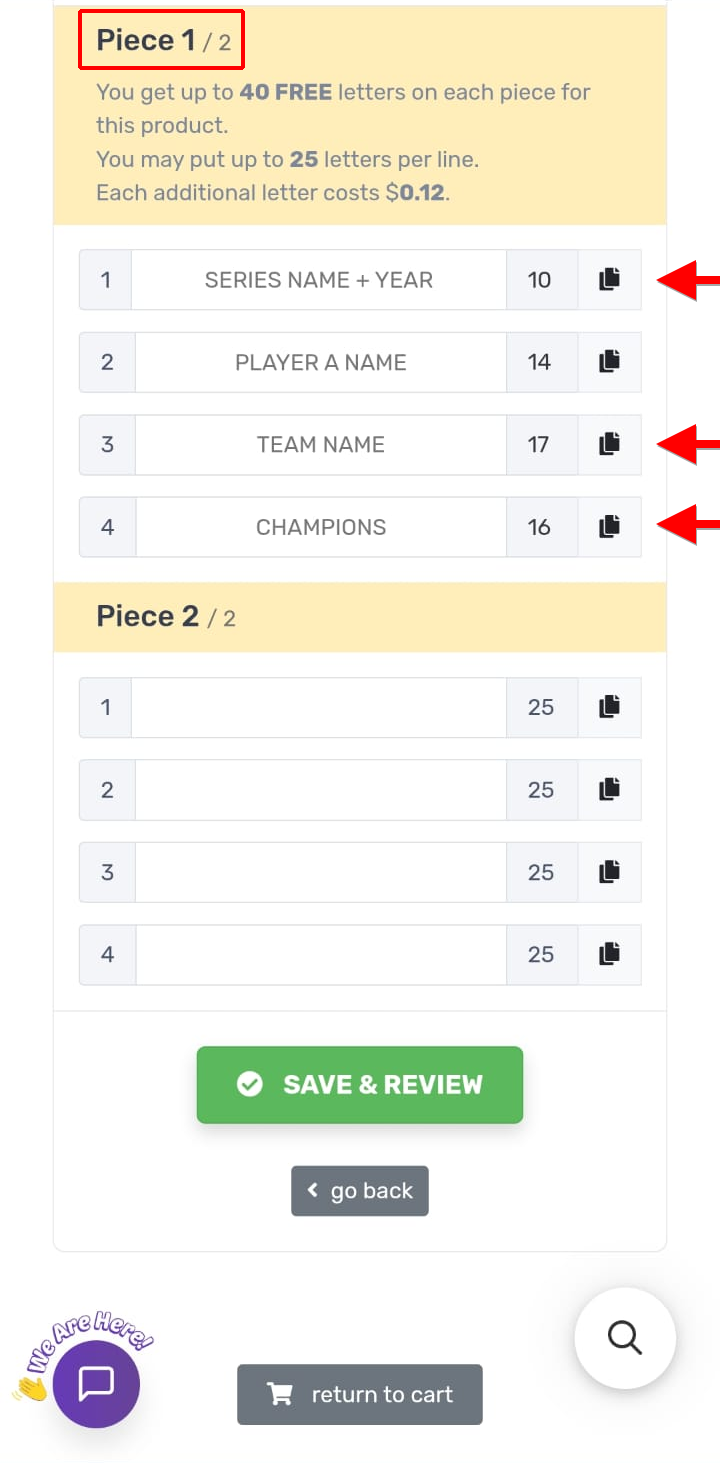
When each trophy needs its own name, choose Separate. The best time-saver here is the copy icon: fill Piece 1, copy the lines that are the same on every piece (team, year, “CHAMPIONS”), then type only the name that differs on each.
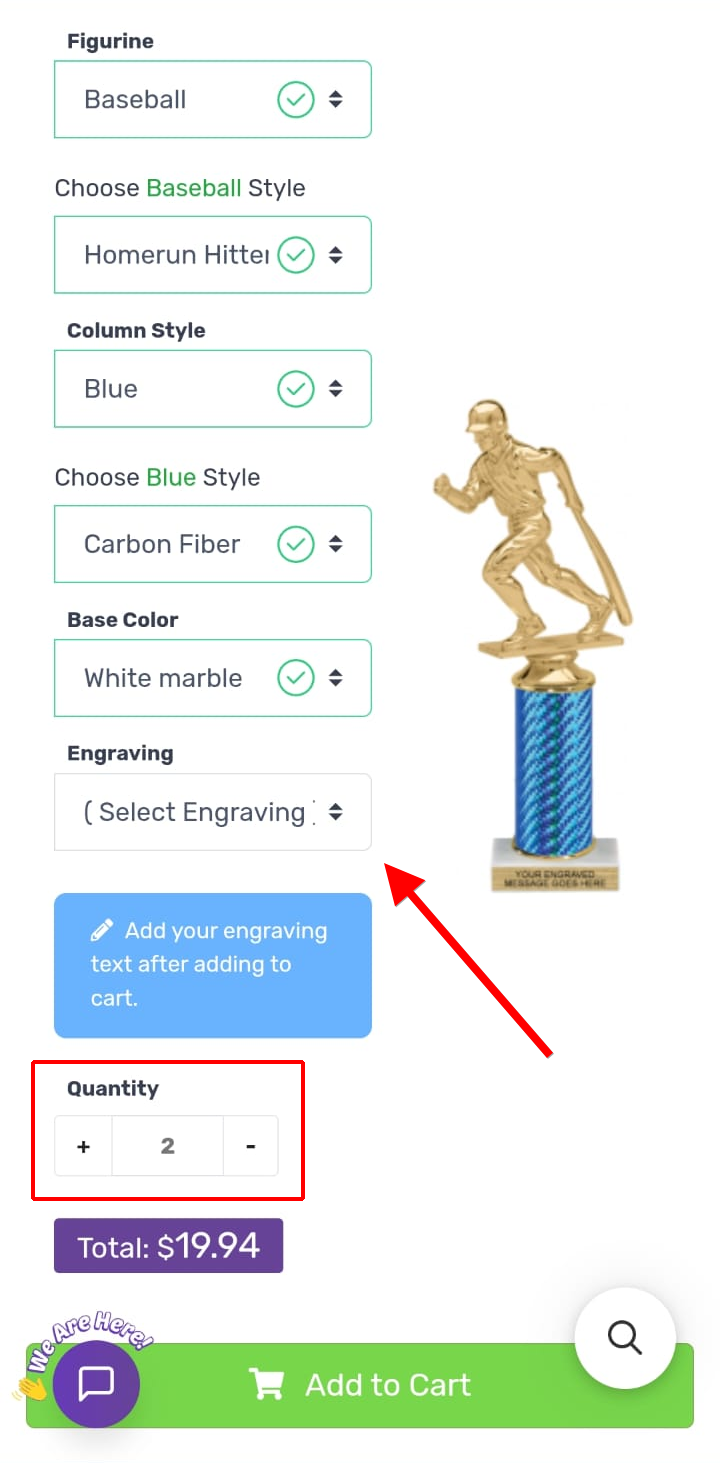
Product page Engraving dropdown with quantity
1 Open the “Engraving” dropdown, and set how many trophies you need.
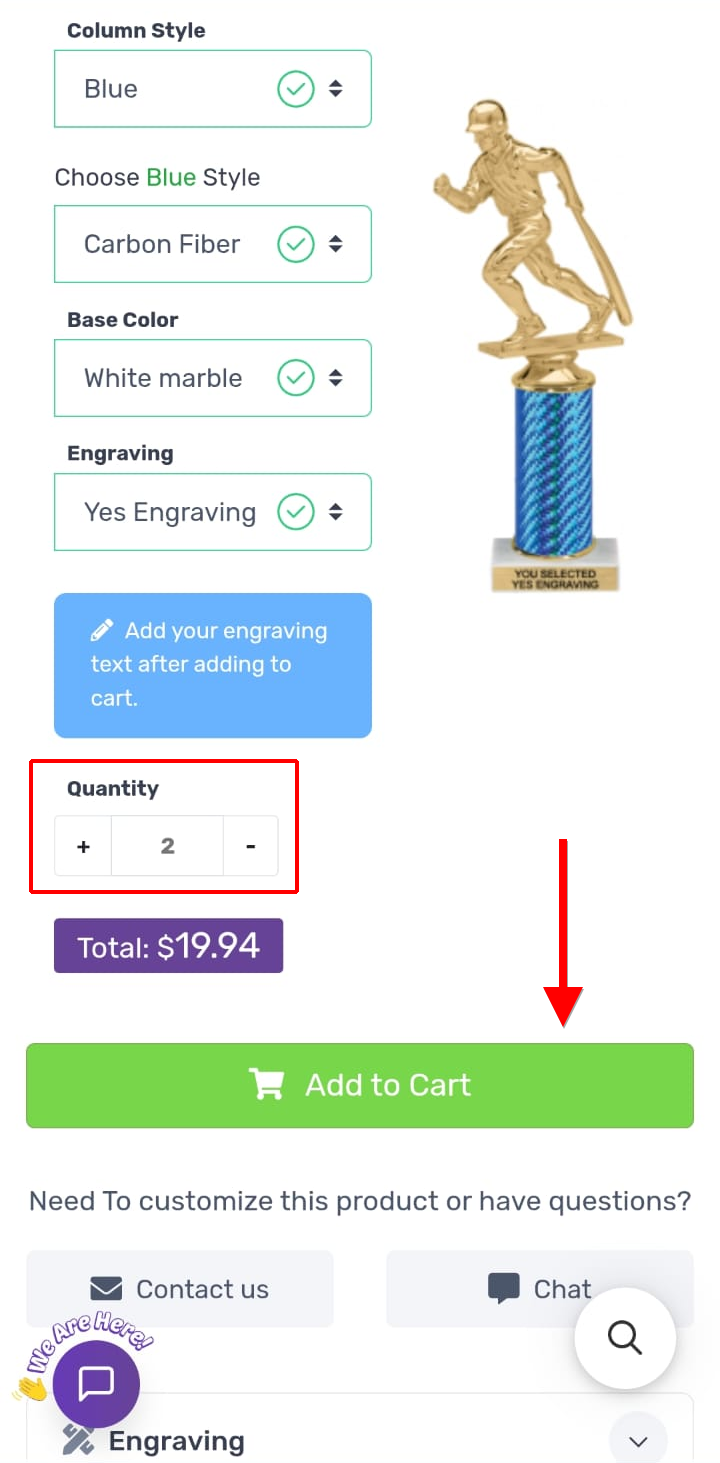
Product page with Yes Engraving and Add to Cart
2 With “Yes Engraving” chosen and quantity set, tap the green Add to Cart button.
Engraving Room with the orange Click to Engrave button
3 In the Engraving Room, tap the orange CLICK TO ENGRAVE button for your item.
Separate Engraving selected with Continue
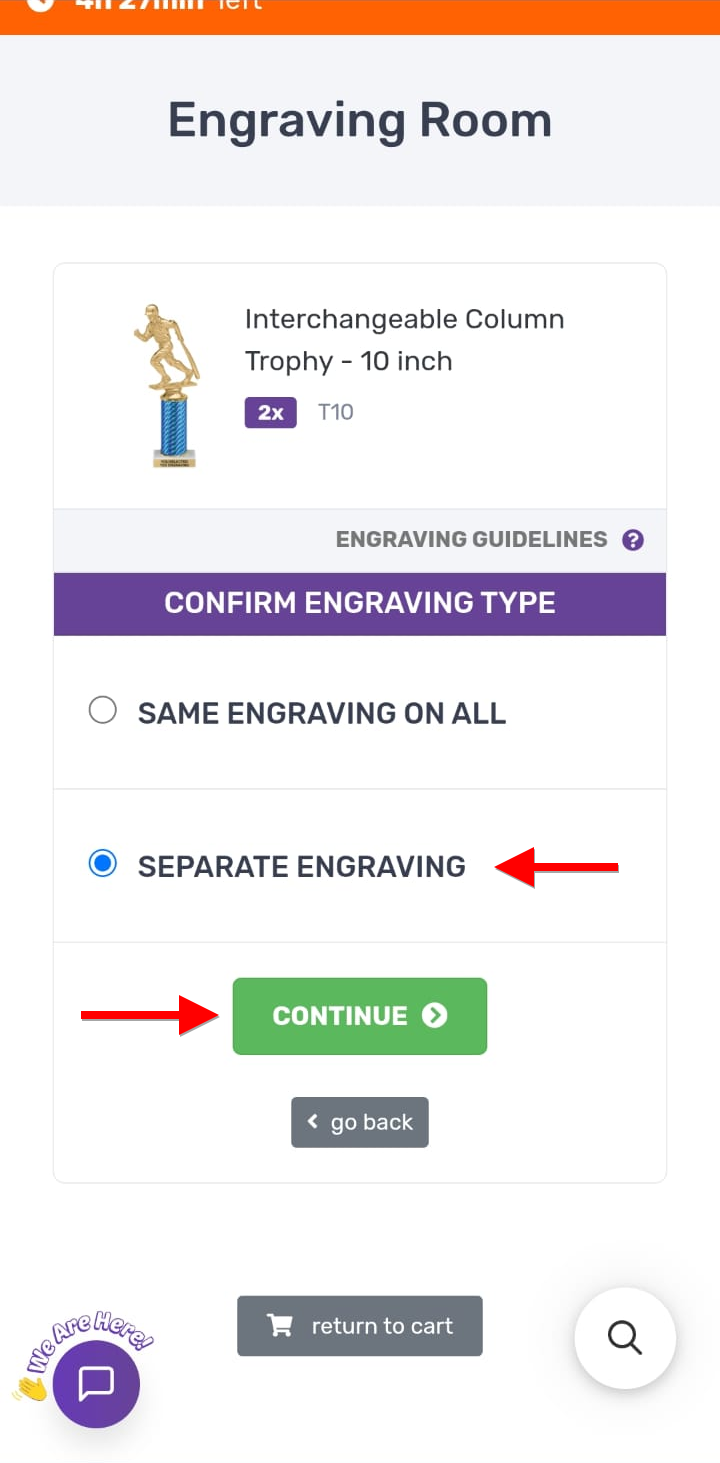
4 Choose “Separate Engraving” to give each piece different text, then tap Continue.
Per-piece form blank, Piece 1 and Piece 2
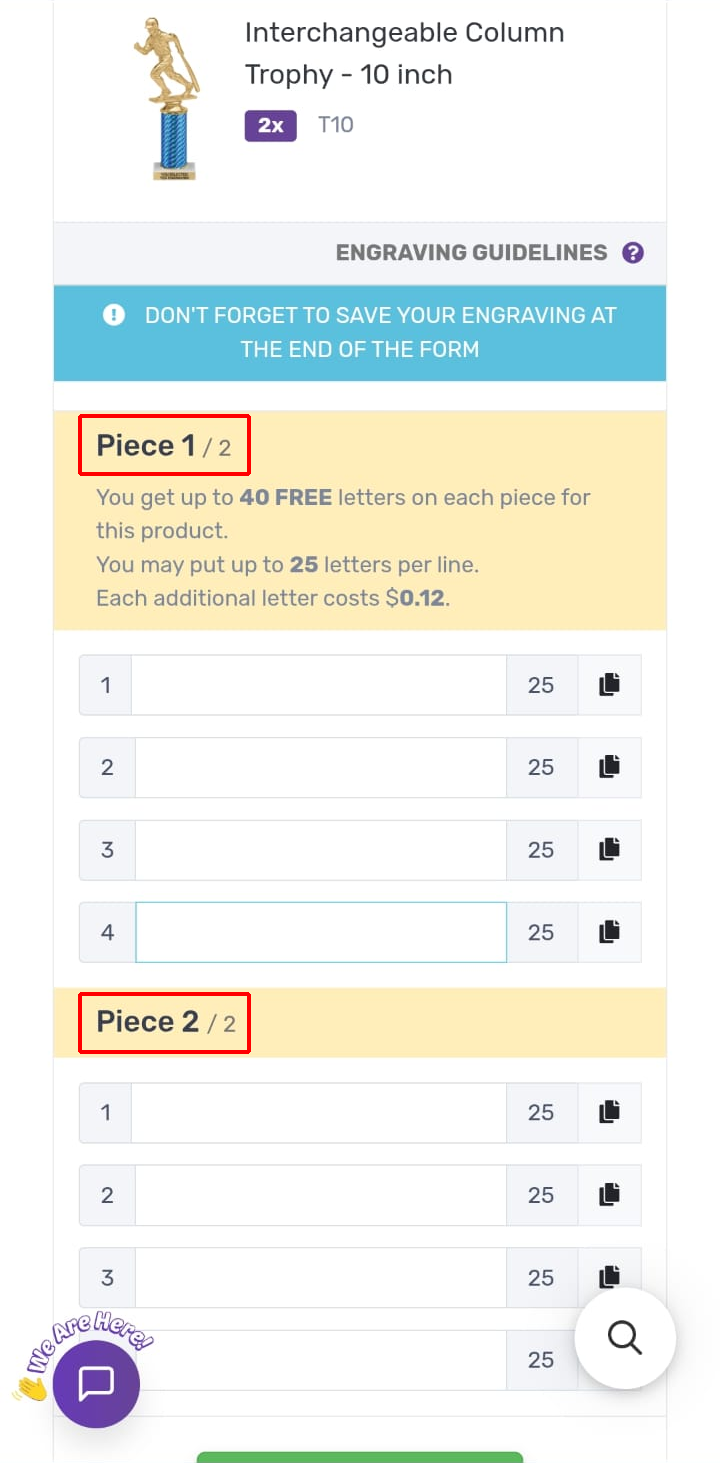
5 You'll get a separate block of lines for each piece, stacked as Piece 1 and Piece 2.
Piece 1 filled with copy icons on each line
6 Fill in Piece 1; the copy icon beside each line lets you reuse that line.
Shared lines copied to Piece 2
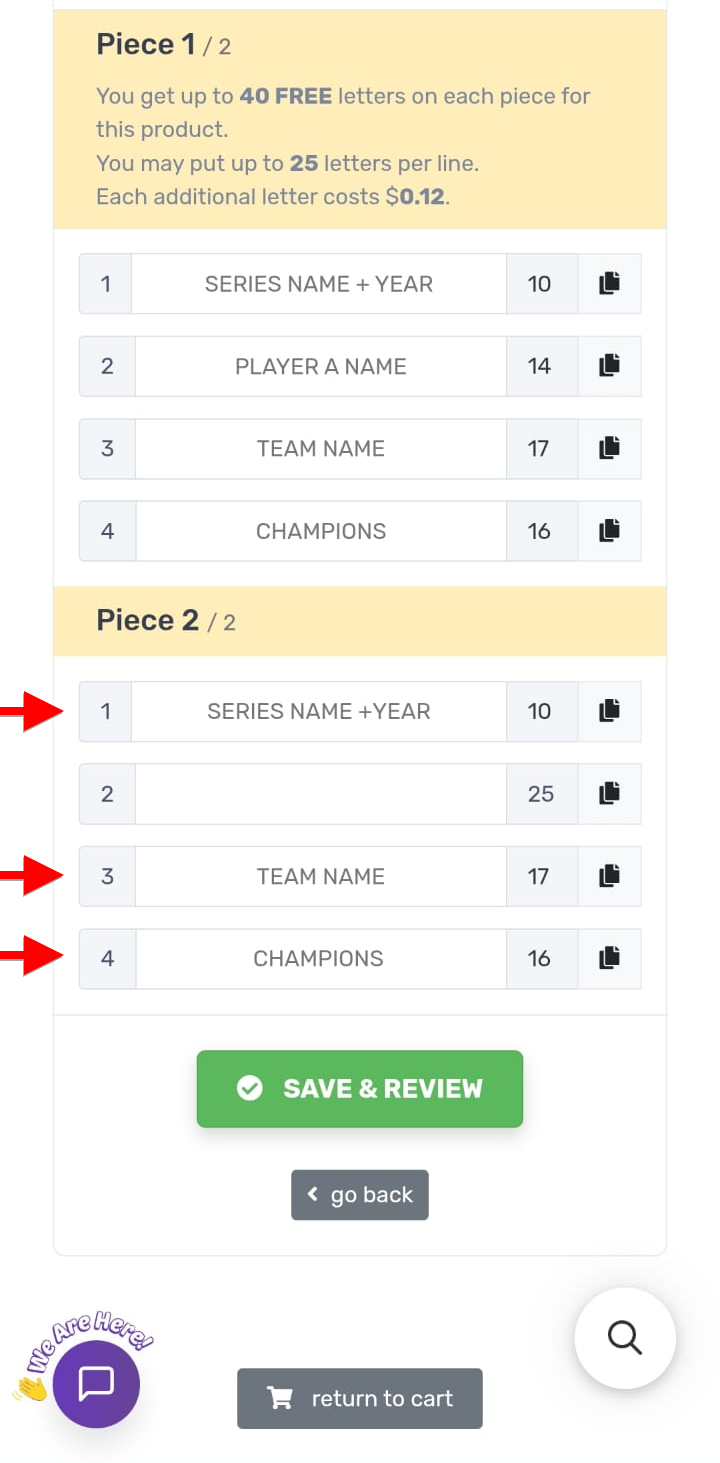
7 The copy icon drops that line onto the same line number of every other piece.
Different name typed on each piece
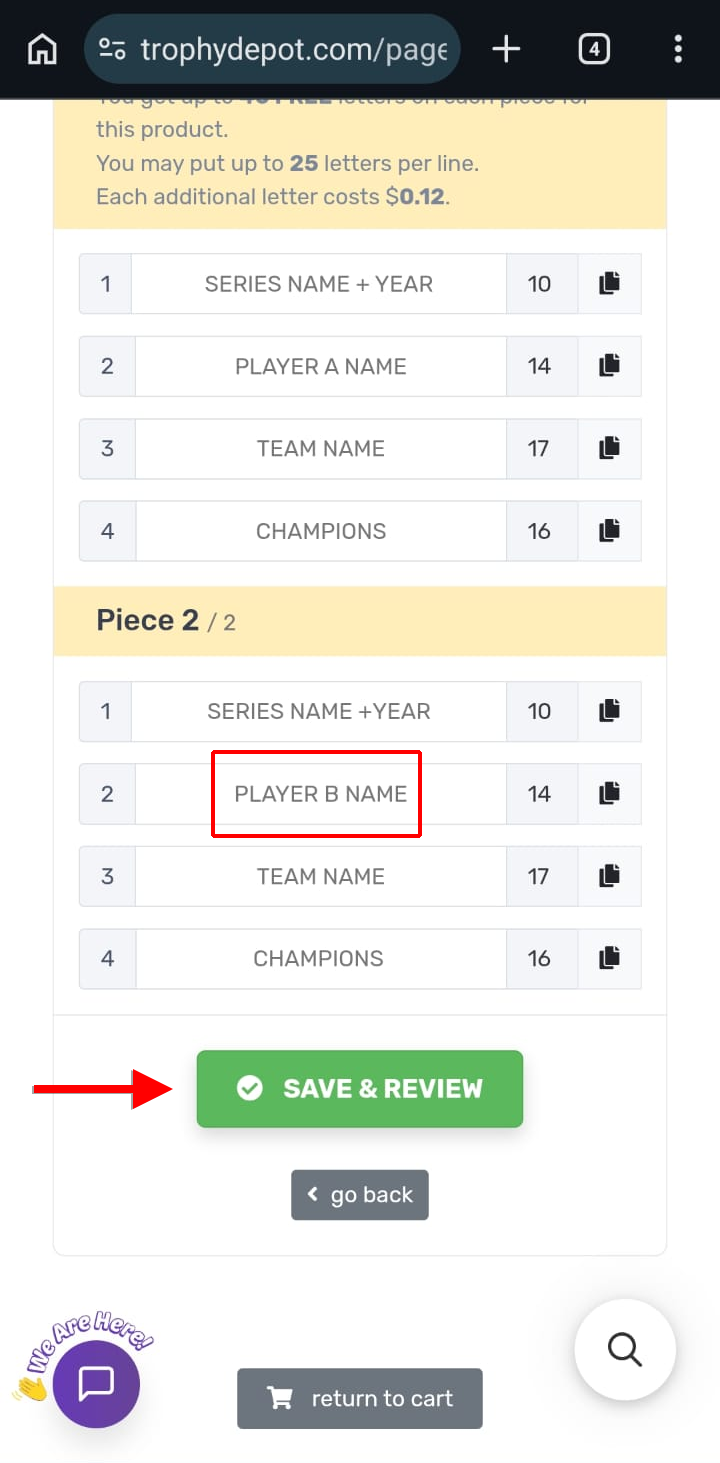
8 Just type the line that differs on each piece, then tap Save & Review.
Review grid for piece 1
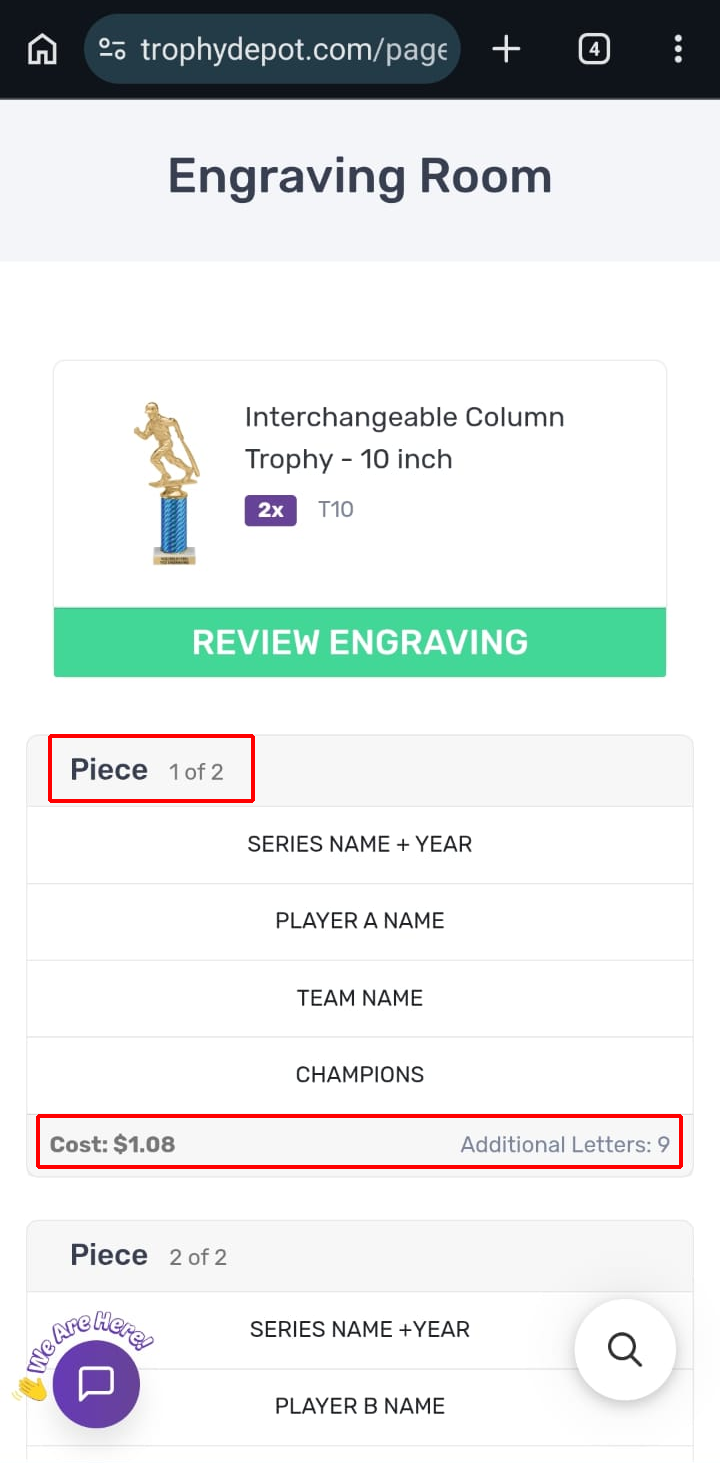
9 Review each piece separately, with its own lines, cost, and additional-letter count.
Spelling agreement with Click to Set Engraving
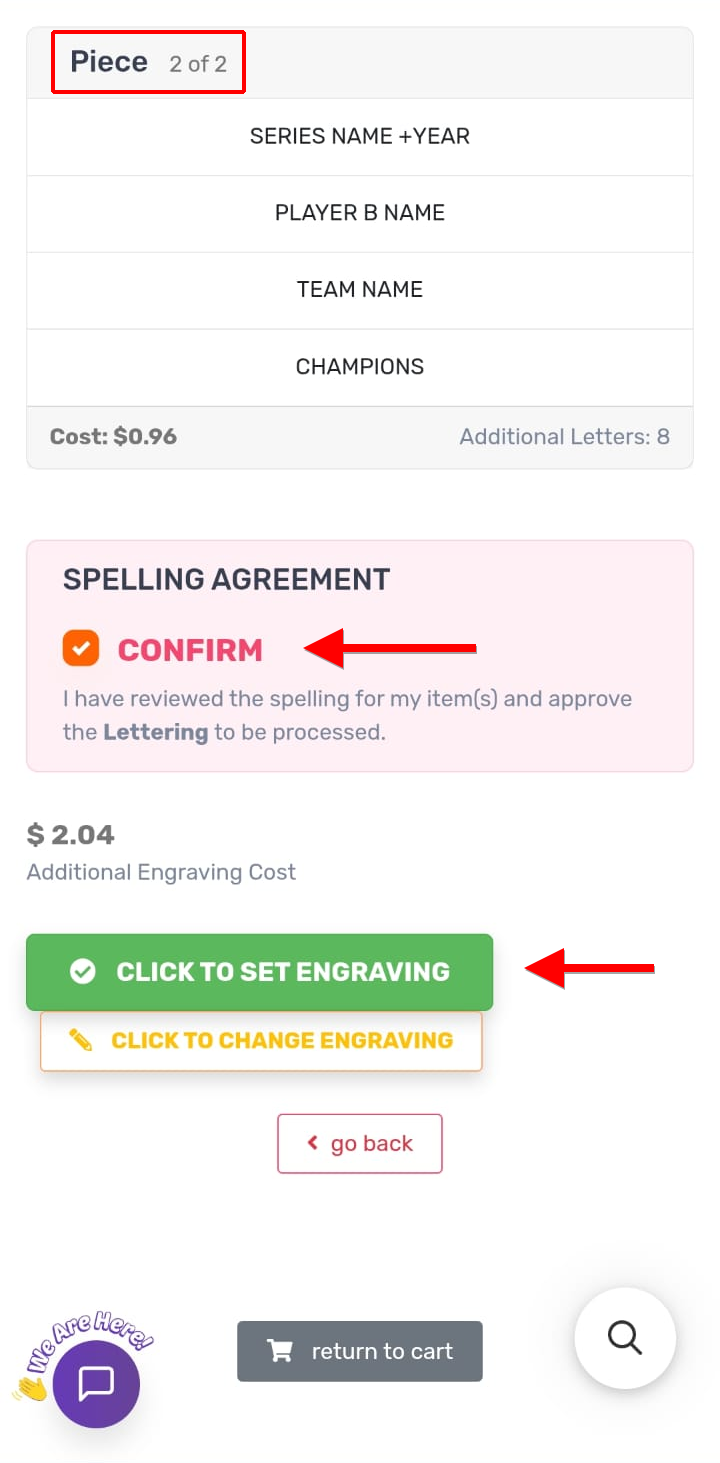
10 Tick Confirm to approve spelling, then tap the green Click to Set Engraving.
Green engraved badge confirmation
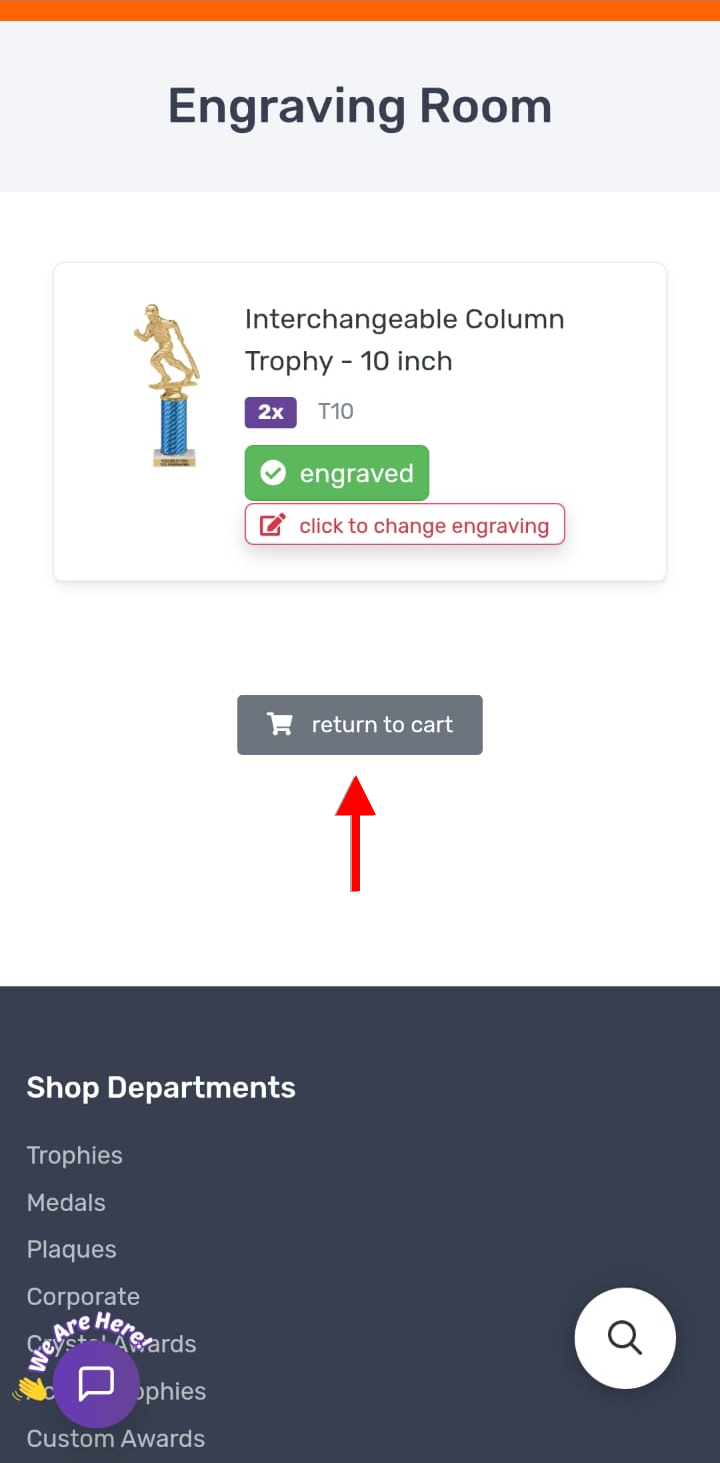
11 A green “engraved” badge confirms it's saved; tap Return to Cart to continue.
Cart summary with an Additional Engraving line
12 Your cart summary lists an “Additional Engraving” line alongside the subtotal and order total.
Two or more different items Different products or sizes in one cart · engrave each in turn

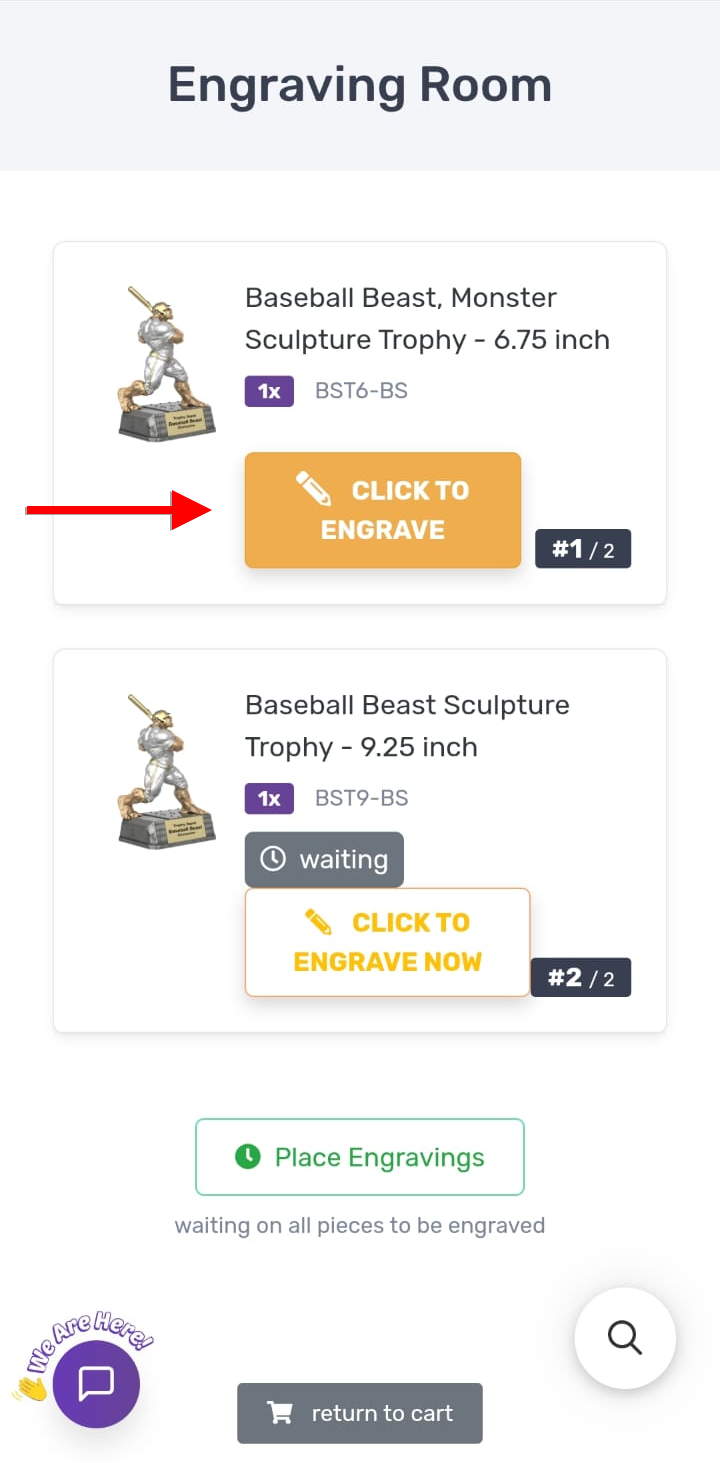
Each item is engraved on its own — there's no “apply to everything” across different products or sizes. The Place Engravings button stays inactive until every item shows the green engraved badge, so if it looks dead, look for one still marked “waiting.”
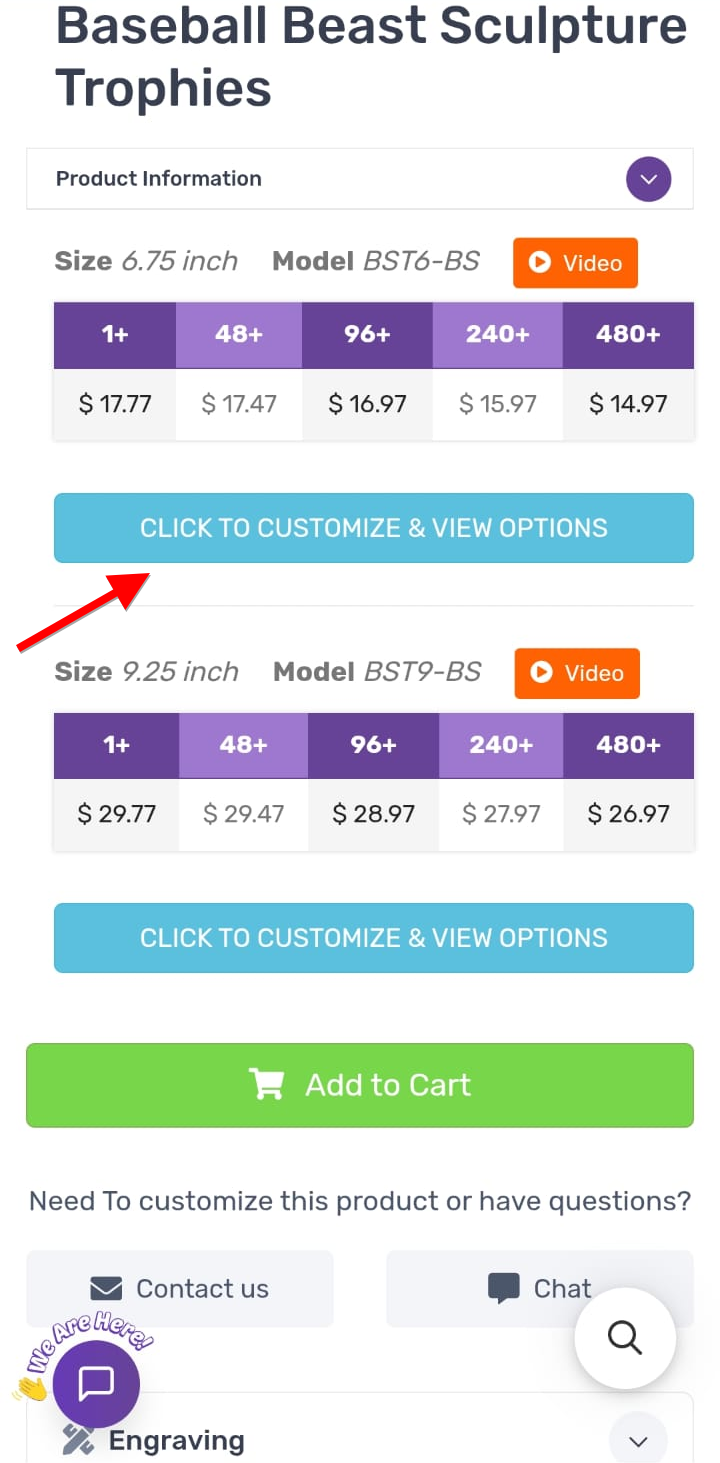
Group page listing two sizes
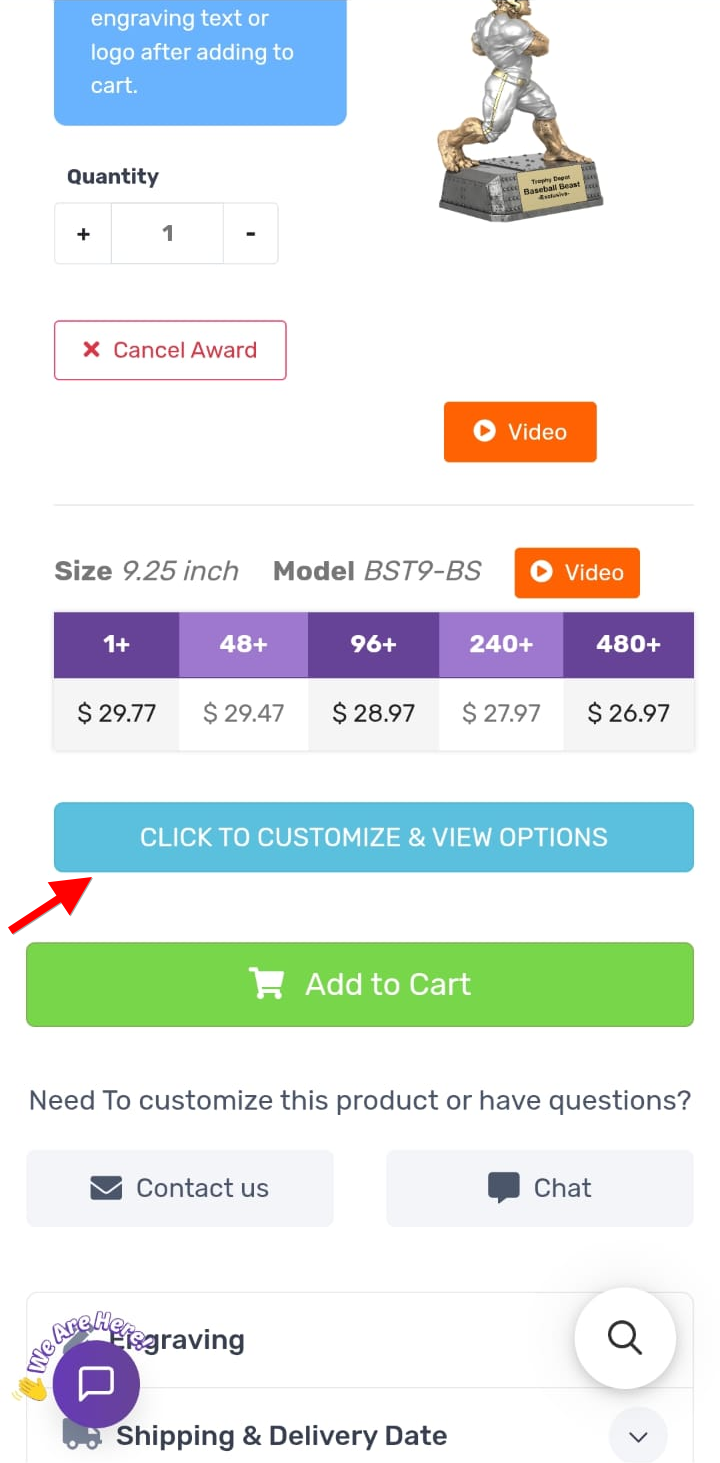
1 This product lists several sizes; tap “Click to Customize & View Options” on the one you want.
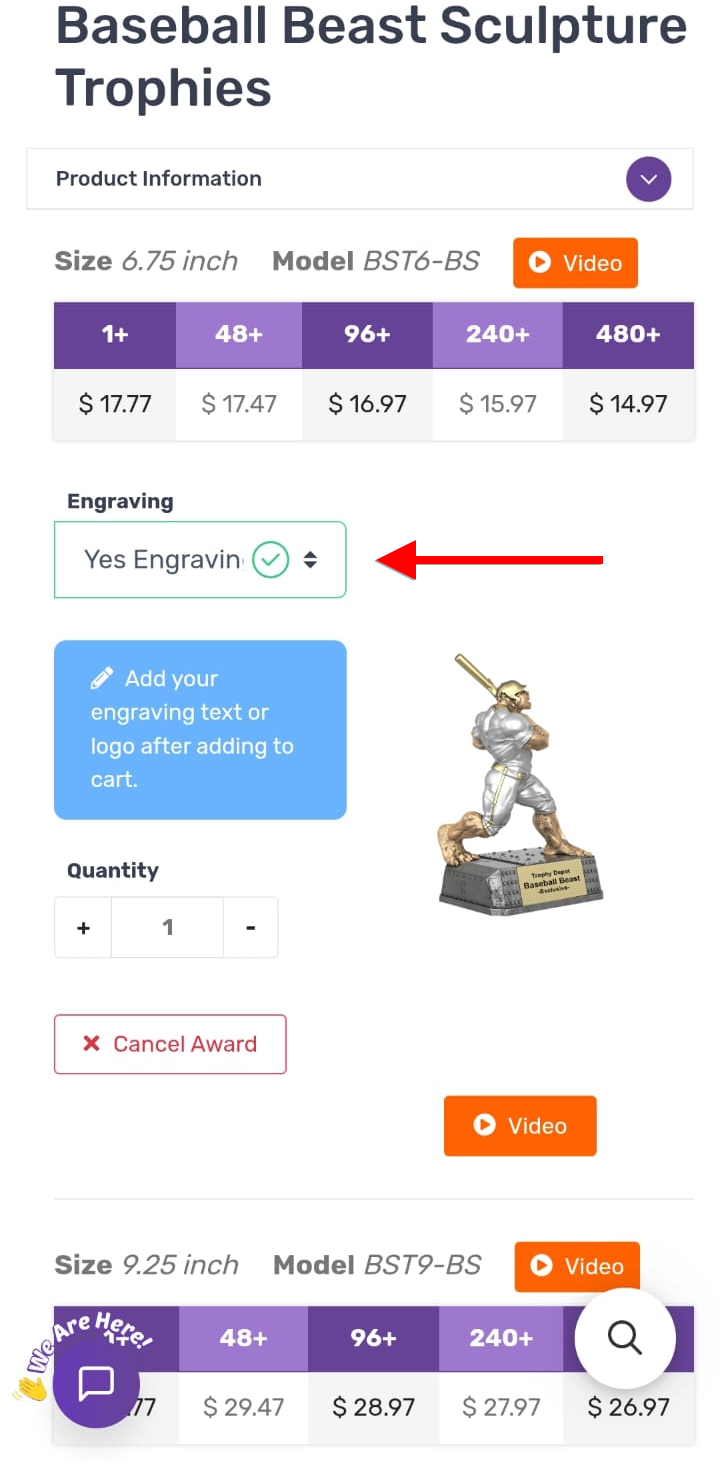
First size with Yes Engraving selected
2 For the first size, choose “Yes Engraving” from the Engraving dropdown.
Second size awaiting customize
3 The other size still needs its own “Click to Customize & View Options” tap.
Second size with Yes Engraving and Add to Cart
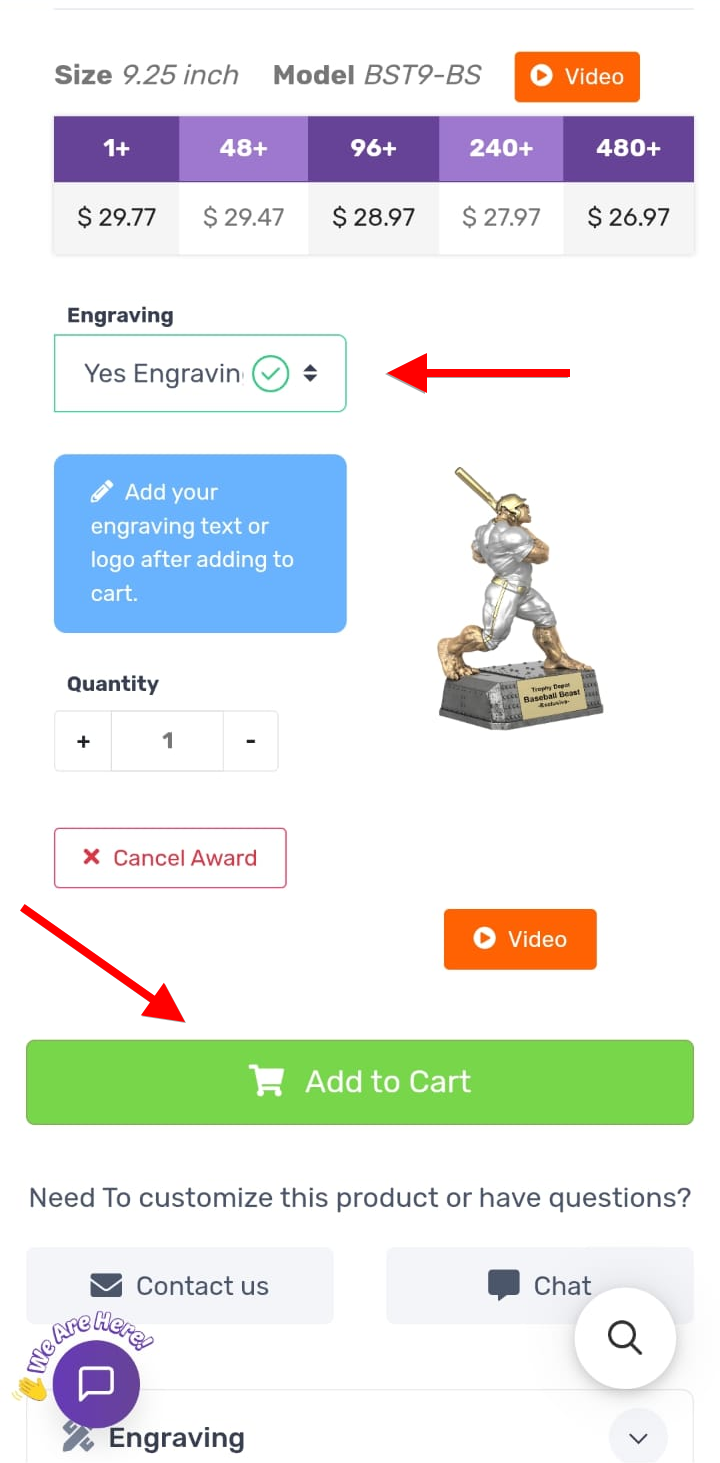
4 Choose “Yes Engraving” on the second size too, then tap the green Add to Cart.
Engraving Room with both items queued
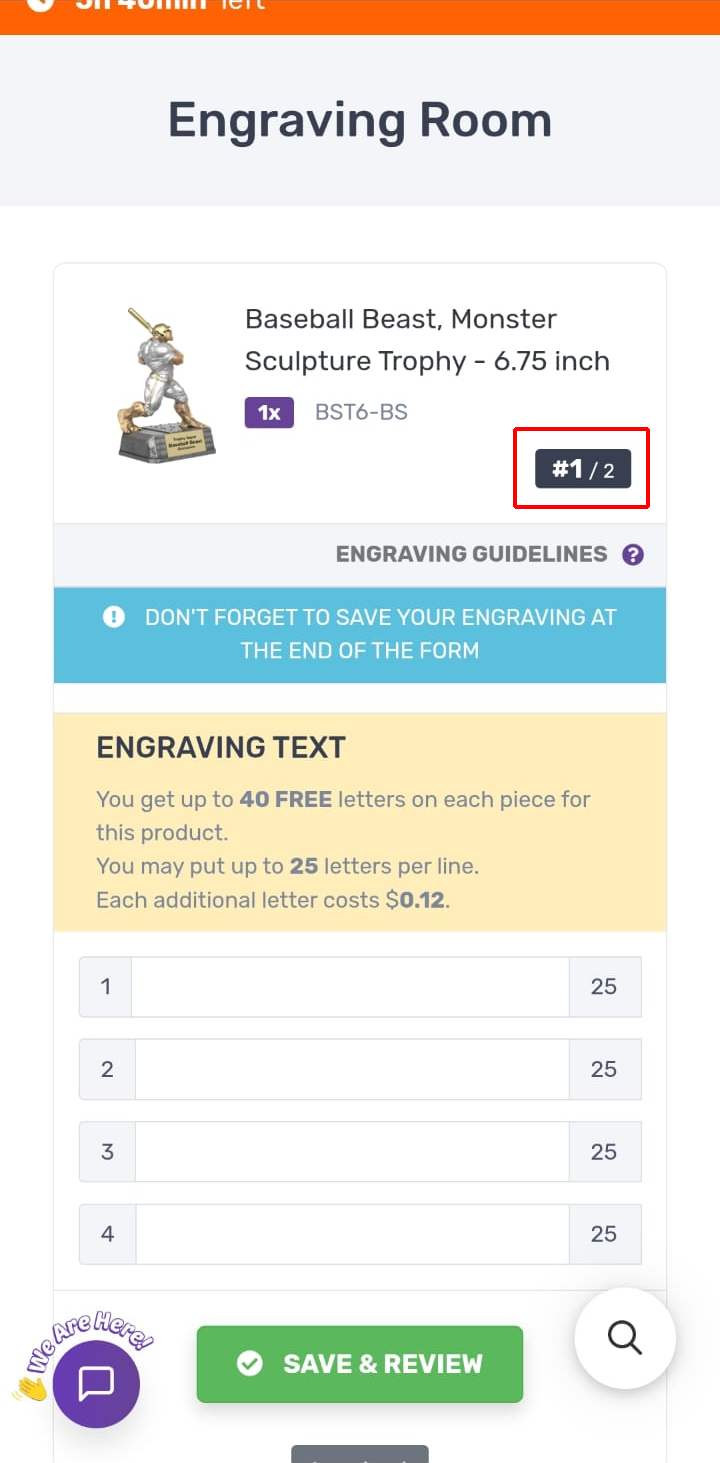
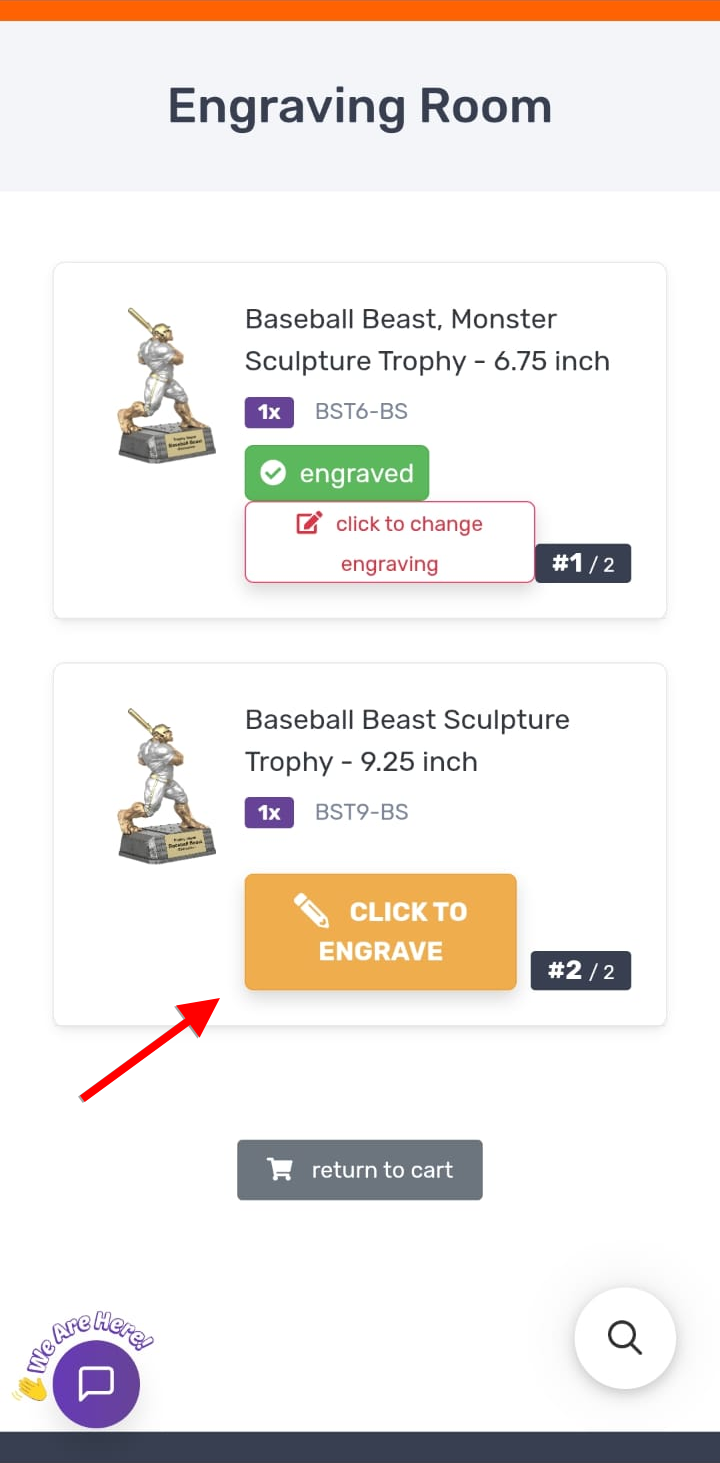
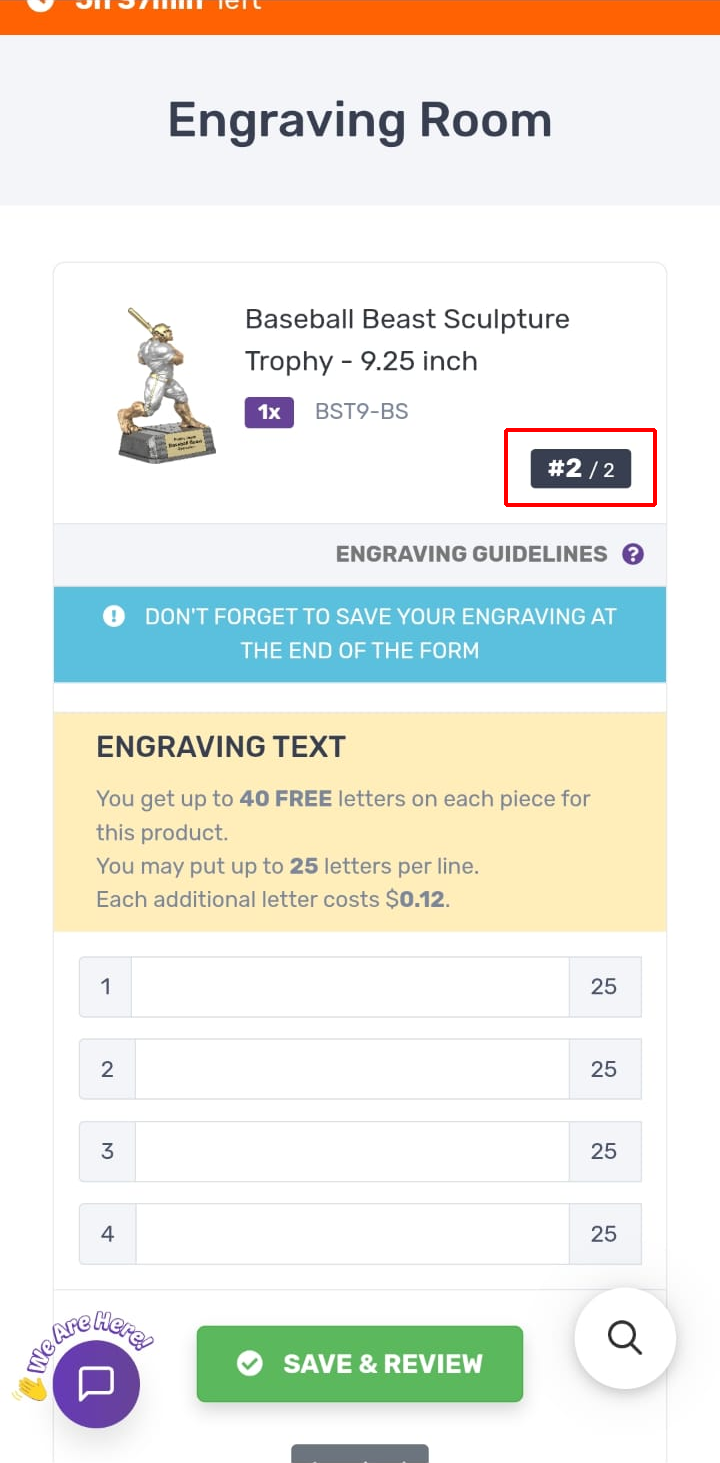
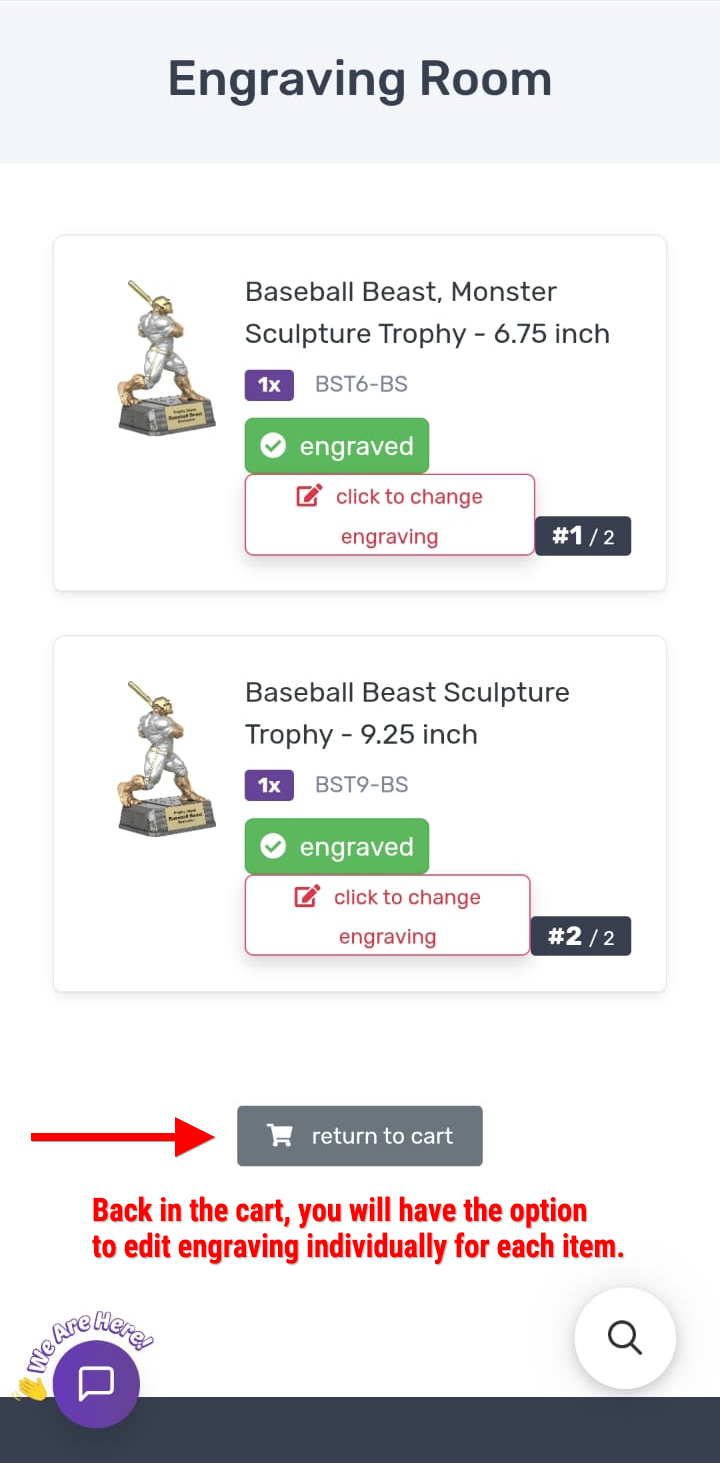
5 The Engraving Room queues both items, badged #1/2 and #2/2; engrave the first one now.
Item 1 blank form
6 Enter your text for the first item on its blank engraving lines.
Item 1 filled form
7 With the first item's lines filled in, tap the green Save & Review button.
Item 1 review, spelling not yet ticked
8 Review the first item; you must still tick the Spelling Agreement to continue.
Item 1 spelling agreement confirmed
9 Tick Confirm for the first item, then tap the green Click to Set Engraving.
Item 1 engraved, item 2 now active
10 Item #1 is engraved; item #2's orange Click to Engrave button is now active.
Item 2 blank form
11 Now enter your text for the second item on its blank lines.
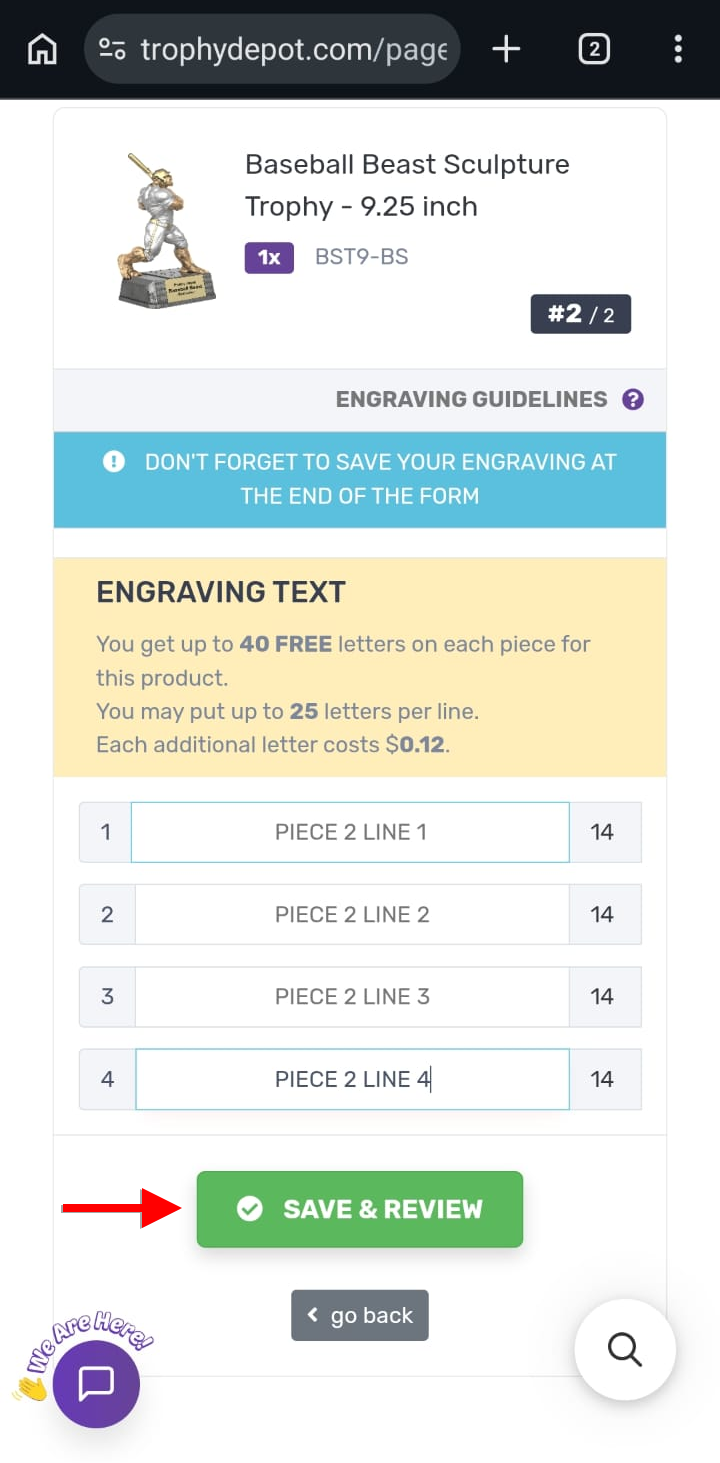
Item 2 filled form
12 With the second item's lines filled in, tap the green Save & Review button.
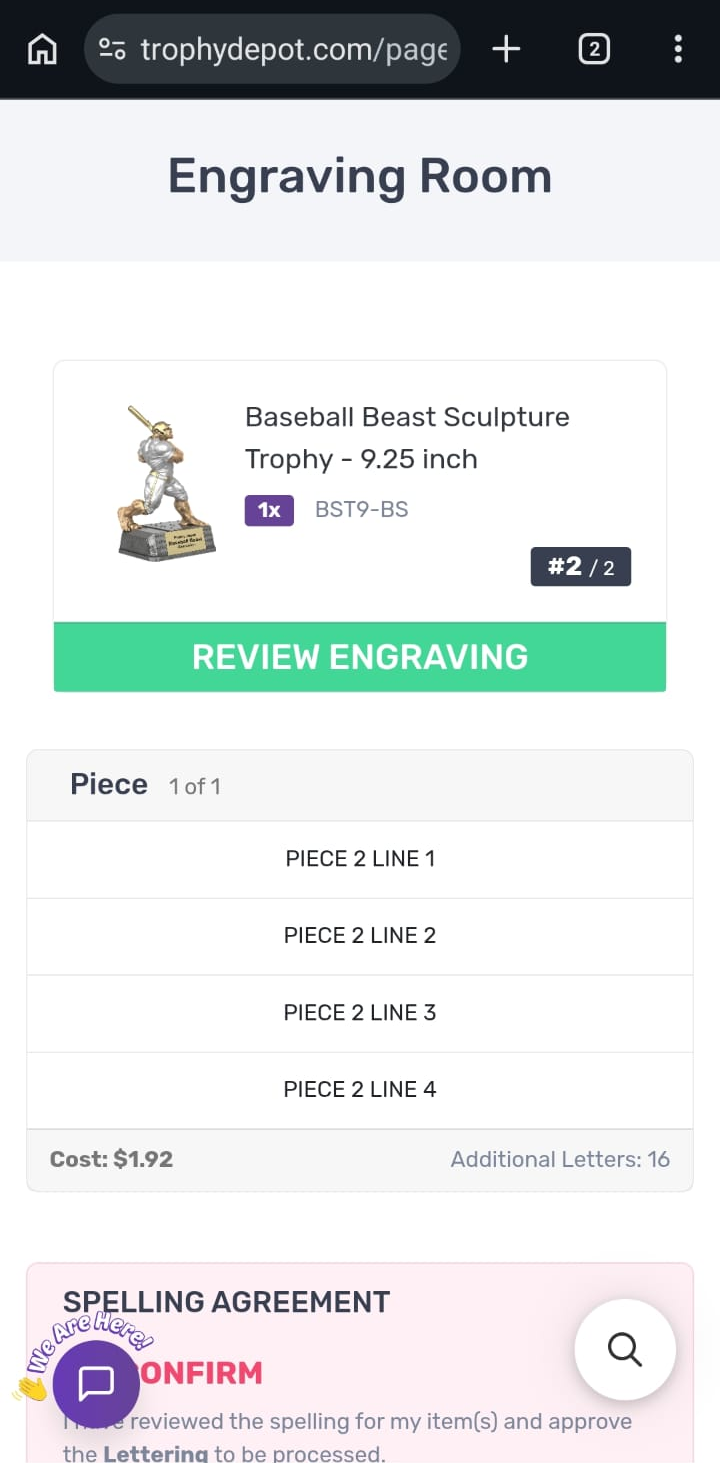
Item 2 review, spelling not yet ticked
13 Review the second item; tick the Spelling Agreement below to approve it.
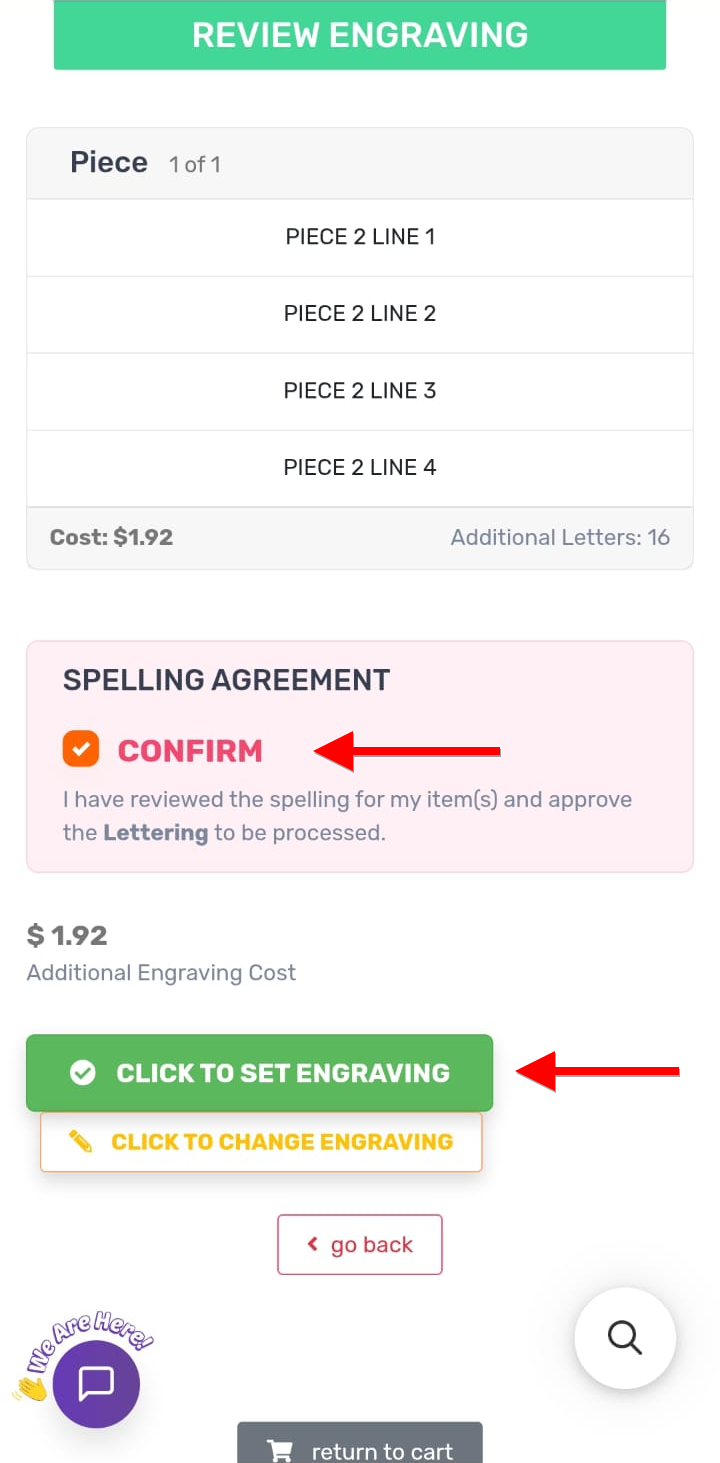
Item 2 spelling agreement confirmed
14 Tick Confirm for the second item, then tap the green Click to Set Engraving.
Both items engraved
15 Both items now show a green “engraved” badge; tap Return to Cart to finish — back in the cart you can edit each item's engraving individually.
Fix text you already saved Reopen from the cart and edit — no need to start over

Editing follows the same three stages as the first time: SAVE & REVIEW stores your revision, then the spelling agreement and CLICK TO SET ENGRAVING finish it. An edit left mid-form isn't kept, so carry on to the end.

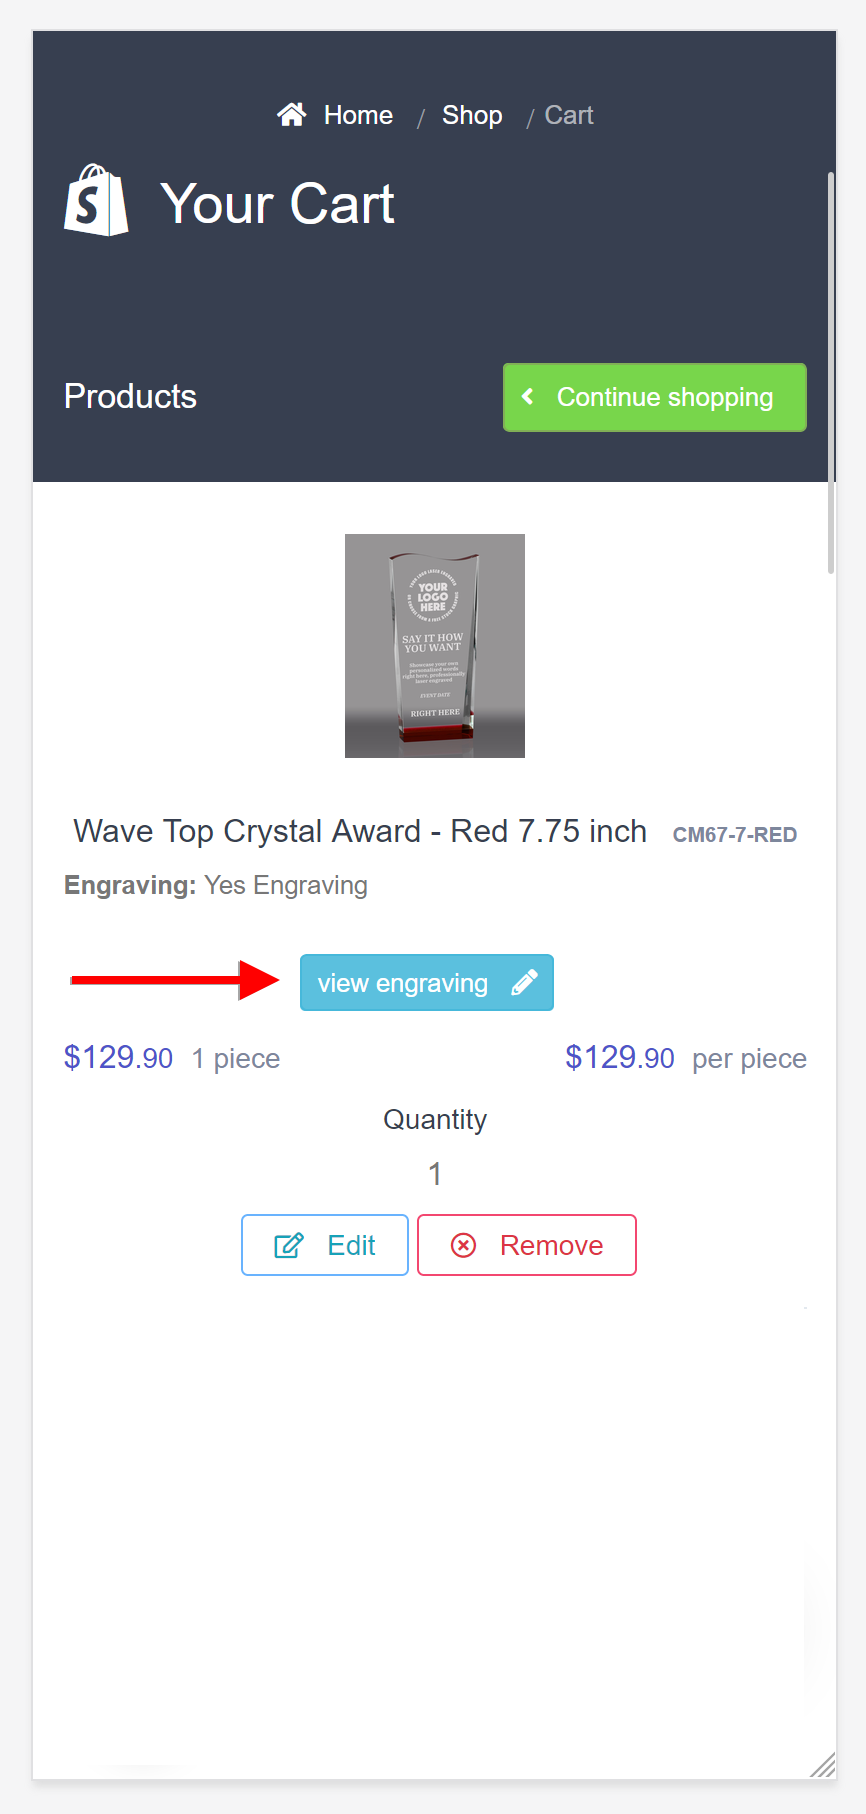
Cart item with view engraving button
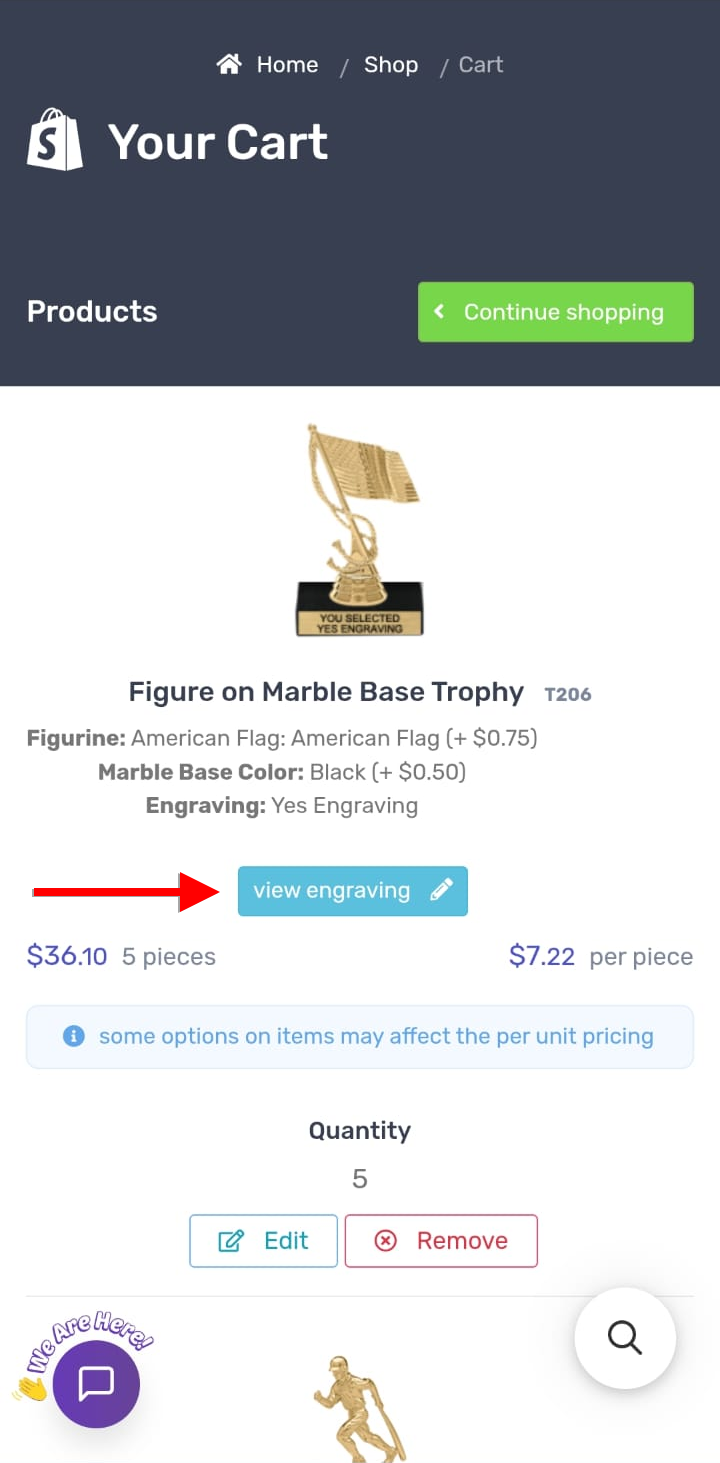
1 In your cart, tap the blue “view engraving” button on the item to review or edit it.
Engraving Room with click to change engraving
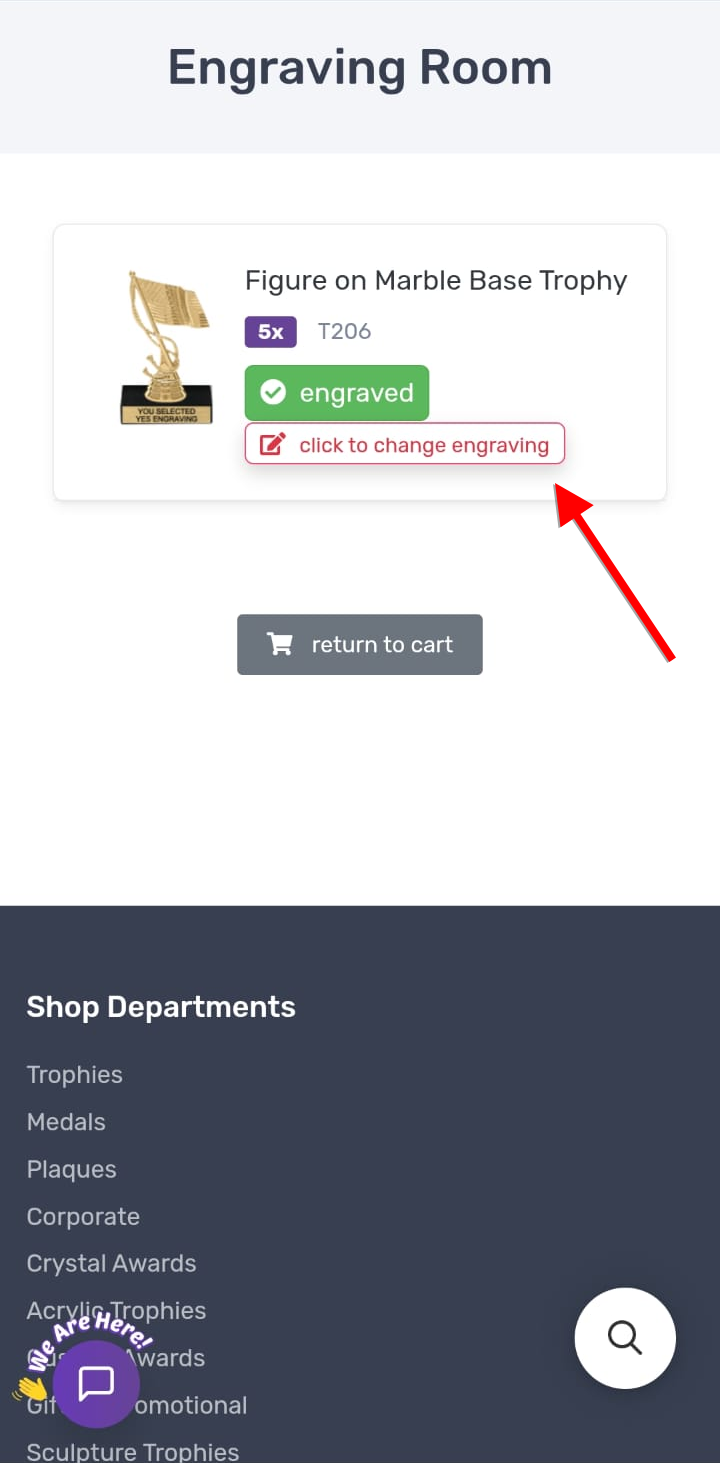
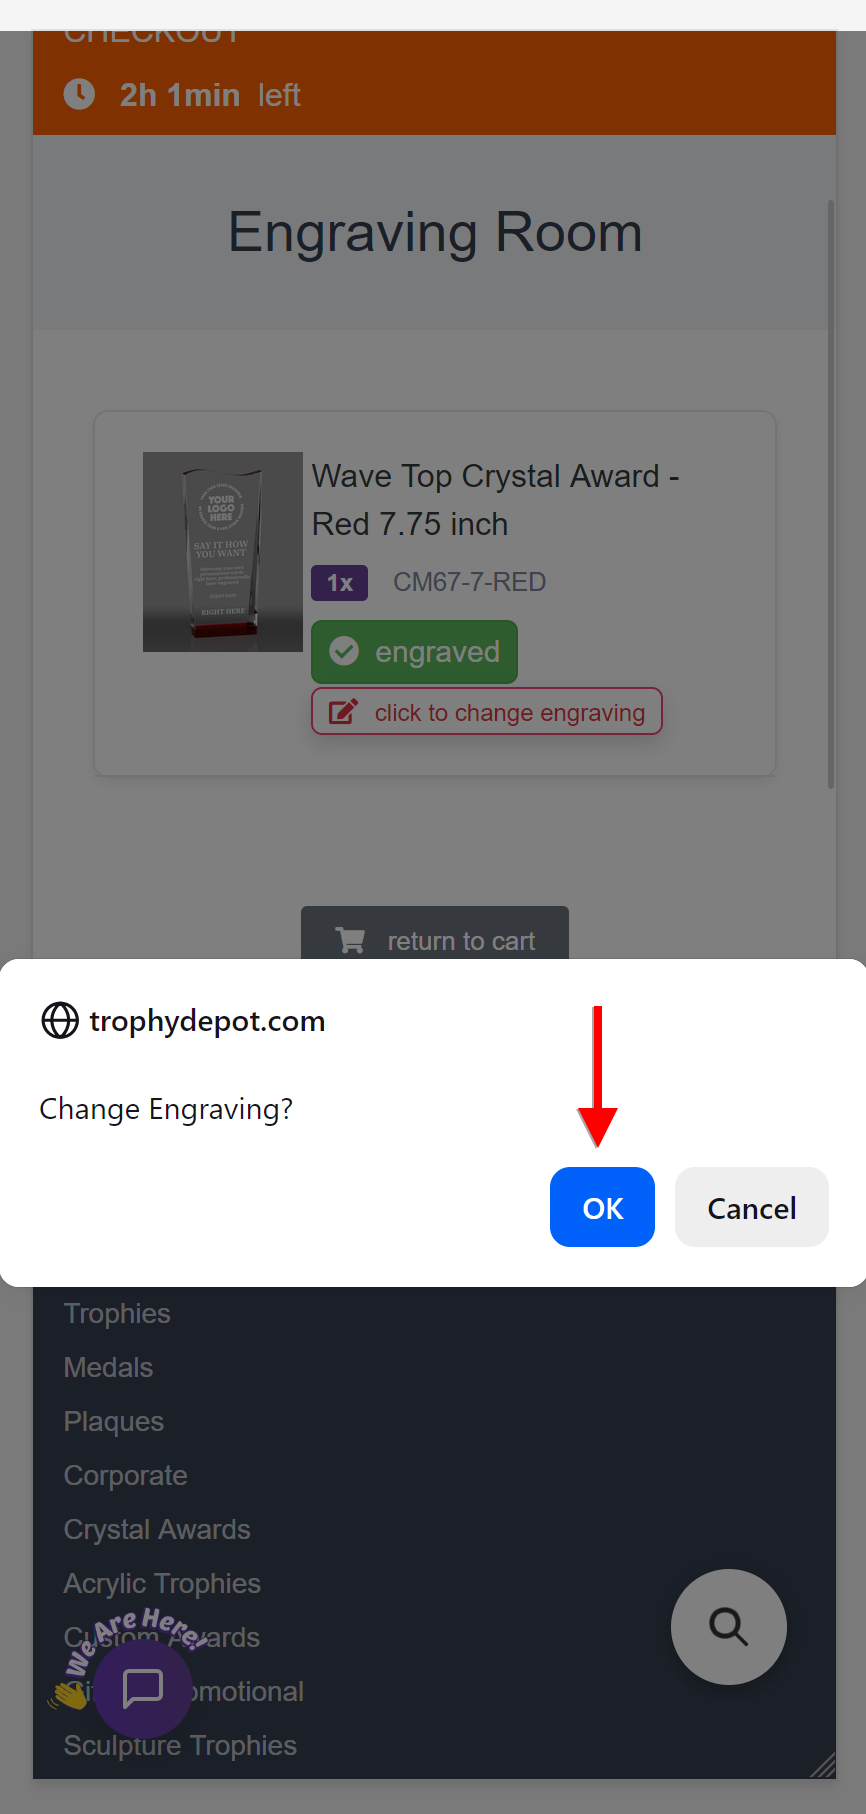
2 In the Engraving Room, tap the “click to change engraving” link under the green “engraved” badge.
Change Engraving dialog with OK
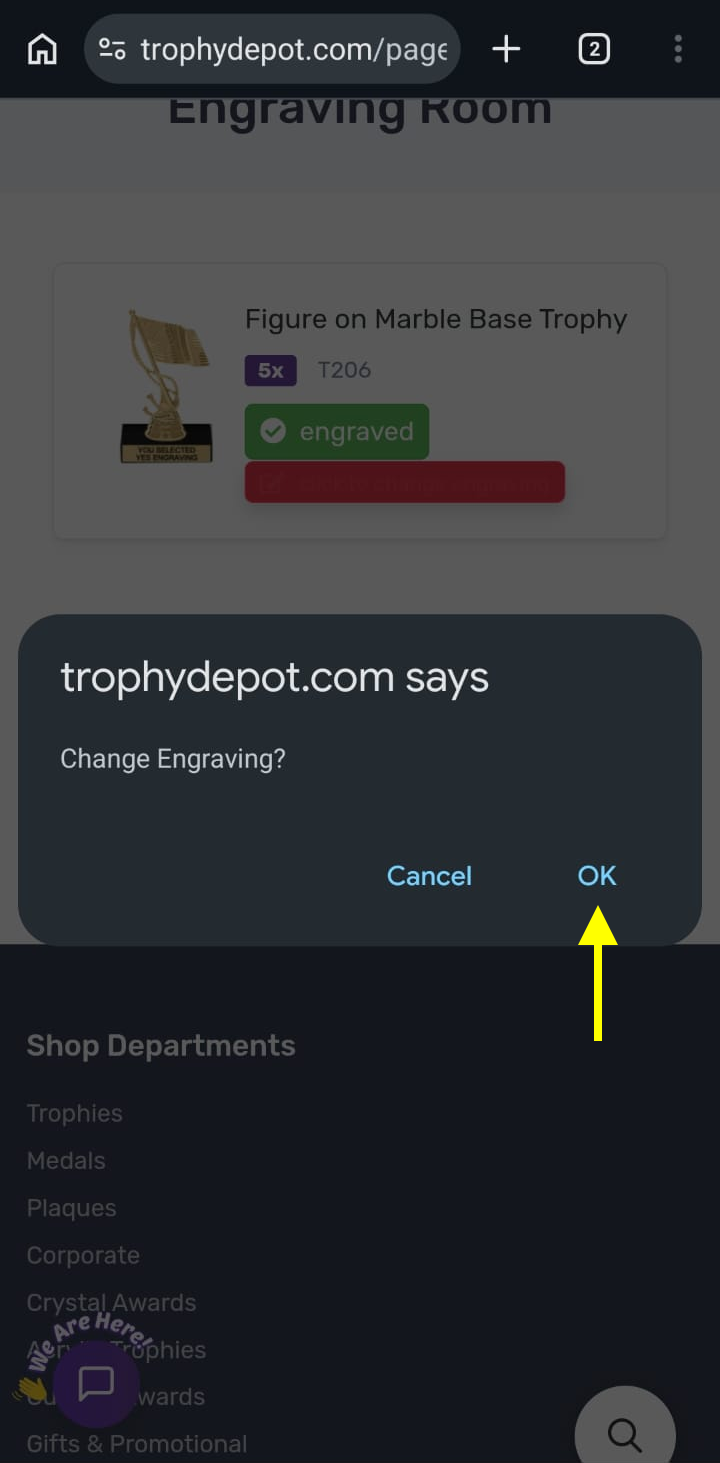
3 Confirm the “Change Engraving?” pop-up by tapping OK to reopen your saved engraving for editing.
Reopened form with existing lines
4 Your engraving reopens with its lines filled in; edit any line, then tap the green SAVE & REVIEW button and confirm again.
Add a logo or stock graphic Upload your artwork or pick a free stock insert · graphic comes before text

On awards that take a graphic, the logo/insert step comes before the text form. You can upload your own artwork, pick a free stock insert, or both. For a logo only with no lettering, use SKIP TEXT — it appears once a graphic is attached. Which options you see depends on the award; some are text-only.

Product page award overview with logo mockup
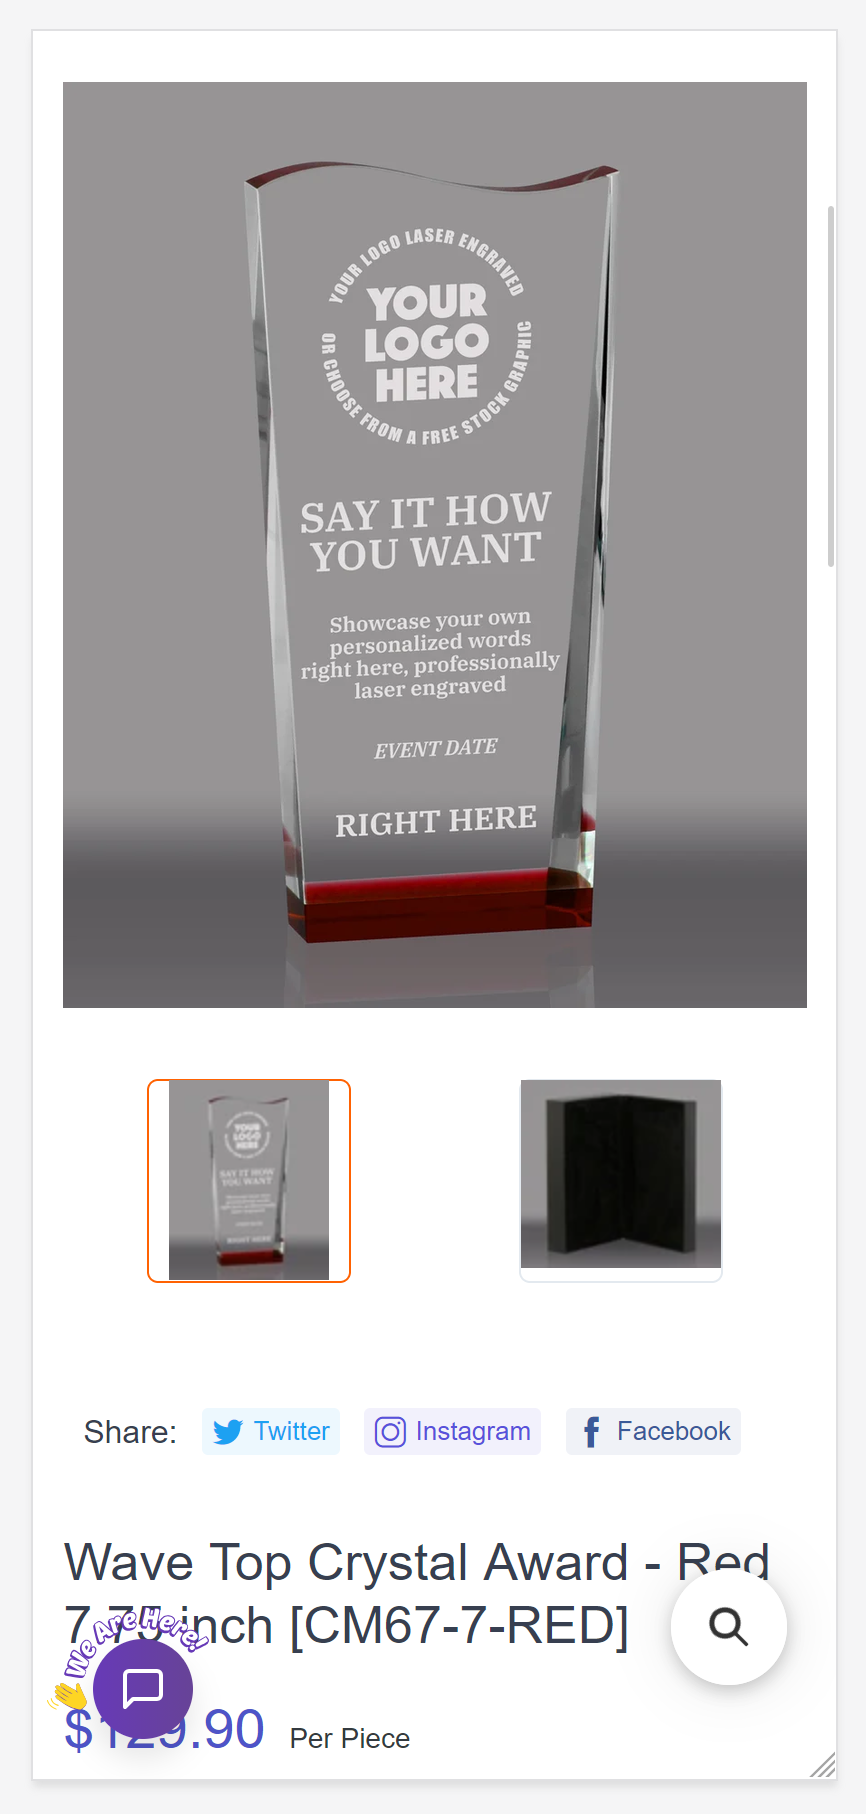
1 On the product page, the mockup shows you can add your own logo or a free stock graphic.
Engraving dropdown for a graphic award
2 Open the Engraving dropdown; you'll add artwork or a stock graphic after adding the item to your cart.
Yes Engraving selected with Add to Cart
3 With “Yes Engraving” selected, tap the green Add to Cart button; you'll personalize it in the next step.
Engraving Room with the orange Click to Engrave button
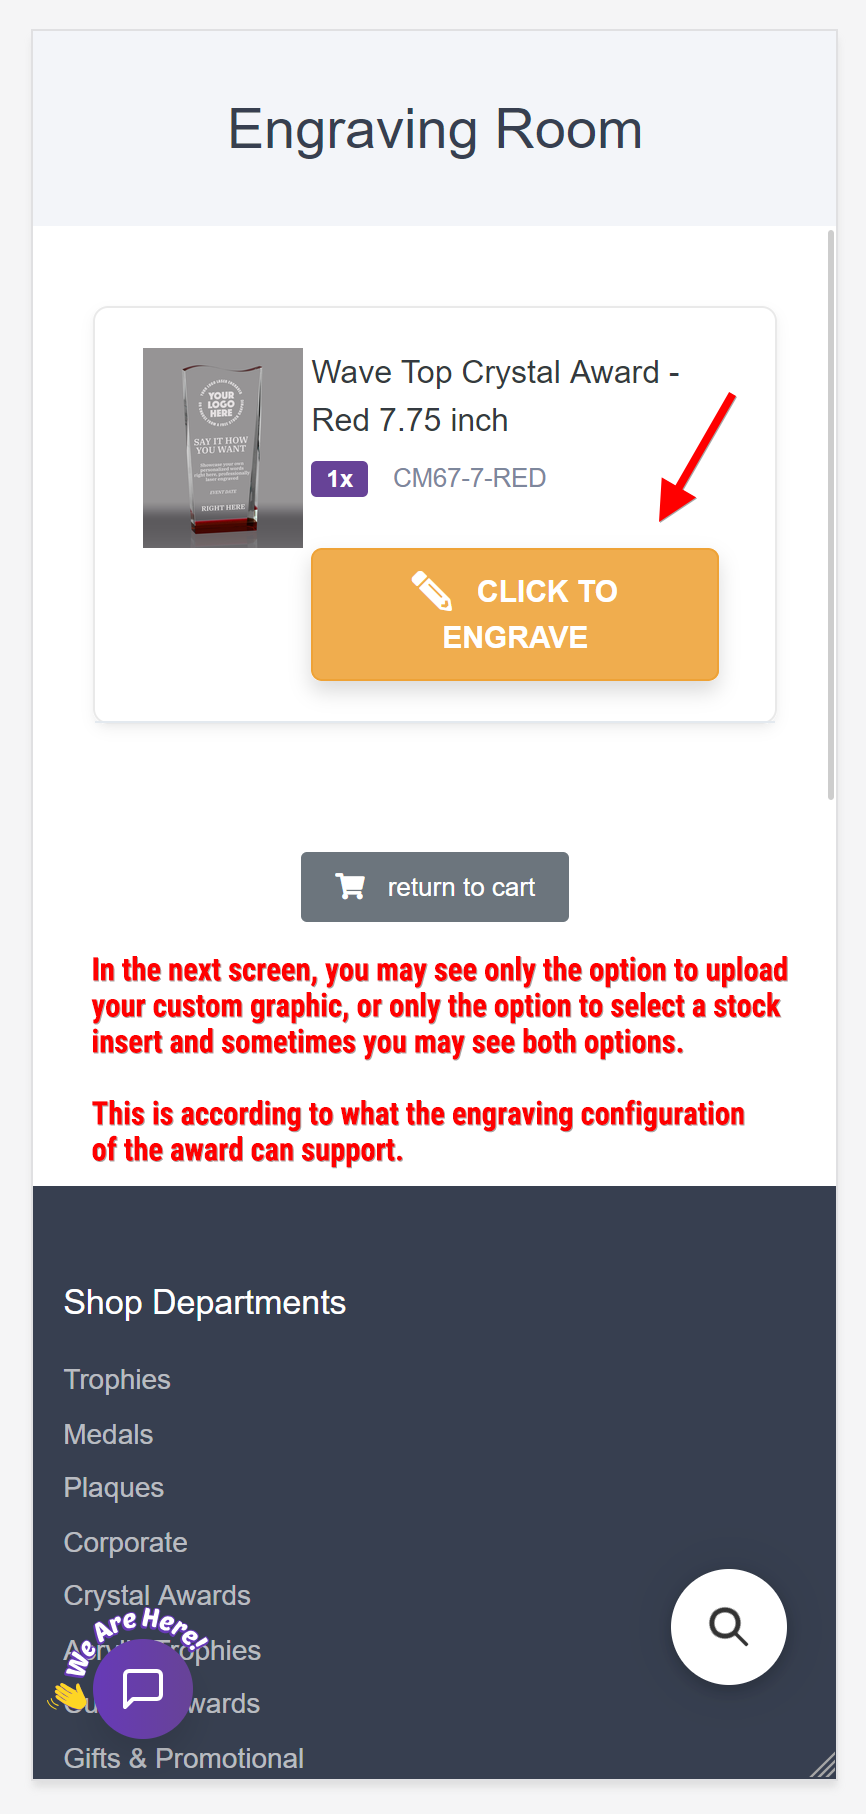
4 In the Engraving Room, tap the orange CLICK TO ENGRAVE button to start personalizing your award.
Upload your logo panel with Browse
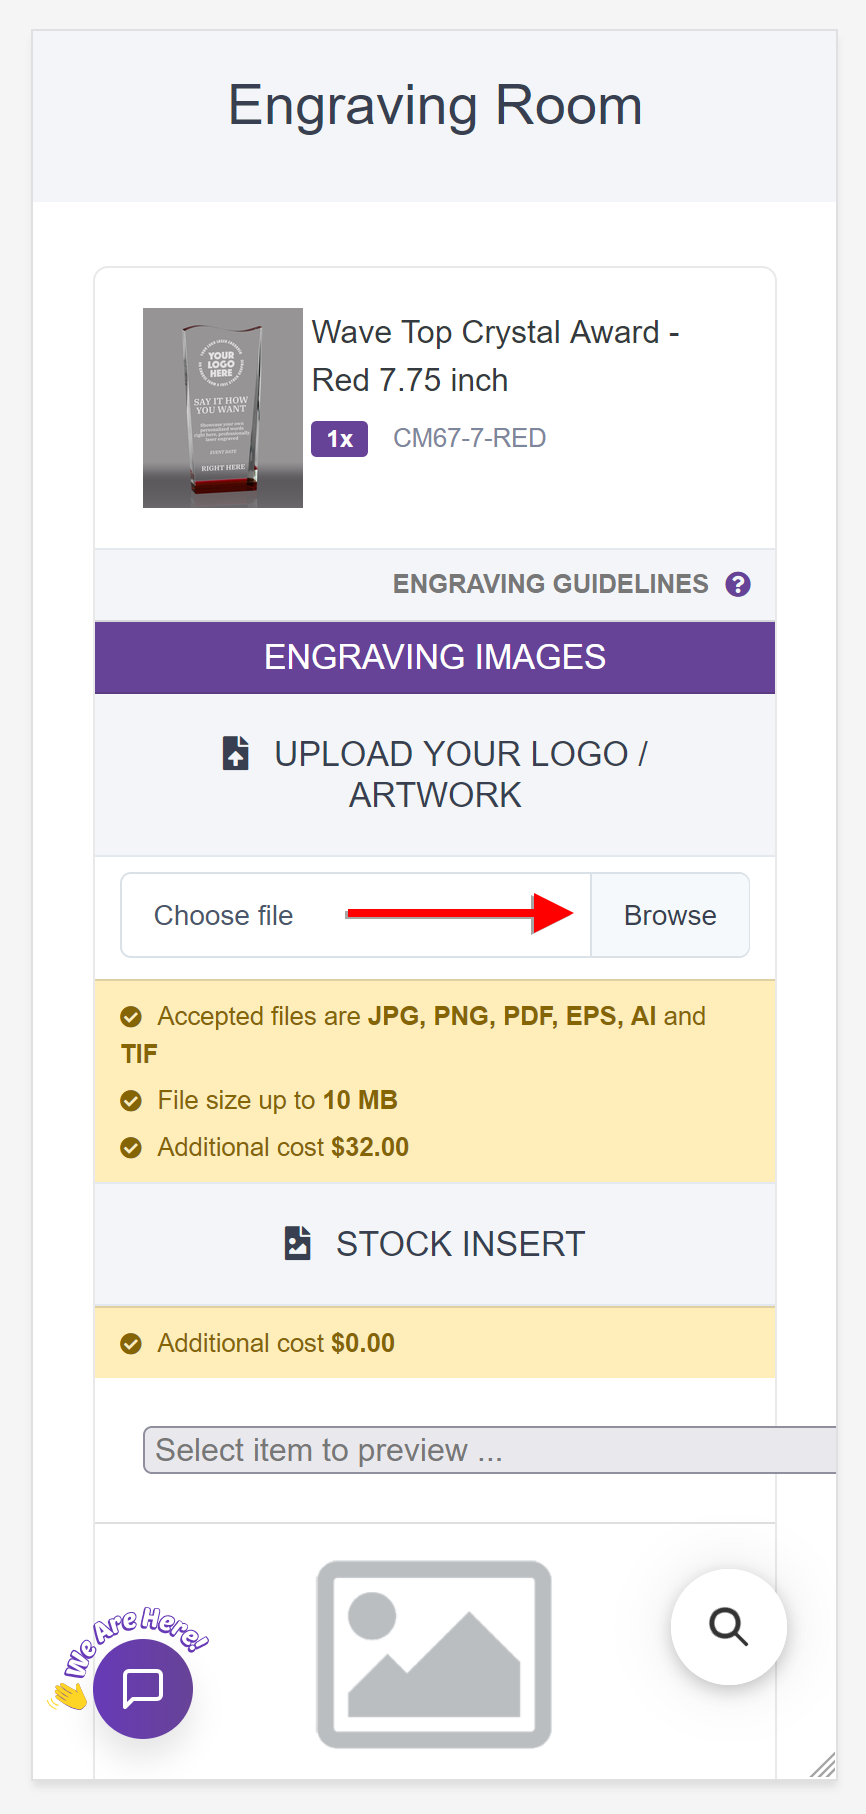
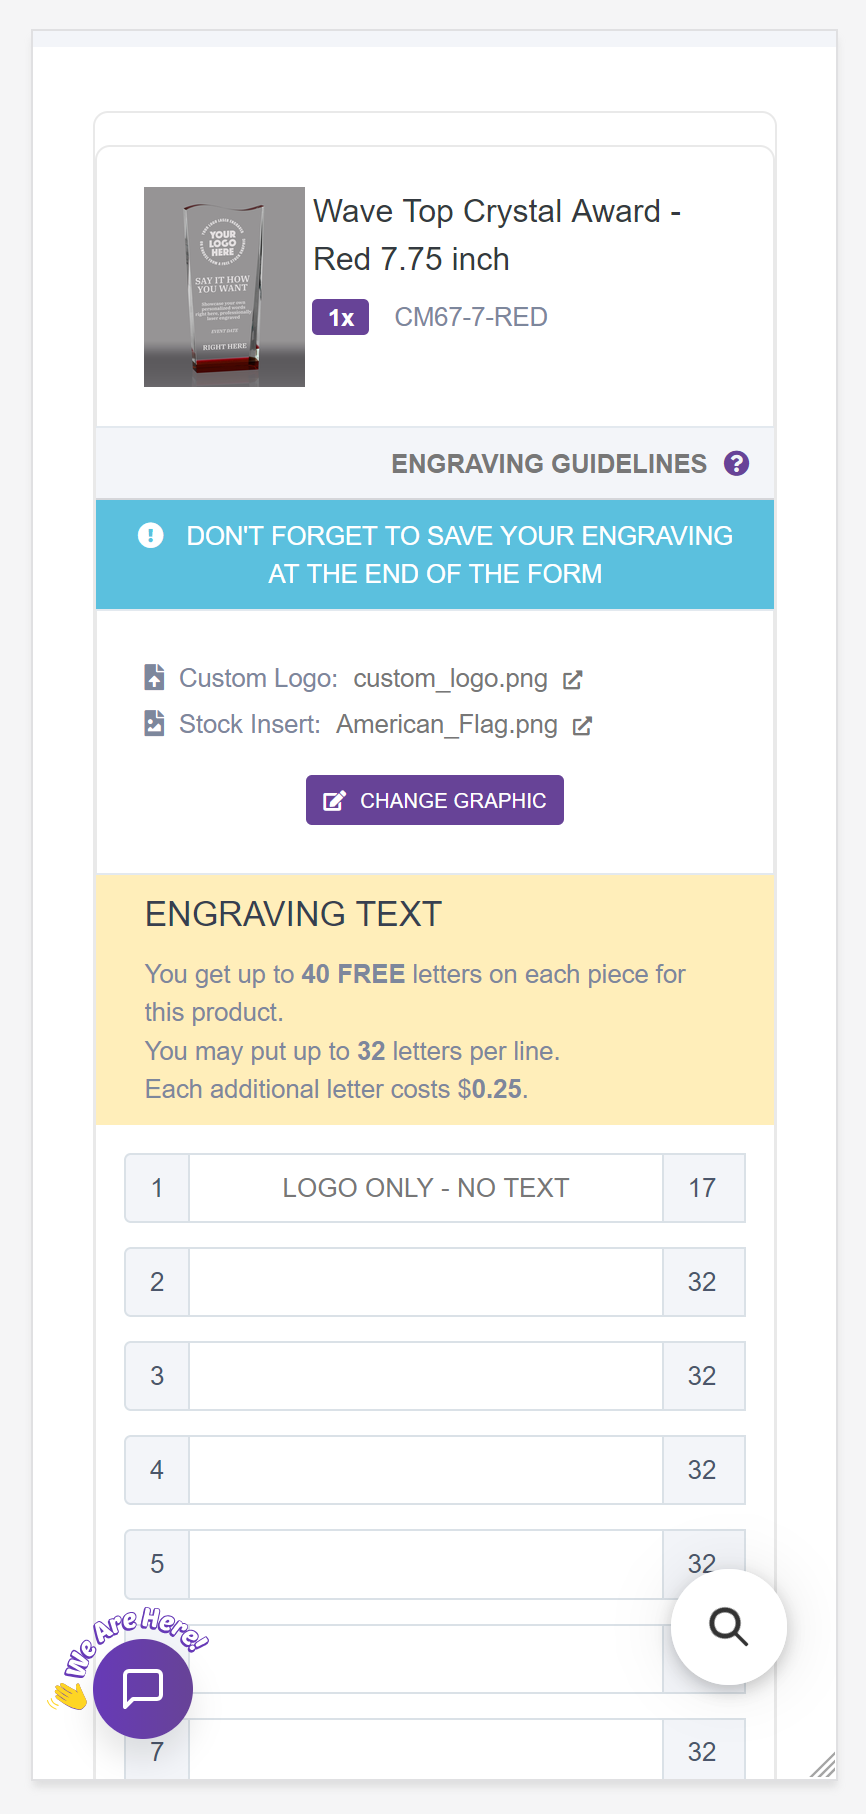
5 To add your own logo, tap Browse and choose an accepted file (JPG, PNG, PDF, EPS, AI, TIF; up to 10 MB).
Logo uploading spinner
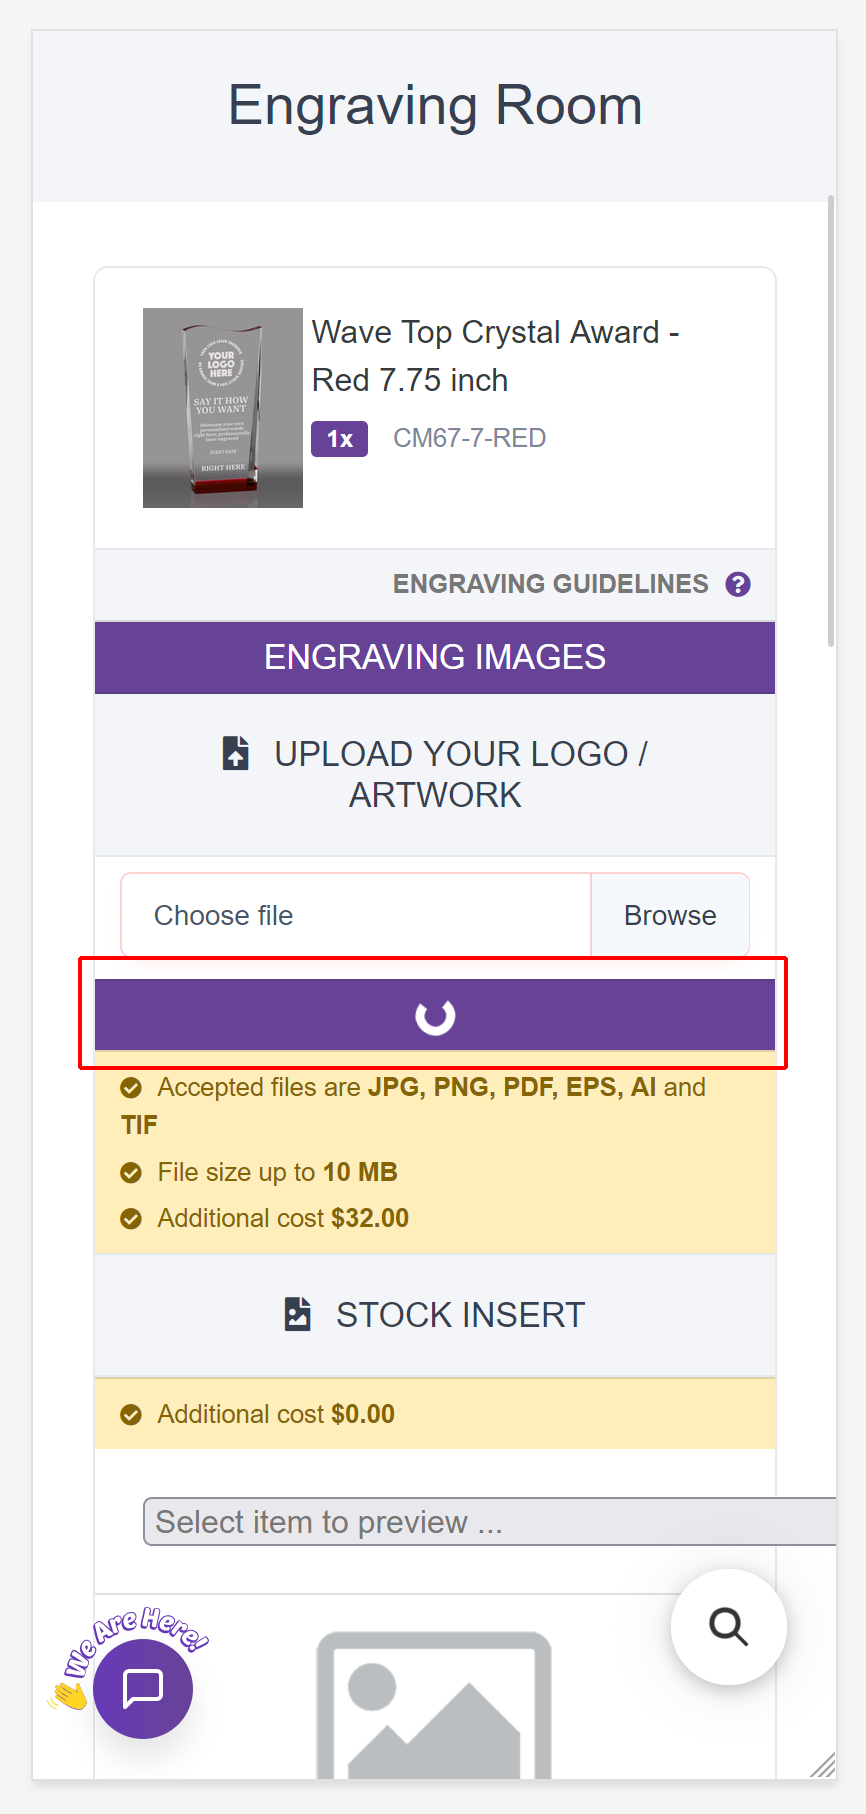
6 A spinner means your file is uploading — please wait a moment for it to finish.
Uploaded logo filename with change view remove
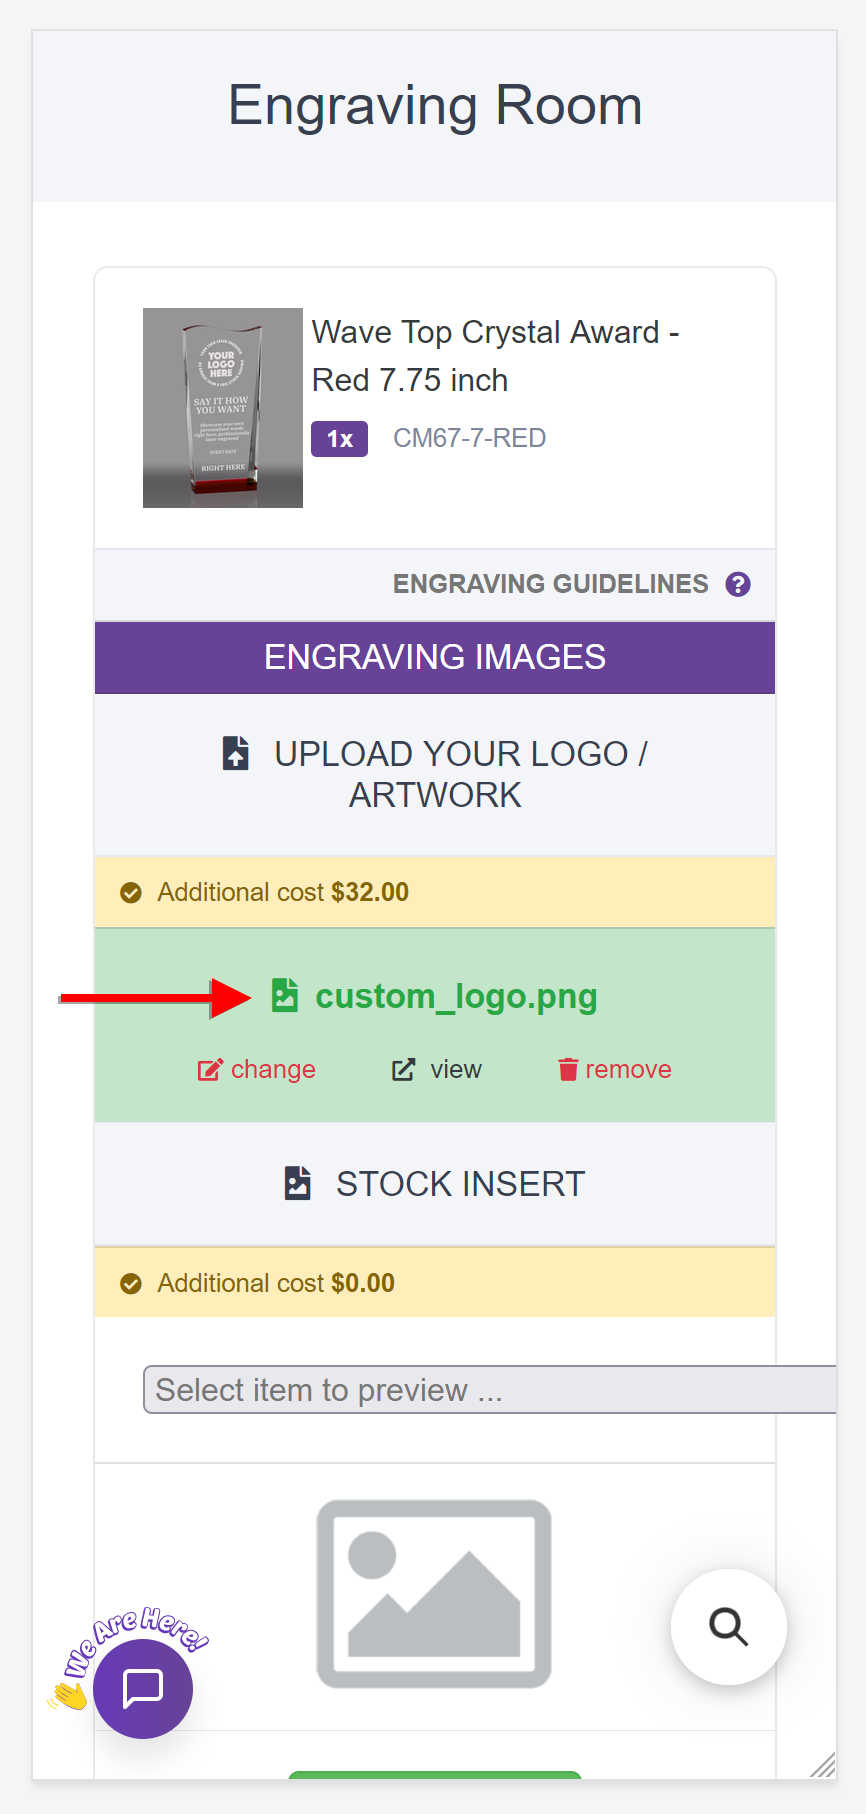
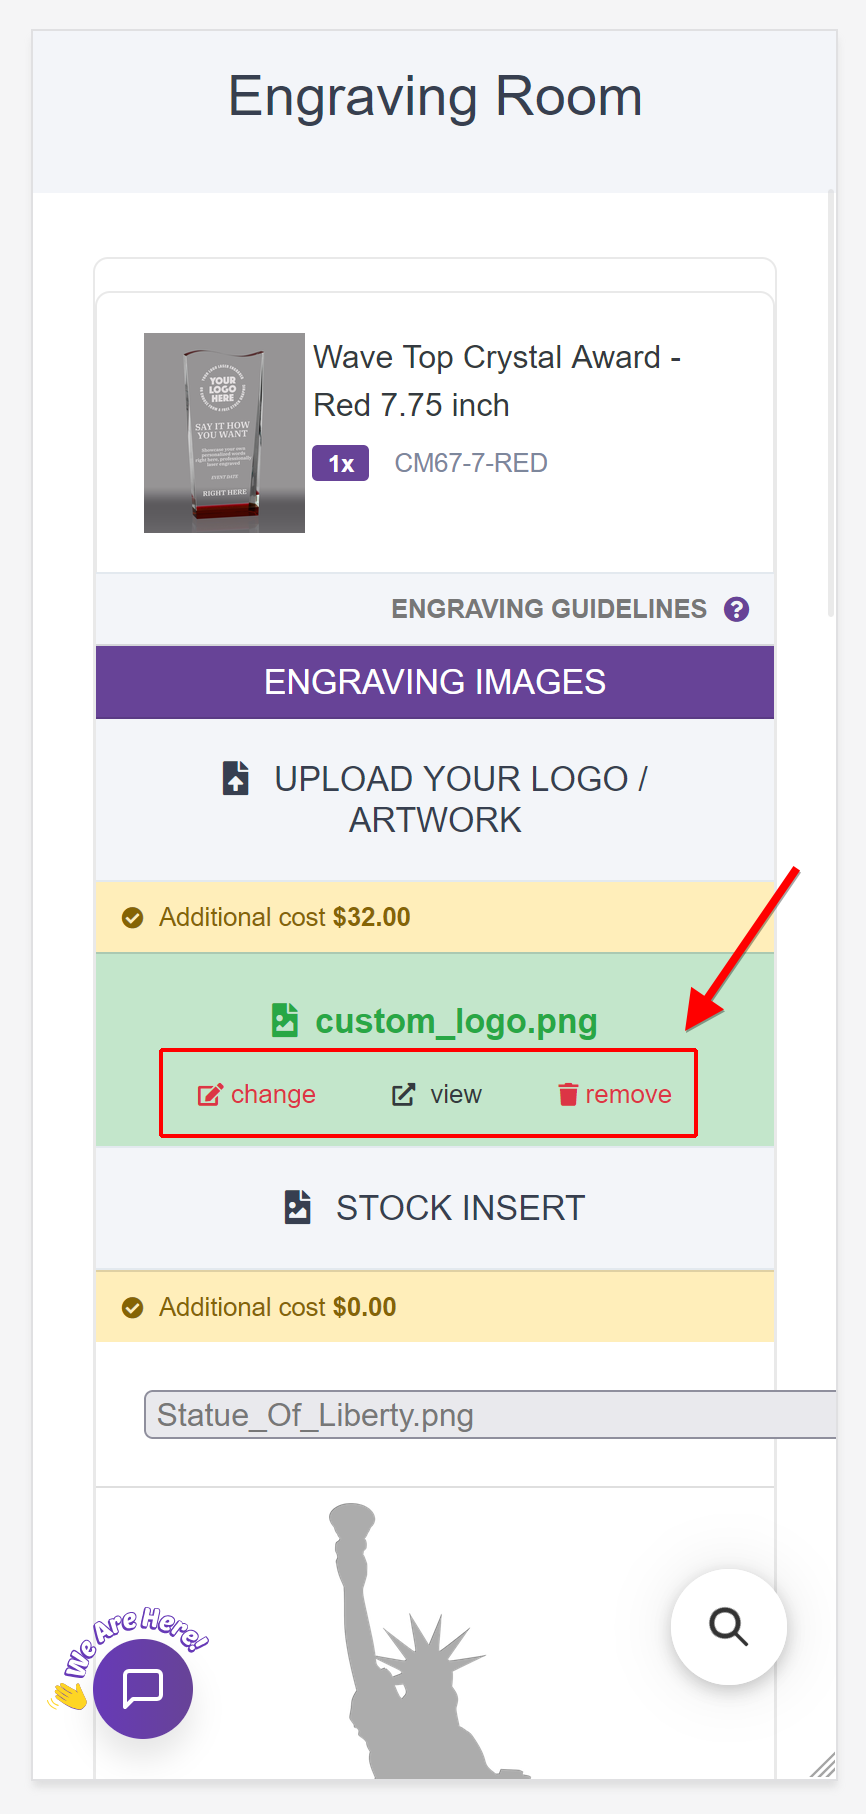
7 The green filename with change / view / remove links confirms your logo uploaded successfully.
Stock insert dropdown open
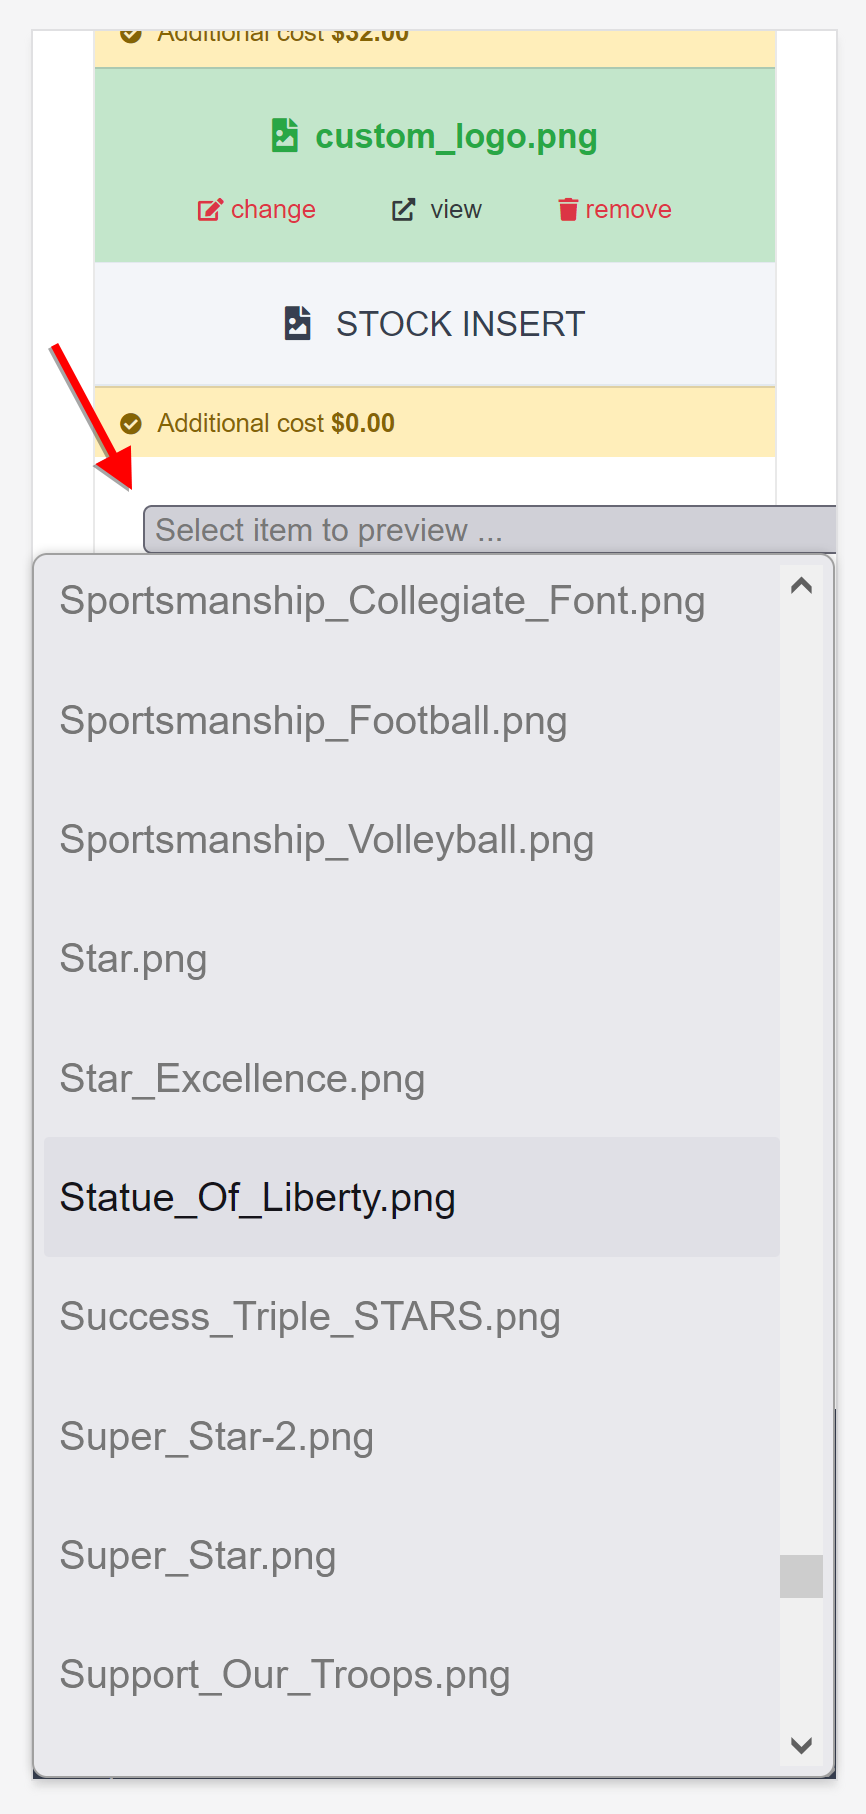
8 Prefer a free stock graphic? Open the stock-insert dropdown and choose from the gallery.
Stock insert preview with Continue and Skip Graphic
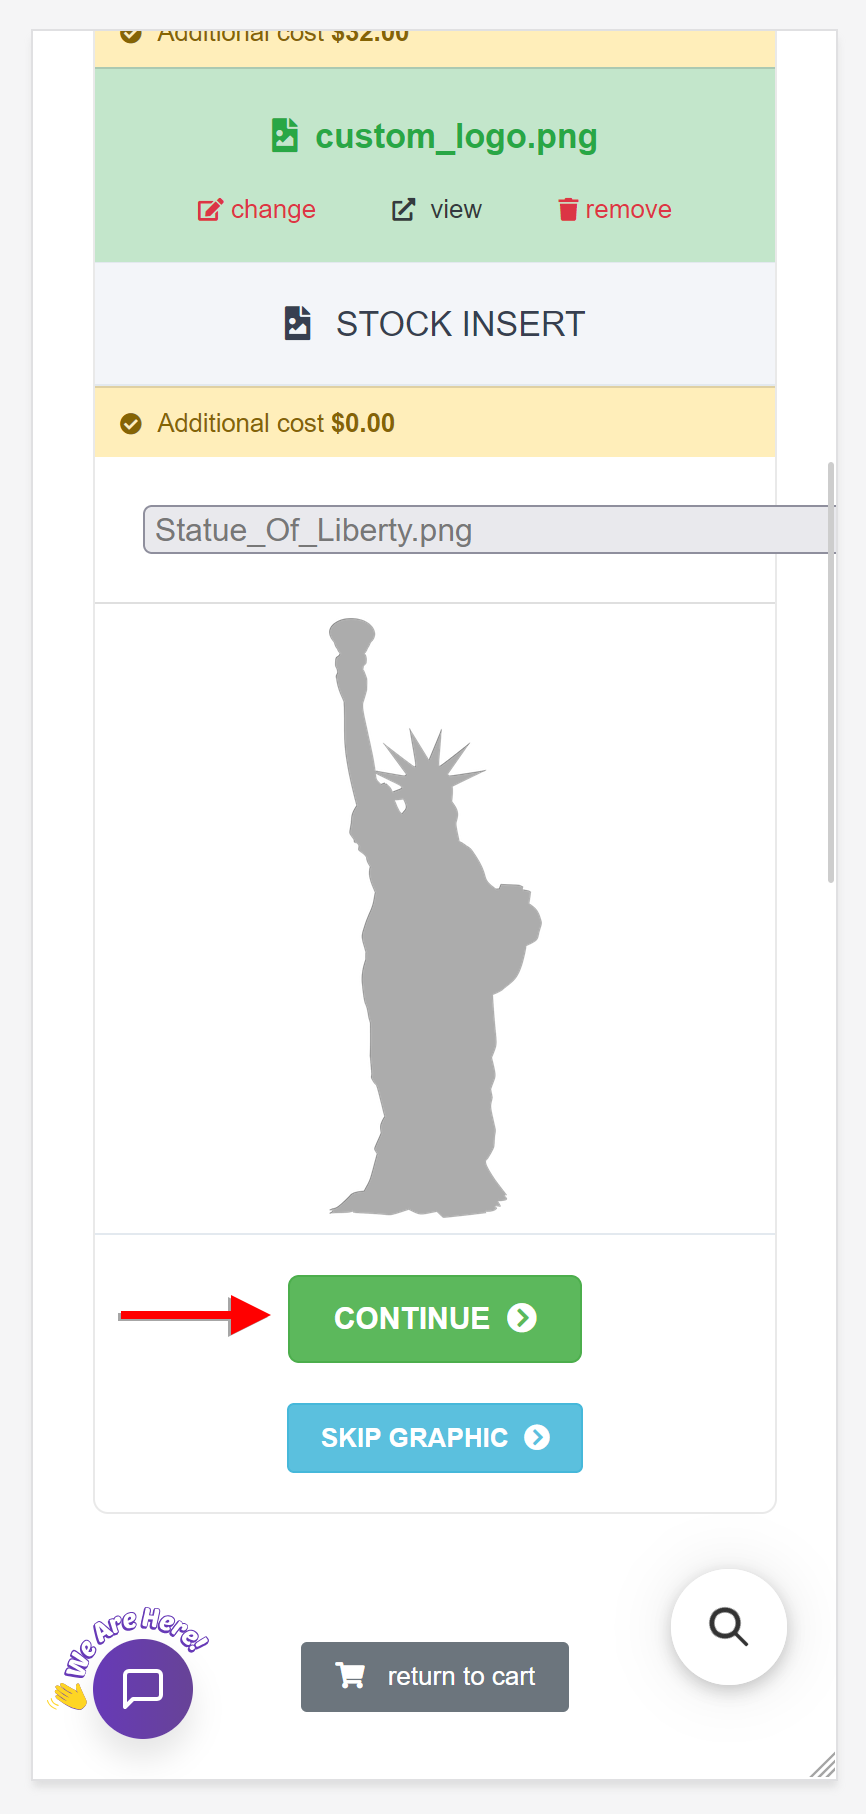
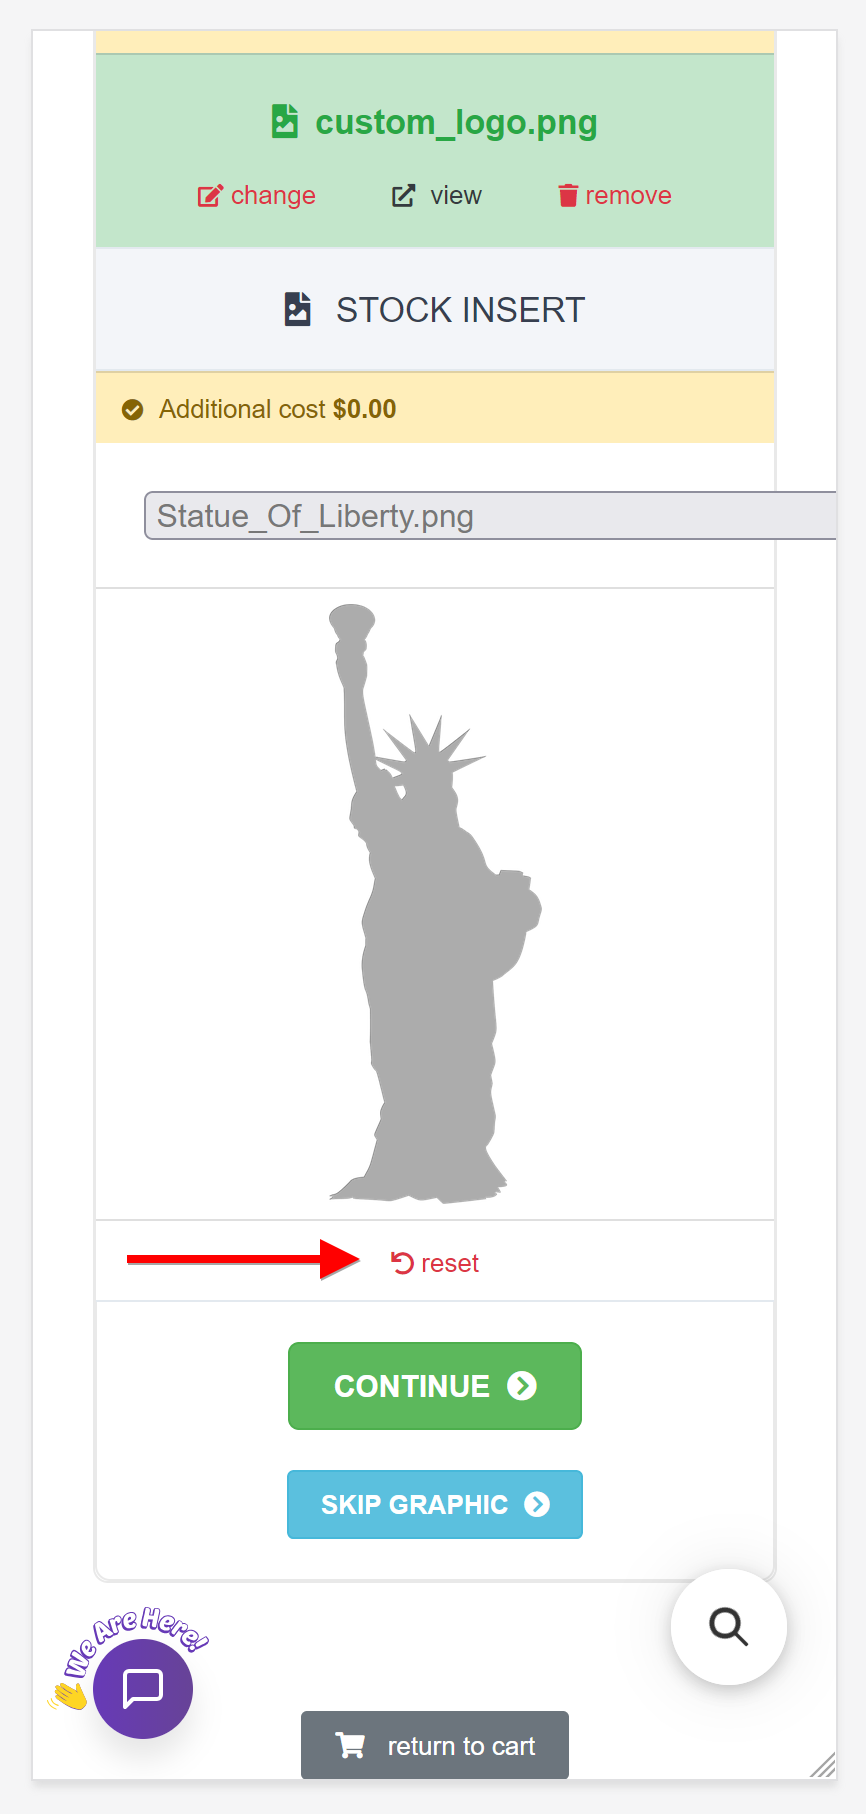
9 Your chosen graphic previews; tap the green CONTINUE button, or blue SKIP GRAPHIC to skip it.
Text form with the graphic summarized
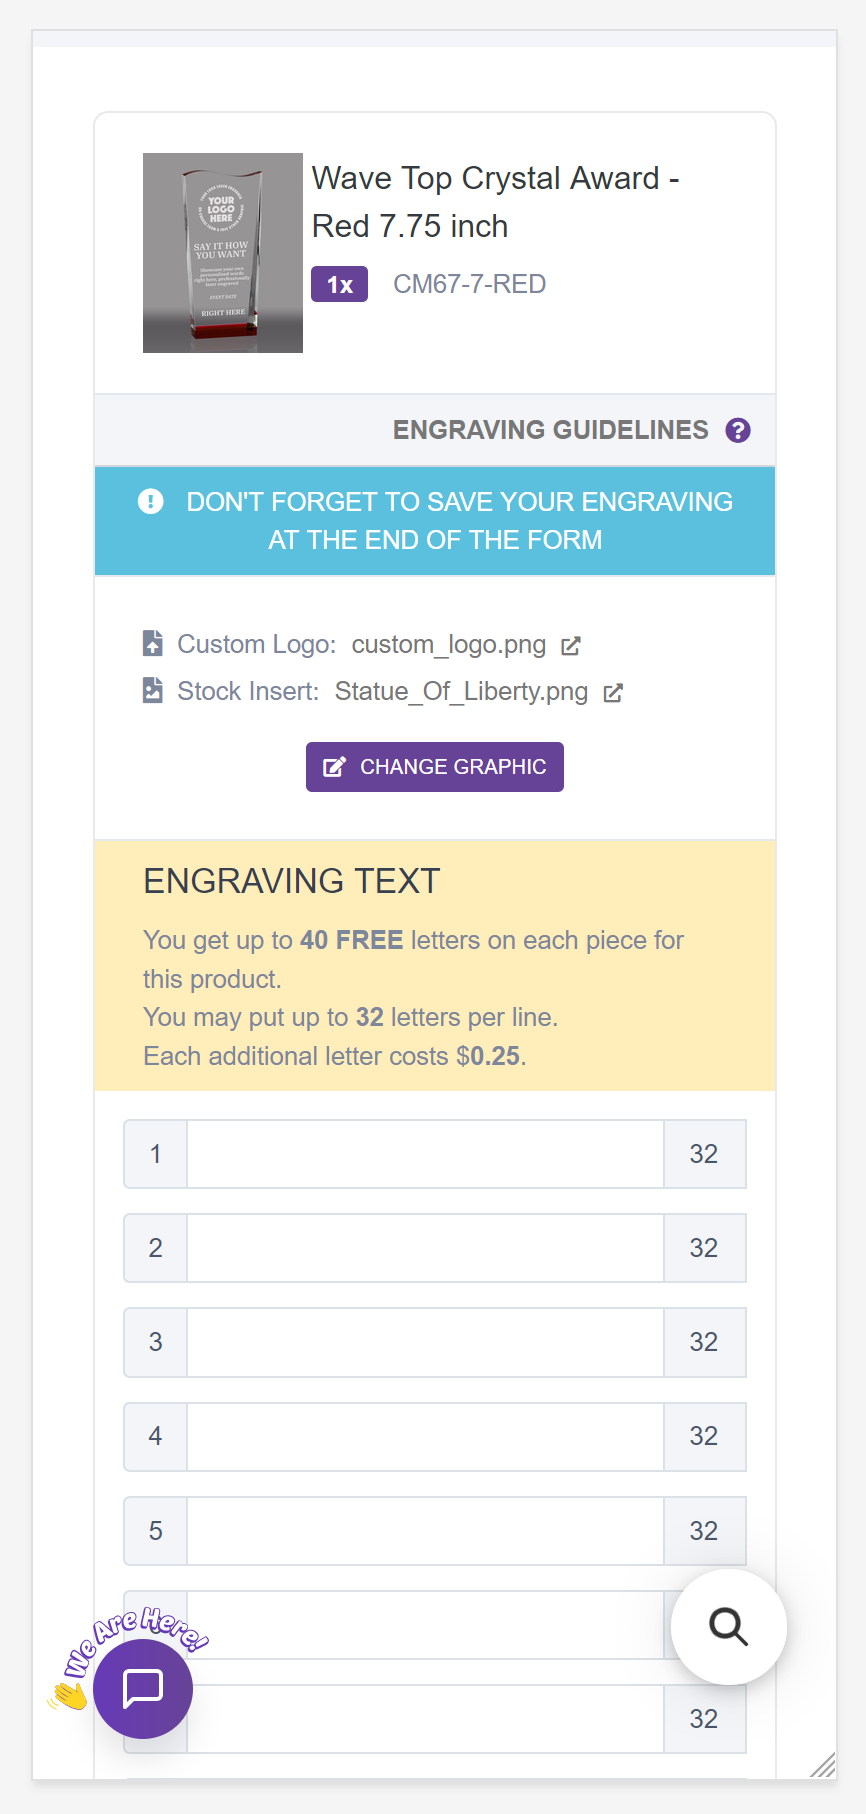
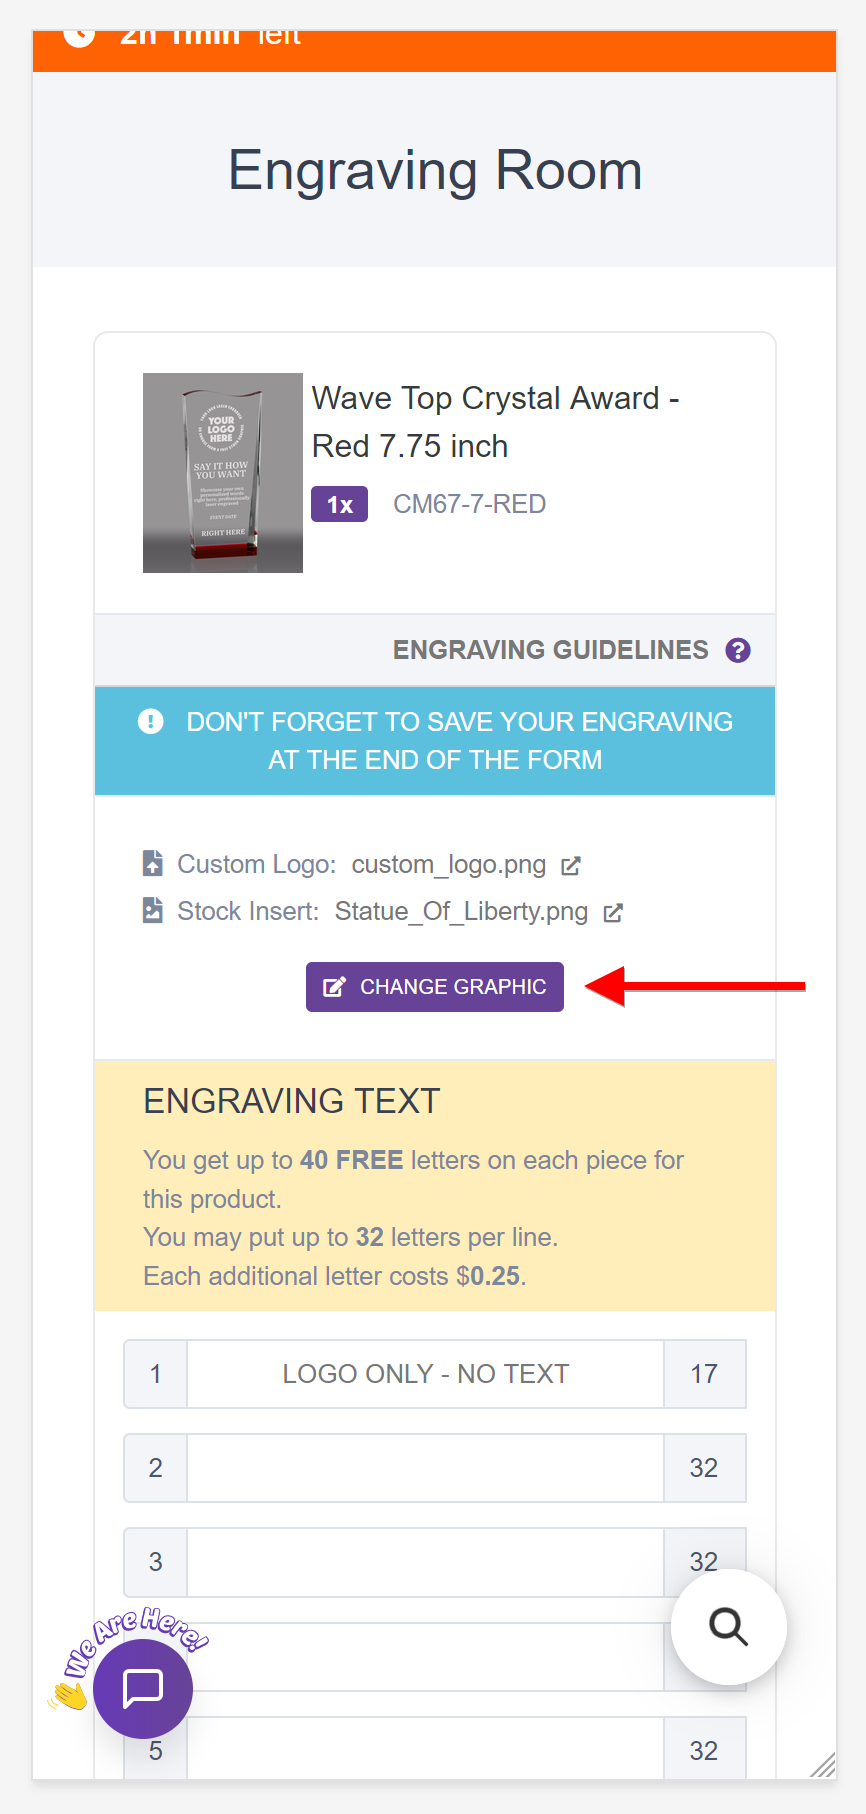
10 Your graphic is summarized at the top; add engraving text below, or tap CHANGE GRAPHIC to swap it.
Save and Review or Skip Text buttons
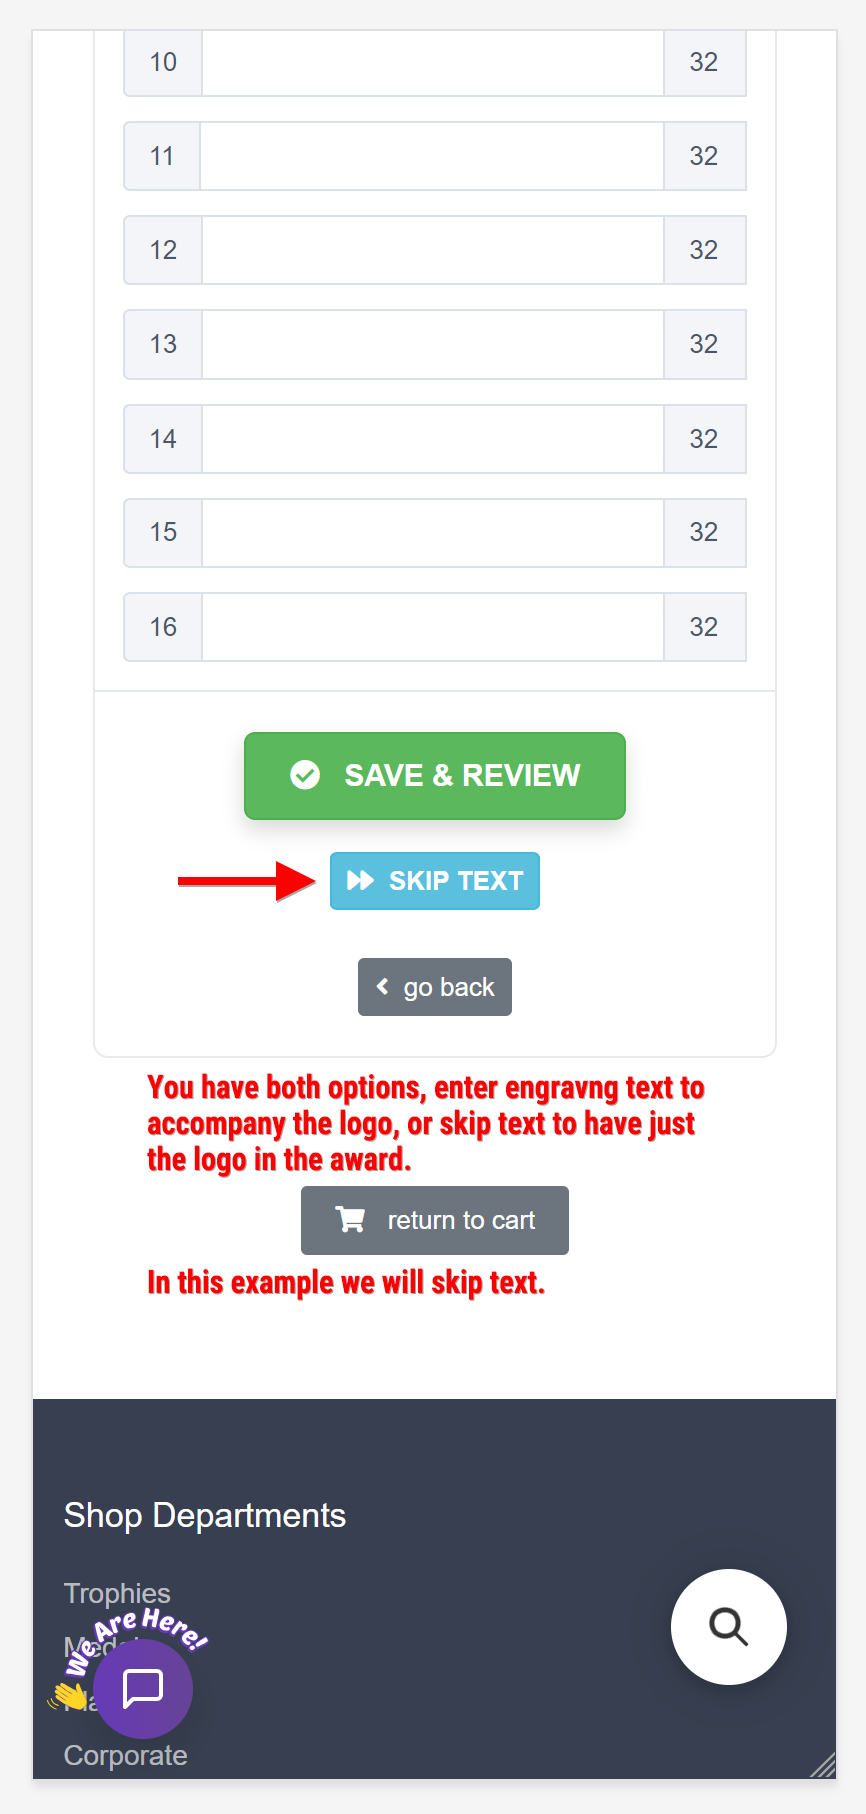
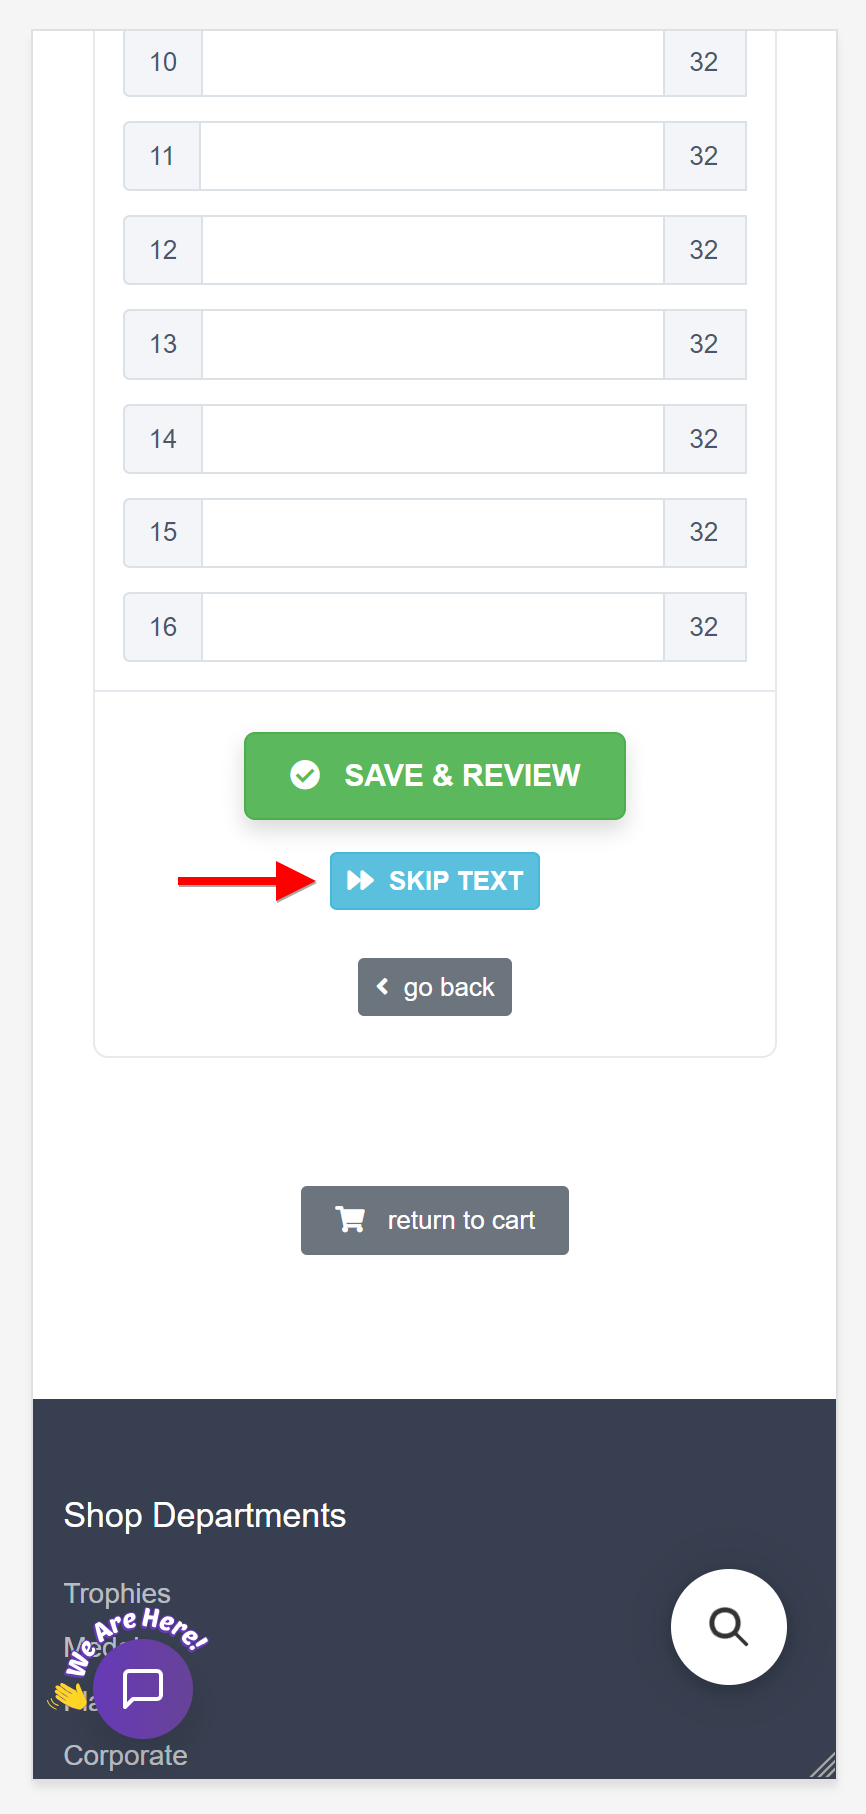
11 For a logo-only award, tap the blue SKIP TEXT button instead of green SAVE & REVIEW.
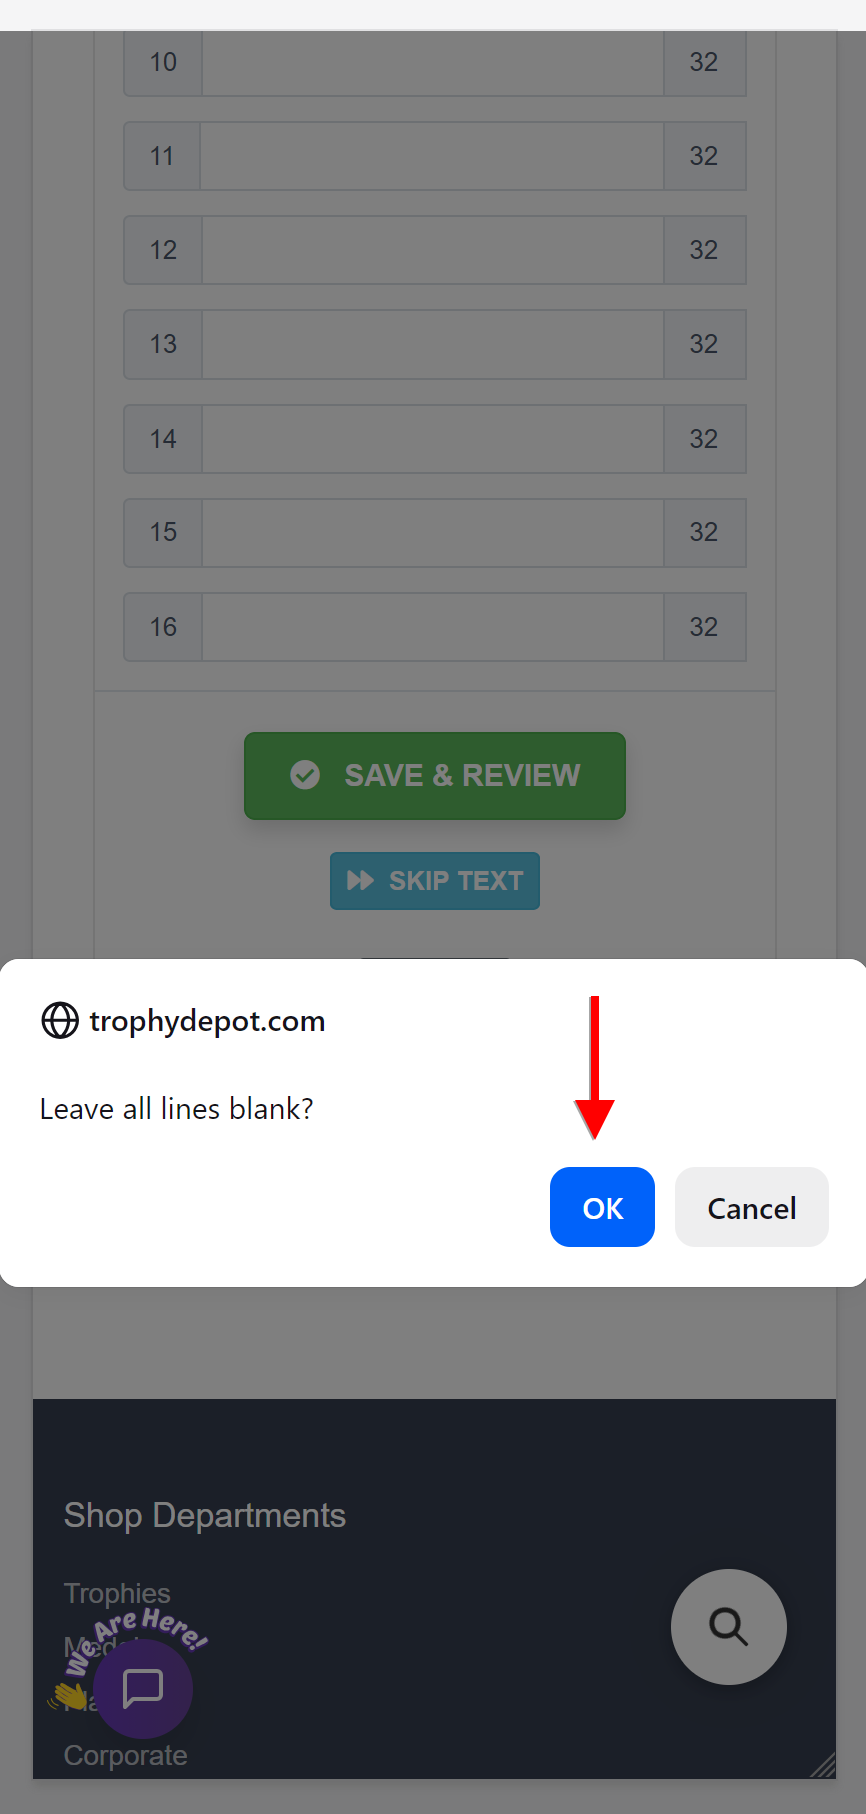
Leave all lines blank dialog with OK
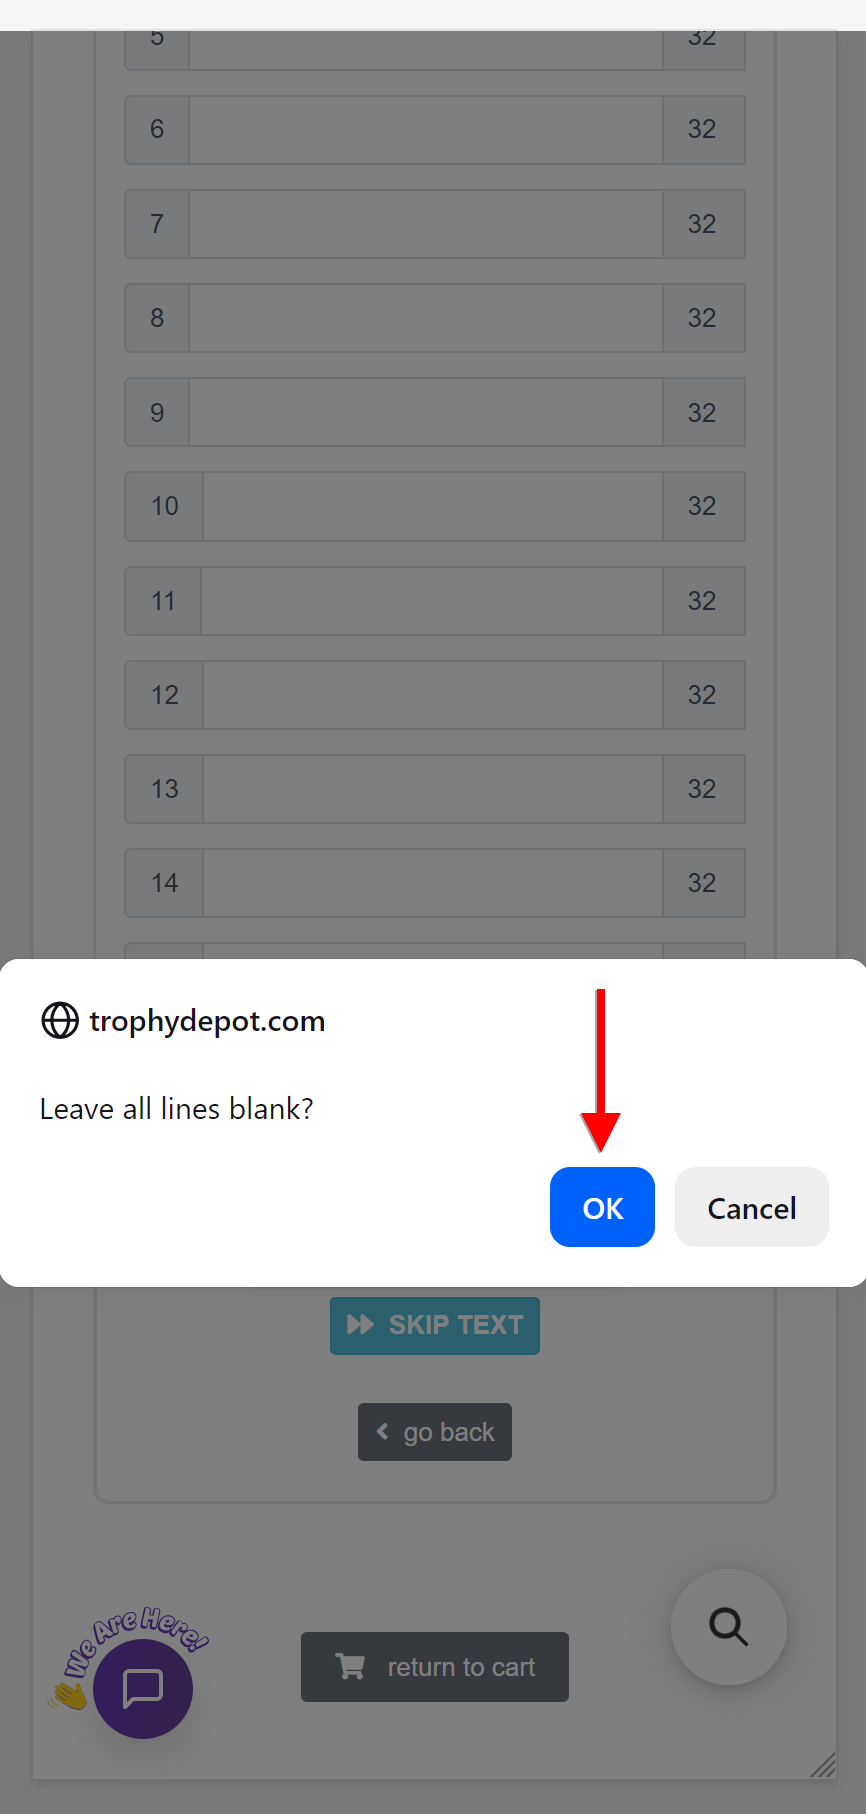
12 Confirm the “Leave all lines blank?” pop-up by tapping OK to keep your award logo-only.
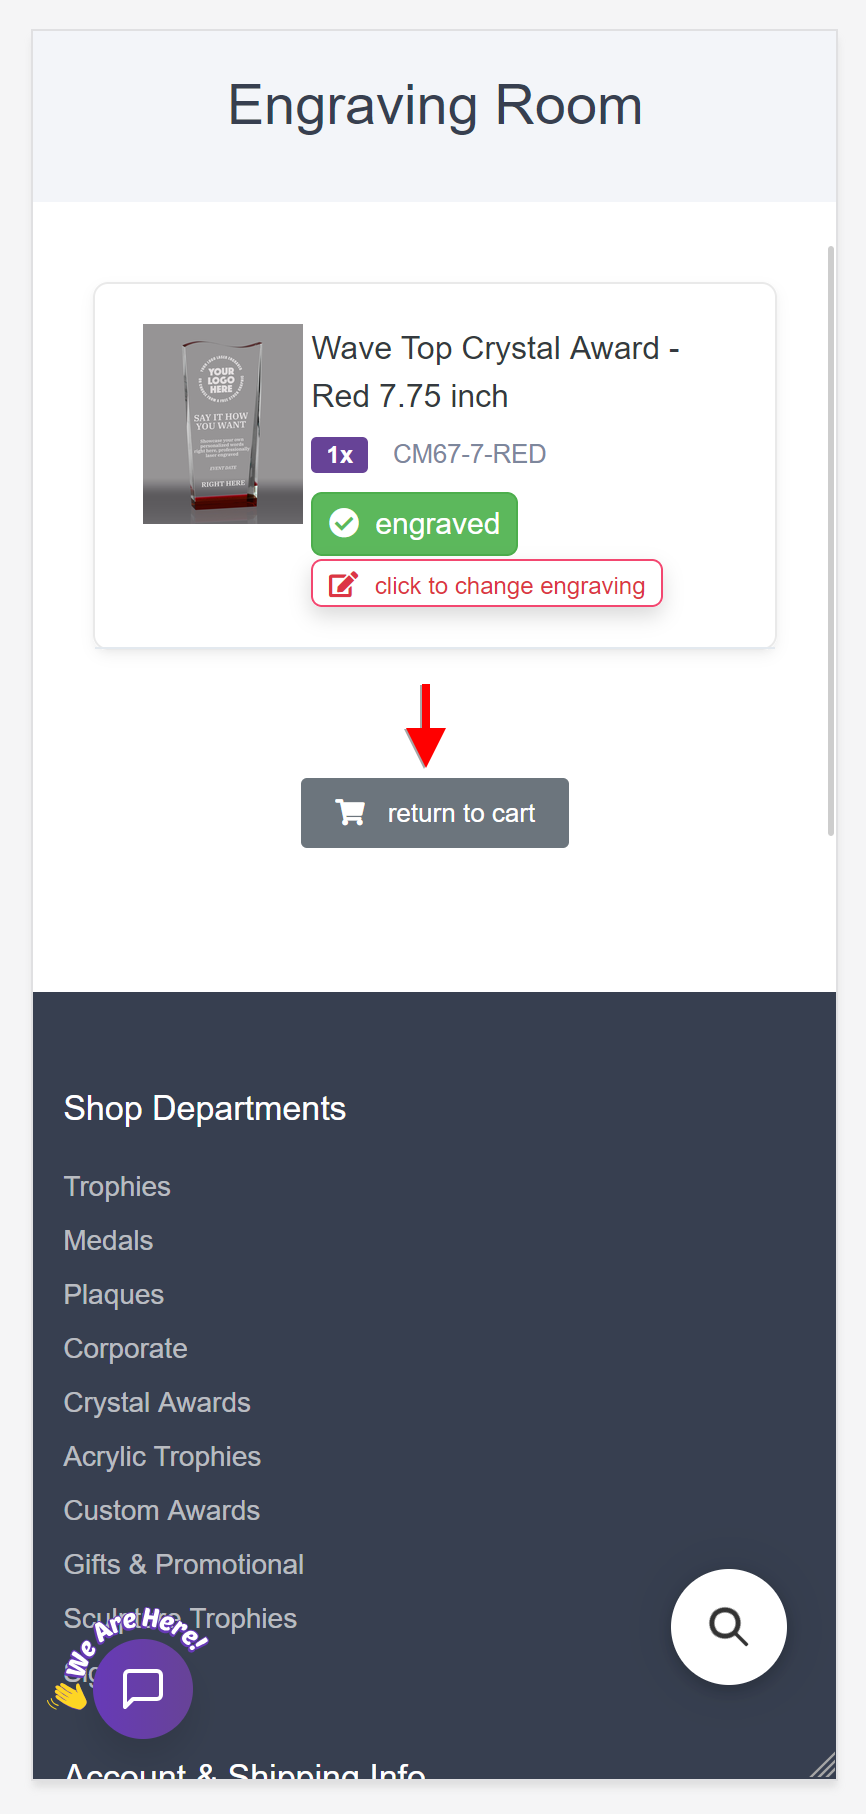
Green engraved badge, return to cart
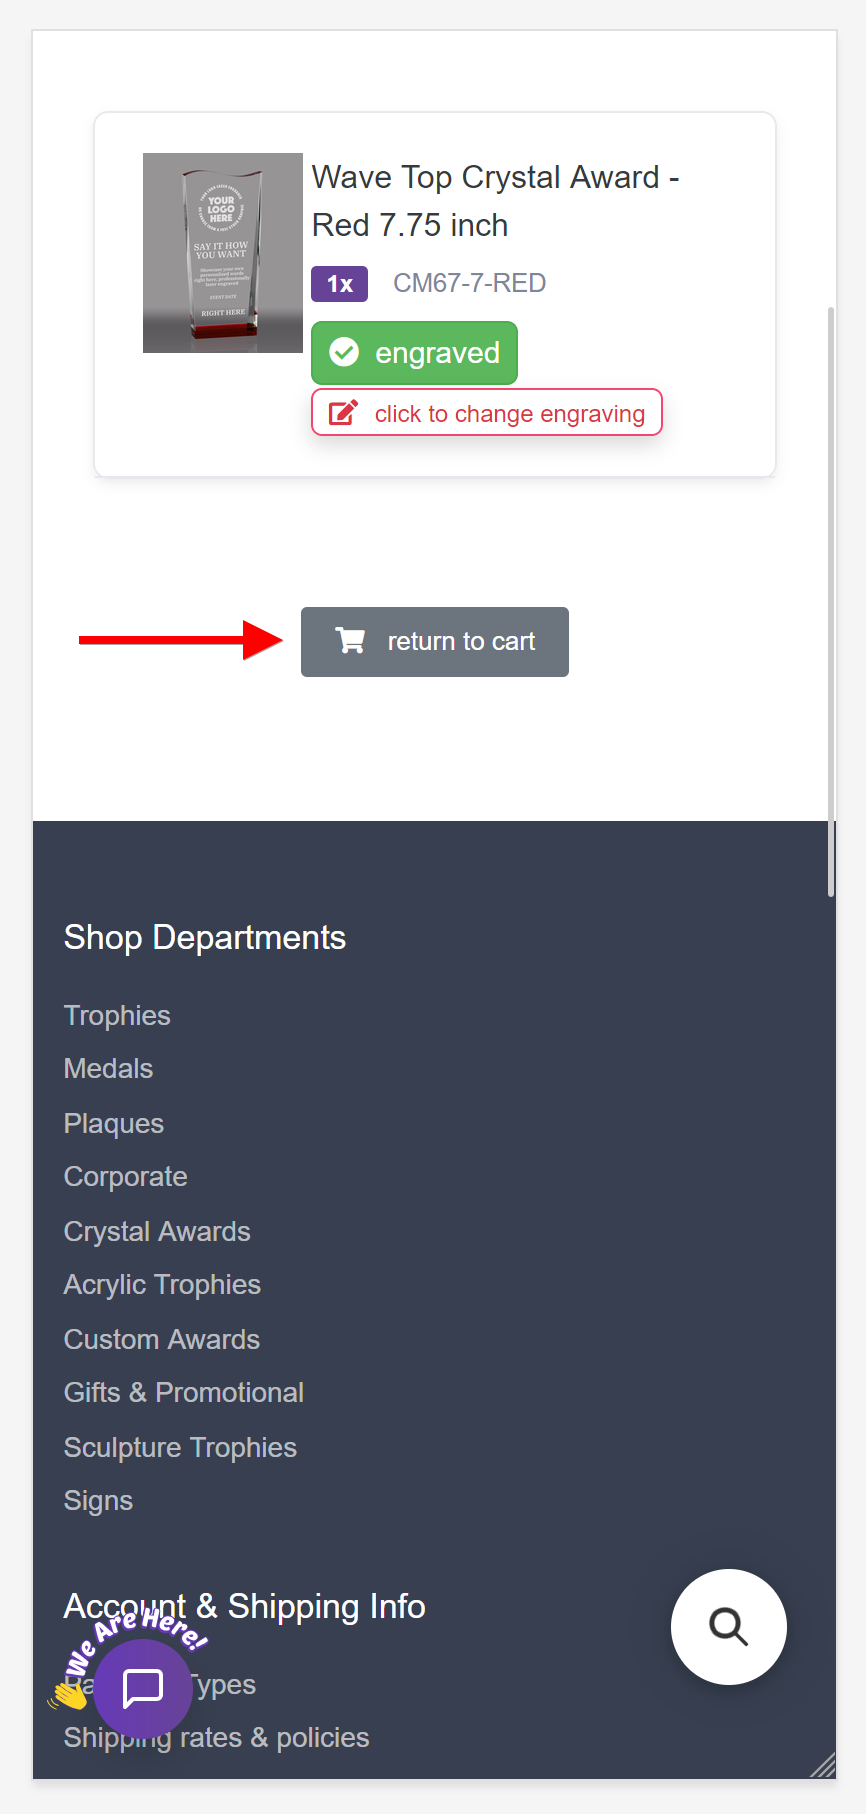
13 The green “engraved” badge confirms you're done; tap “return to cart” to continue.
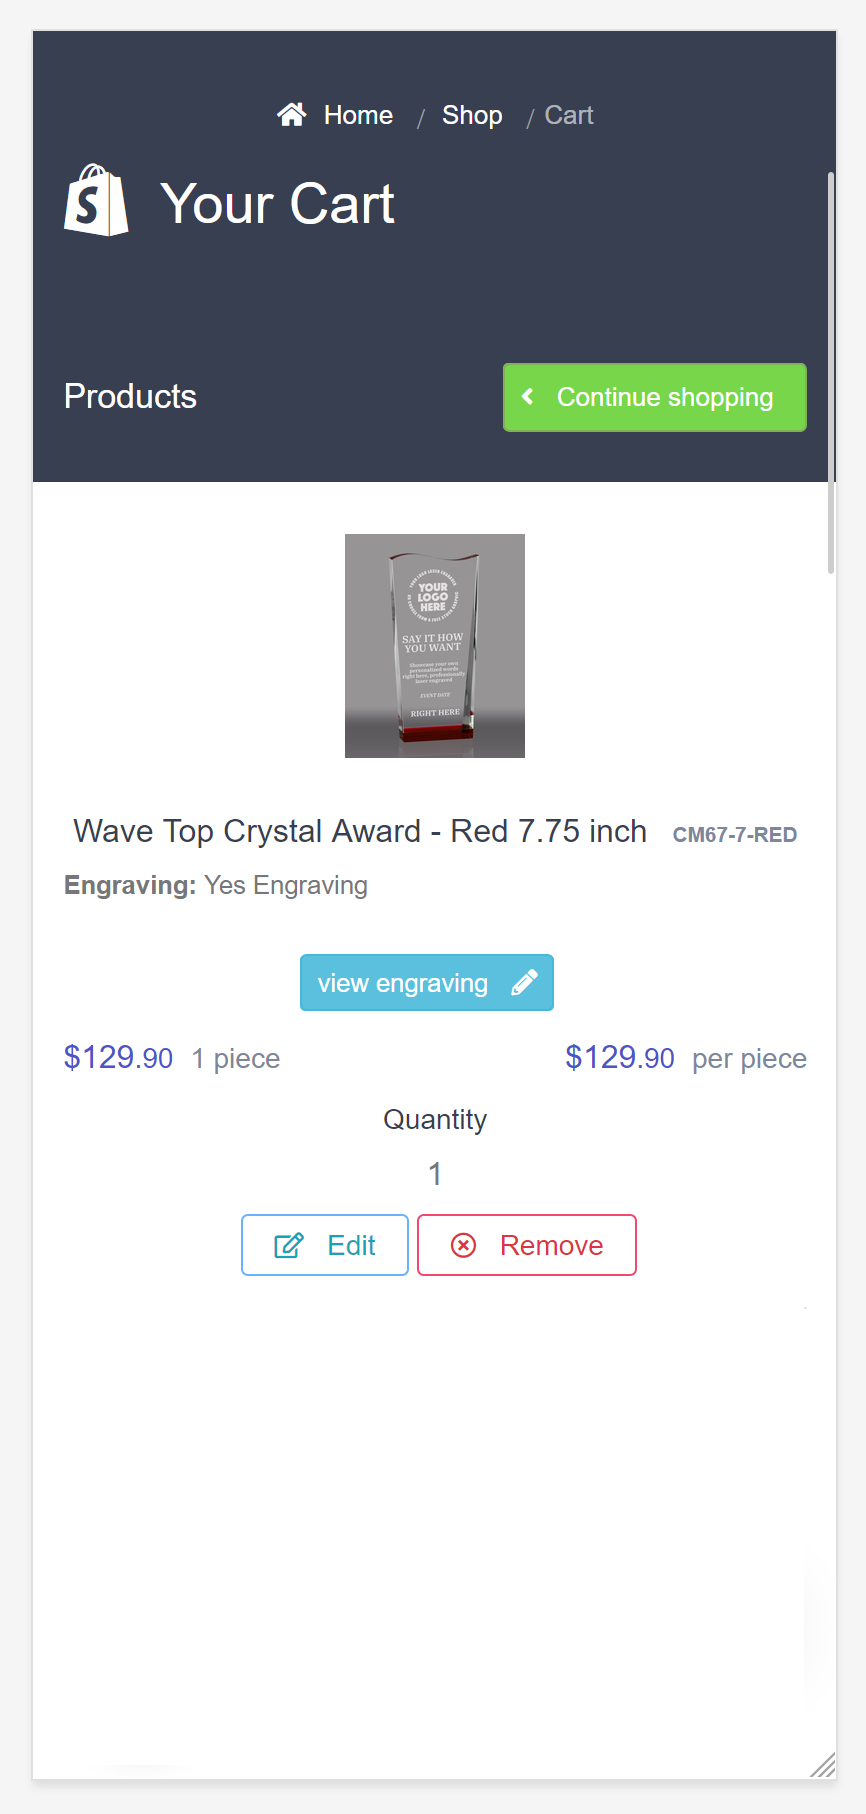
Cart showing Engraving Yes Engraving
14 Back in your cart, the item shows “Engraving: Yes Engraving” with a “view engraving” button.
Change a graphic you added Swap or reset a logo or stock insert already attached

Reopen the engraving and tap CHANGE GRAPHIC. Use remove on an uploaded file, or the reset control on a stock insert, then pick a new one. On a logo-only award, line 1 reading “LOGO ONLY - NO TEXT” is an automatic marker — leave it, or type over it if you now want text.

Cart item with view engraving button
1 To change a saved graphic, tap the blue “view engraving” button on your cart item.
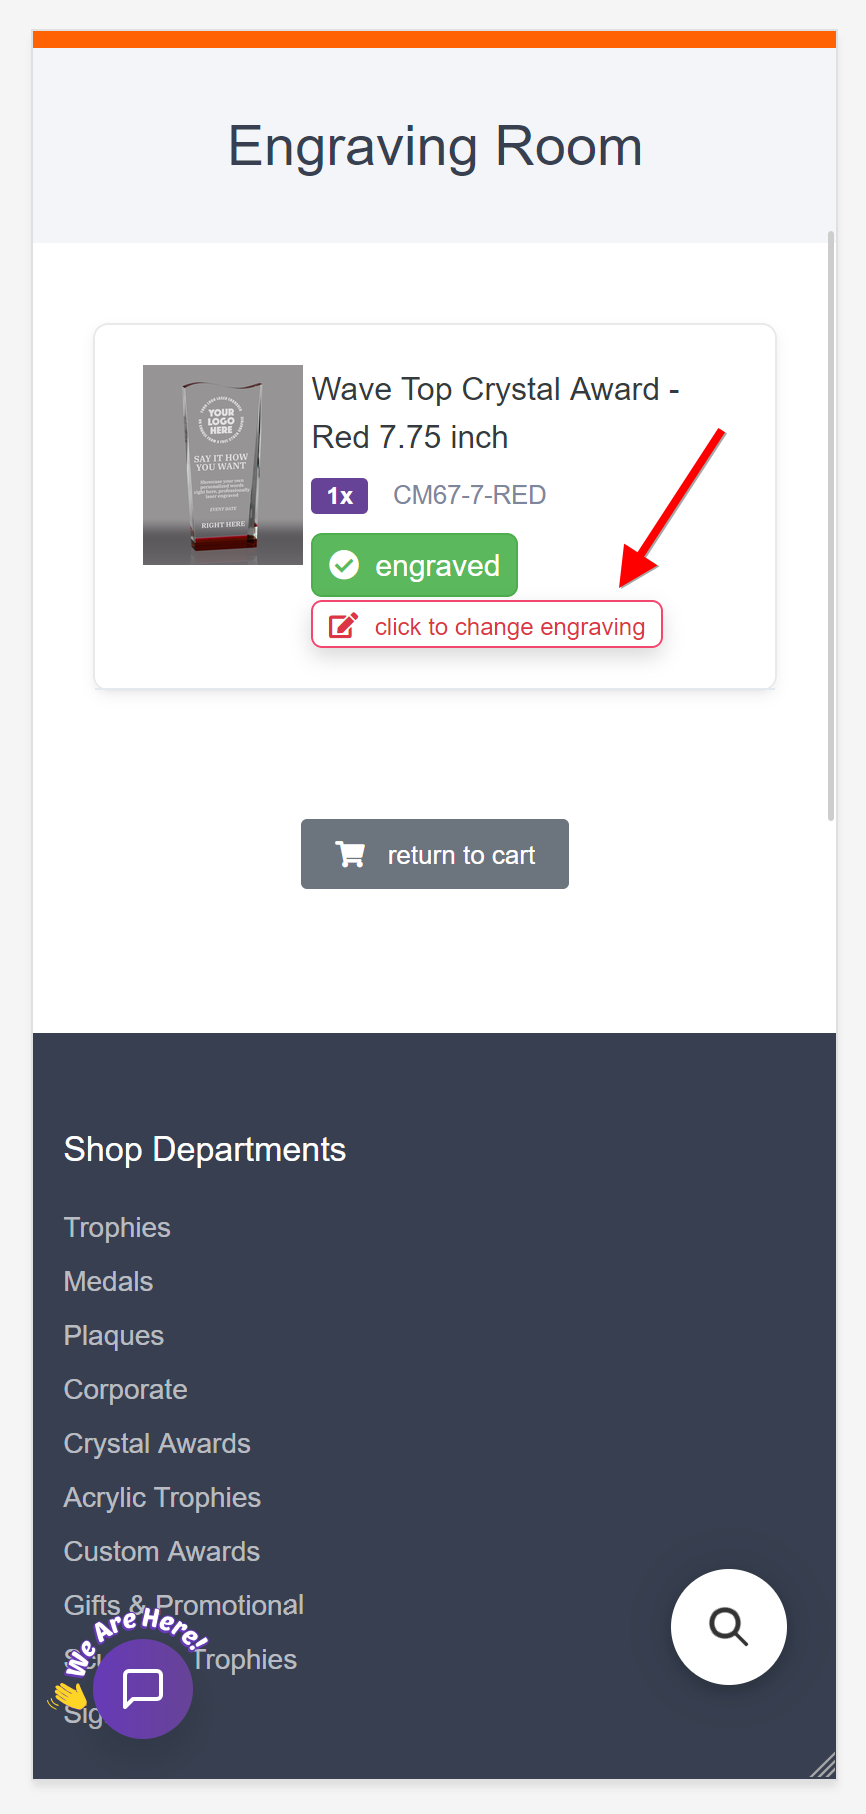
Engraving Room with click to change engraving
2 In the Engraving Room, tap the “click to change engraving” link under the green “engraved” badge.
Change Engraving dialog with OK
3 Confirm the “Change Engraving?” pop-up by tapping OK to reopen your graphic and text.
Reopened form with Change Graphic button
4 In the reopened form, tap the purple CHANGE GRAPHIC button to swap your logo or stock insert.
Current logo with change view remove
5 Use the change / view / remove links to replace or delete your current uploaded logo.
Reset link below the stock insert preview
6 To swap a stock graphic, tap the reset (↻) link below the current preview.
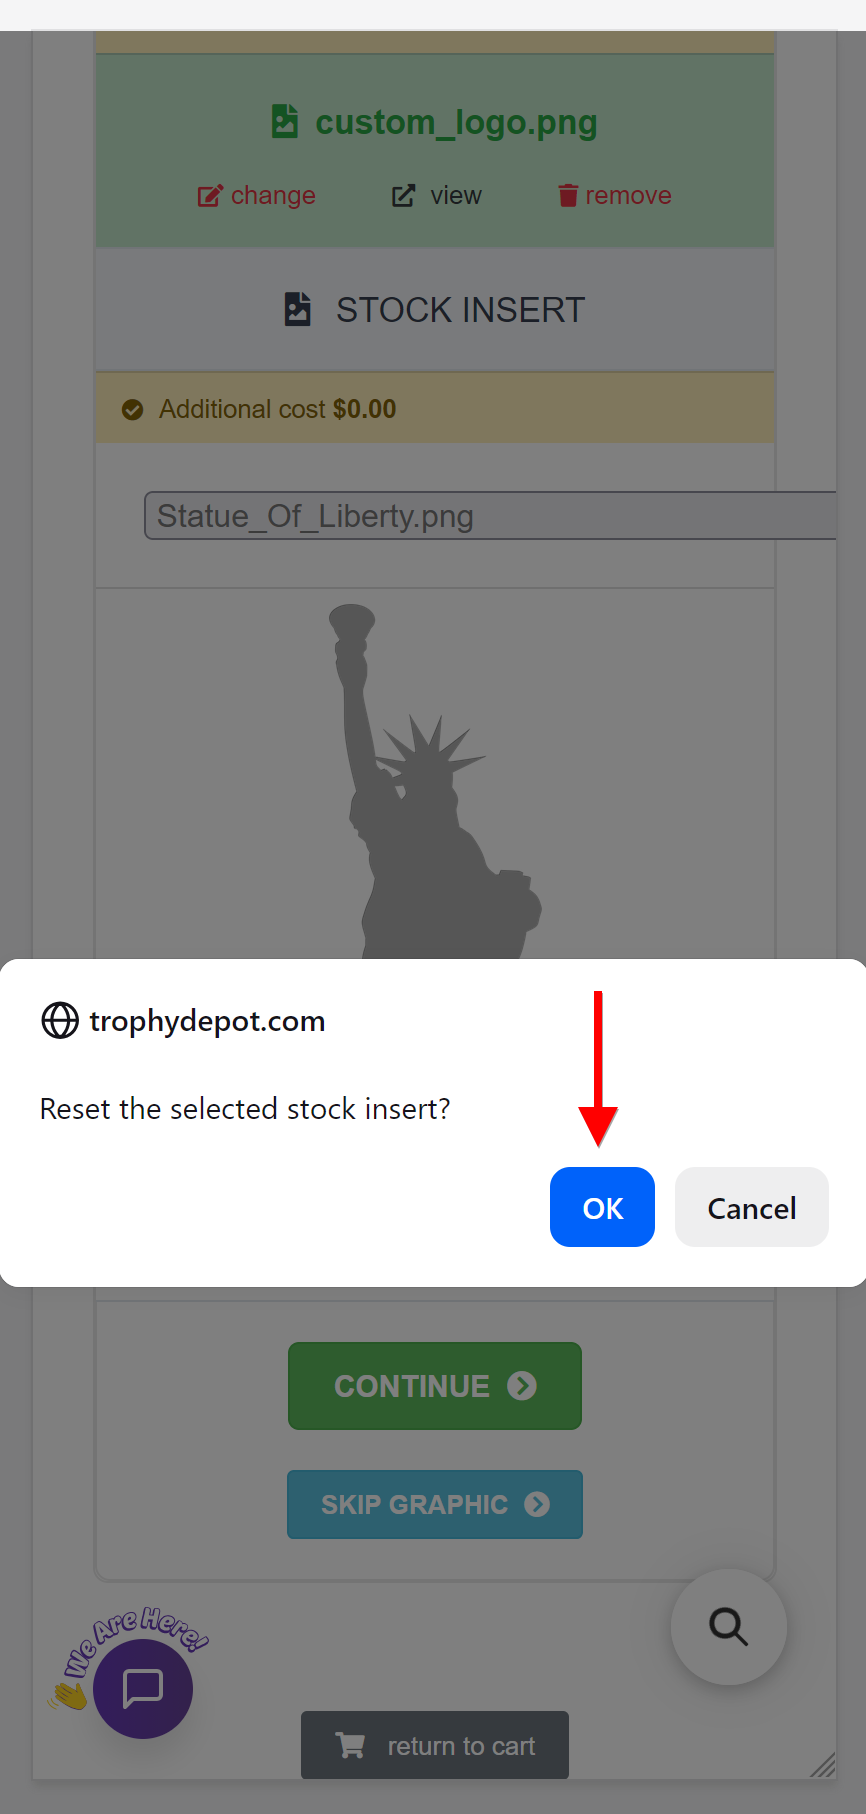
Reset stock insert dialog with OK
7 Confirm the “Reset the selected stock insert?” pop-up by tapping OK to clear it.
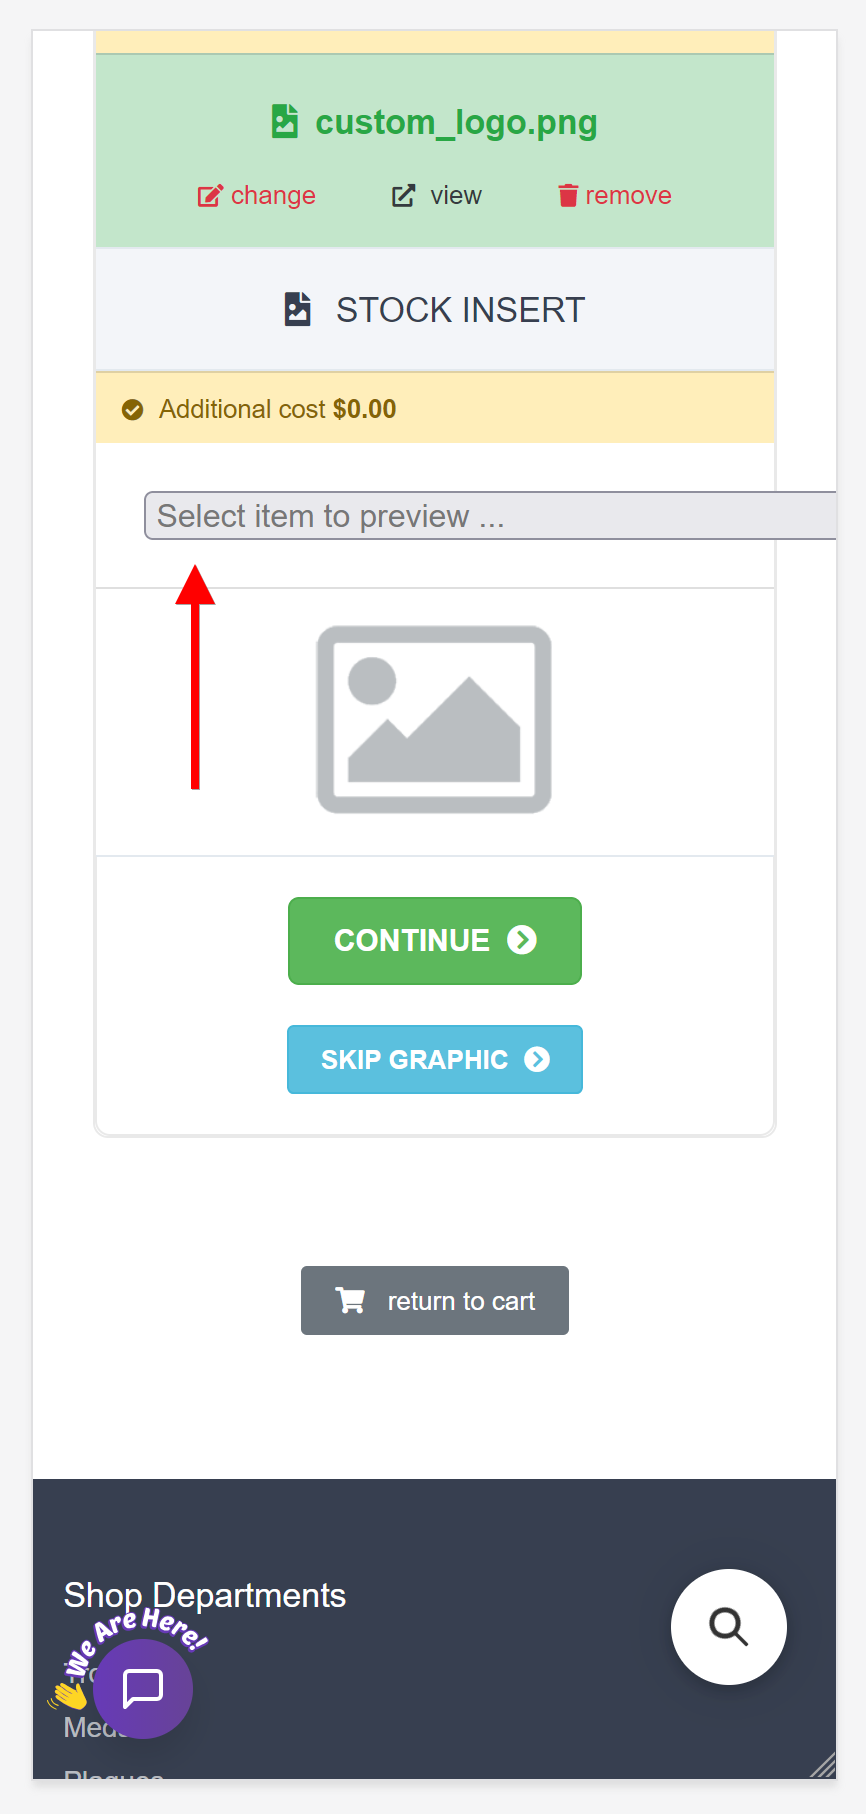
Cleared stock insert placeholder
8 The preview clears back to the empty placeholder; open the dropdown to choose a new graphic.
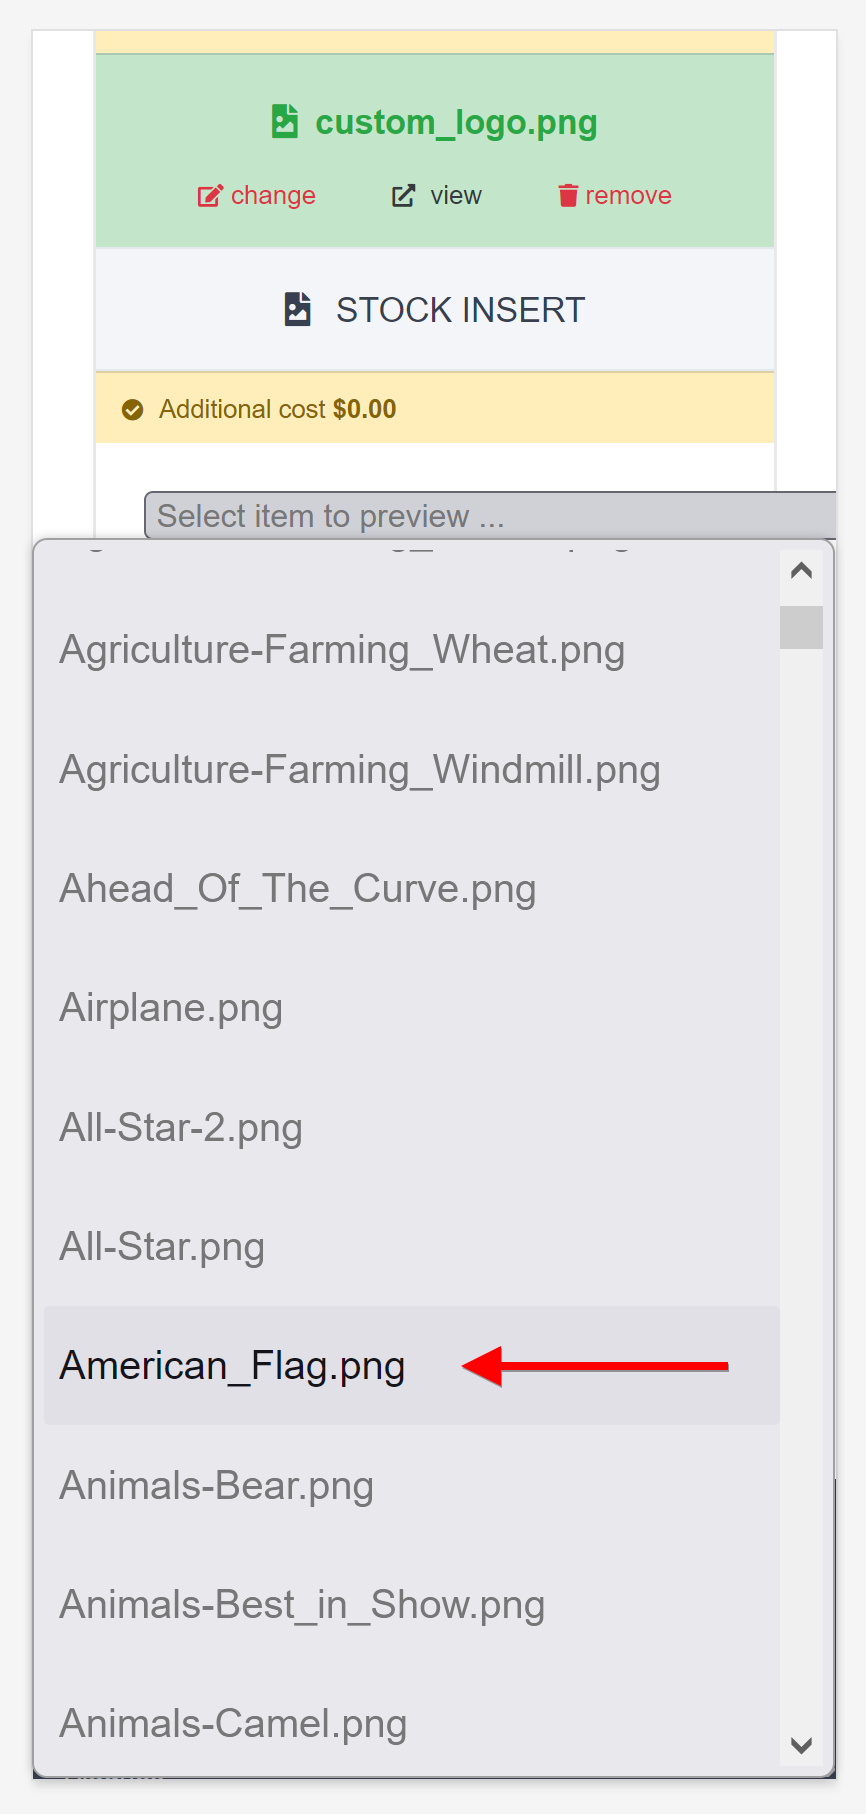
New stock insert selected in dropdown
9 Pick a different graphic from the stock gallery dropdown.
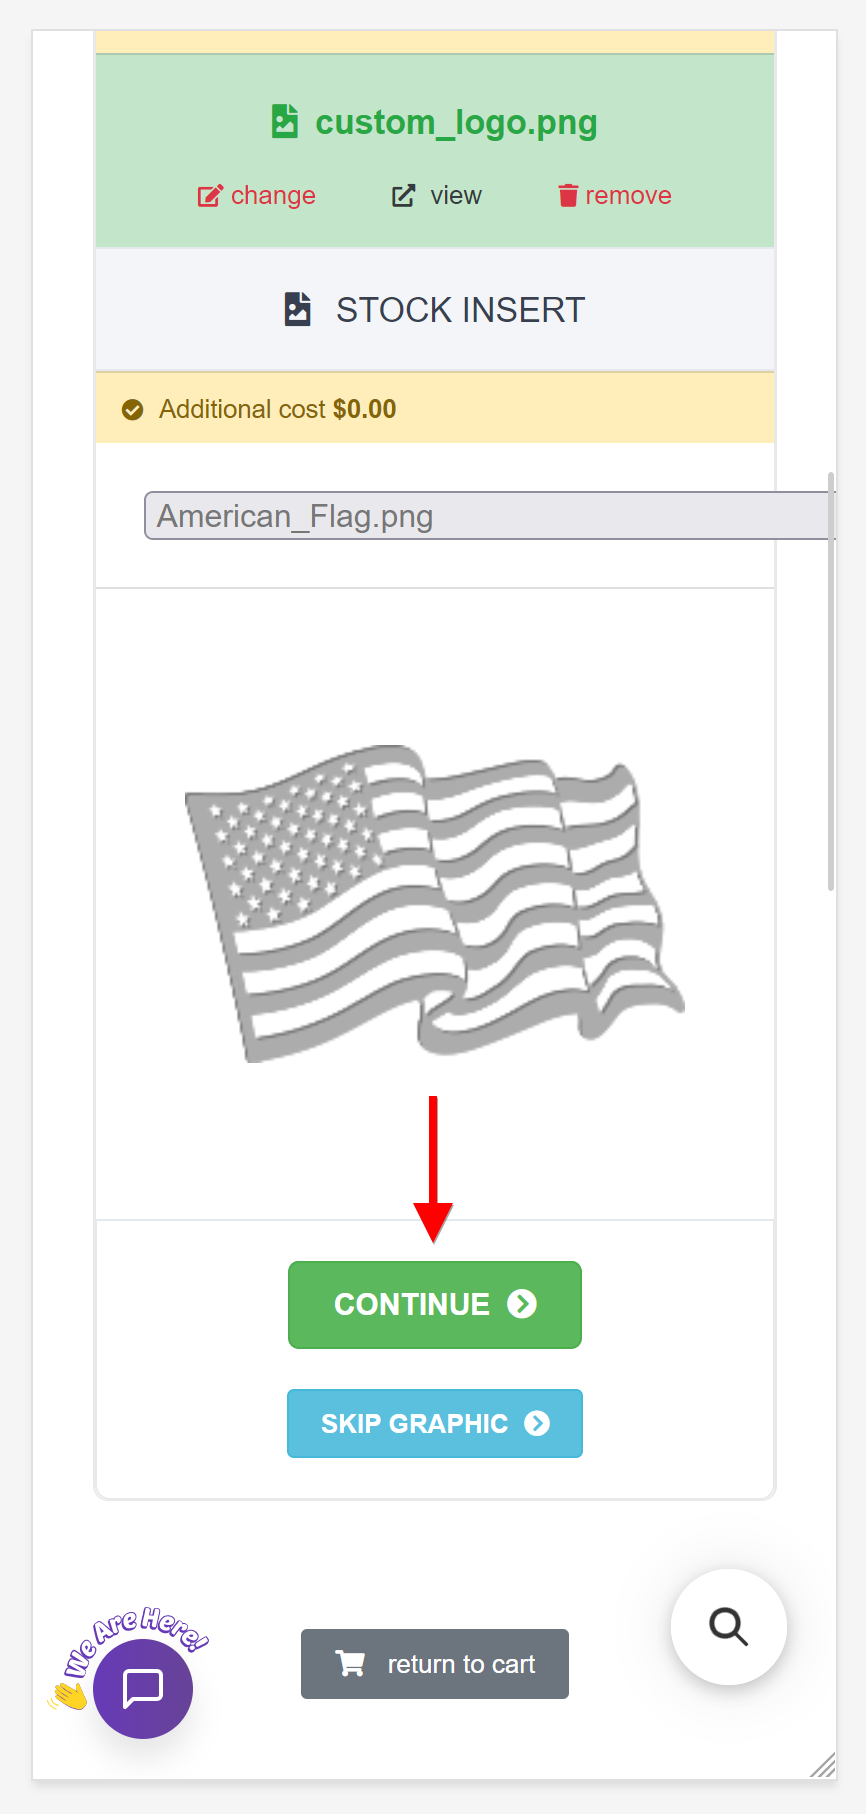
New stock insert preview with Continue
10 Your new graphic previews; tap the green CONTINUE button to apply it.
Text form showing the new graphic
11 The text form now shows your new graphic in the summary at the top.
Save and Review or Skip Text buttons
12 Add engraving text with green SAVE & REVIEW, or keep it logo-only with blue SKIP TEXT.
Leave all lines blank dialog with OK
13 Confirm the “Leave all lines blank?” pop-up by tapping OK to finish logo-only.
Green engraved badge, return to cart
14 The green “engraved” badge confirms your change; tap “return to cart” to continue.

How the character counter & guidelines work

The box on the right of each line counts down: it shows how many characters you have left on that line, not how many you've used. It turns orange as you get close and red when you're nearly out. Spaces don't count — not toward the line limit or the free-letter allowance. The free-letter allowance is per piece. Going over isn't blocked; the extra letters are charged and shown as Additional Engraving in your cart summary, with a per-piece breakdown on the review grid.

  • Everything is engraved in UPPER CASE.
  • All text is centered, top-to-bottom and left-to-right.
  • Using fewer than the available lines is fine — it still centers correctly.
  • Don't add extra spaces or blank lines to position text; they're removed before engraving.
  • We do not spell-check — what you type is exactly what gets engraved.
  • Emojis can't be engraved and are removed.
The number of lines, characters per line, free-letter allowance and extra-letter price vary by product. The figures visible in these screenshots are just examples from the items we photographed — your product's own engraving form shows the limits that apply to it.

Common questions

I picked engraving but nothing happened — where do I type?
You type it after adding to cart, in the Engraving Room. Tap the orange CLICK TO ENGRAVE. See the walkthrough →

I added it to the cart and never entered anything.
Go to your cart and tap the blue “view engraving” on that item — it takes you straight back in. See how →

Same text on all, or different?
Quantity 2+ asks this first. Same = type once, copied to every piece. Separate = a block of lines per piece. Different text per piece →

Most lines are the same, only the name changes — do I retype everything?
No. Fill Piece 1, use the copy icon on each shared line, then type just the name on each piece. See the copy shortcut →

I have two sizes / two items — how do I engrave both?
Each item is engraved separately. Finish the first and the second becomes active. See the walkthrough →

The button at the bottom does nothing.
That's Place Engravings — it stays inactive until every item shows the green “engraved” badge. Look for one still marked “waiting.” See how →
My engraving disappeared / it didn't save.
If you got as far as pressing the green SAVE & REVIEW, your text is stored — reopen it from your cart (view engraving → click to change engraving → OK) and it will be filled in; just finish the spelling agreement. If you left the form while still typing, that text wasn't saved and needs retyping — there's no auto-save. The rule that prevents a repeat: press SAVE & REVIEW before navigating away. Reopen from the cart →

I saved my text but the item doesn't say engraved.
You stopped at SAVE & REVIEW. Your text is safe — tick the spelling agreement and press CLICK TO SET ENGRAVING to finish and get the green “engraved” badge. See the final steps →

It's asking me to confirm the spelling.
That's the last step, not an error — we don't spell-check, so we ask you to approve your own text. Tick Confirm, then CLICK TO SET ENGRAVING.

How do I fix a typo or change my text?
Cart → view engraving → click to change engraving → OK → edit → then confirm the spelling agreement again. See how →

I don't see where to upload my logo, or I only get stock inserts.
It depends on the award: some take an uploaded logo, some only a free stock insert, some both, and many are text-only. If yours supports a graphic, that step comes before the text form. See adding a graphic →

How do I get just my logo, with no text?
Add the graphic first, then use the blue SKIP TEXT button and confirm “Leave all lines blank?”. SKIP TEXT only appears once a graphic is attached. See how →

Line 1 says “LOGO ONLY - NO TEXT” and I didn't type that.
That's our automatic marker for a logo-only award — leave it, or type over it if you now want text. See changing a graphic →
I want to change or remove the logo I picked.
Reopen the engraving and tap CHANGE GRAPHIC; use remove on an uploaded file, or reset on a stock insert. See how →

My upload isn't working — is it stuck?
A spinner means it's still uploading — wait for the green filename with change / view / remove. Accepted files: JPG, PNG, PDF, EPS, AI, TIF, up to 10 MB. Anything larger or a different type won't take — you can always email your artwork instead.

On my phone I picked a file and nothing happened (Android).
On Android, choosing a file straight from Google Drive — or OneDrive, Dropbox, or a Google Photos item that isn't saved on the device — hands the browser a file it can't actually read. The name and size look normal, which is why it seems like it should work, but the upload can't complete on the phone. The fix: get the file onto the device first (open it in Drive, choose Download / Save to device), then tap Browse again and pick it from Downloads. This is an Android browser limitation, not a problem with your artwork or our site — and it doesn't happen on a computer.

It won't let me type any more on this line.
That's the per-line limit; the box on the right is characters remaining and has reached zero. Continue on the next line — and remember spaces are free.

Why is my total higher than the item price?
Extra letters beyond the free allowance are charged per piece and totalled as Additional Engraving in your cart summary. The review grid shows the per-piece breakdown before you commit.

There's a countdown timer — am I about to lose my order?
It's a hold on your cart while you work, not a limit on the engraving. Your saved text won't vanish mid-typing.

Will I get a proof of the engraving?
Plain text isn't proofed — what you type is exactly what gets engraved. An uploaded logo can be proofed on request.

What about jersey awards?
Names and numbers for jersey awards aren't entered here — they go in the Customer Note at checkout.

Perpetual & multi-plate awards

Some awards — perpetual plaques and annual winner boards — carry several small nameplates rather than one engraving area, so a new name can be added each season. These have their own separate allowances (a number of plates included, a cost per extra plate, and their own character limits), shown on the product itself. If you'd like help laying names out across plates, just contact our team.

Still stuck?

If something genuinely won't move forward — the room won't advance, an upload rejects a file it should accept, or your engraving vanished after you confirmed it — that's on us, not you. Contact our team and we'll sort it out; you can always email your artwork and engraving text to a person instead.

For engraving pricing and policy details, see Engraving Policies & Instructions.